Showing posts with label gold. Show all posts

Monday, February 22, 2016

And They Call It Puppy Love

PUPPIES! 

I mean I know we all love nails here but I have another love too... PUPPIES! I have such a sorf spot in my heart for puppies, big or small, old or young, I love them all :) So when I stumbled upon the Furry Best Friends stamping plate by UberChic Beauty I just KNEW I needed to have it! And good news... I was right, it is as amazing as I thought it would be!

I decided to start off with a simple look with a few paw prints and a puppy face. What I like about these is that they are so unique, along with all of the  images on this plate, they aren't like everything I've seen before and I love that!

I started with a base of CBL Berries in the Snow. When it was dry I stamped over each nail with the paw print/puppy face images form the Furry Best Friends plate form UberChic Beauty and Mundo de Unas Light Gold. I sealed it all in with some Seche Vite and that was it!


I absolutely adore the way these came out! I hope they brough a smile to your face as they did to mine :) 

What about you? Do you love puppies? Or maybe you're a kitty person? Share you loves with me in the comments!

Thanks loves :) 

Monday, November 30, 2015

An Early Holiday Manicure

Hi guys!

So I know it's a bit early for holiday designs but I've been obsessing over Lacquer Lust Velvet Rope and it's just such a perfect color for the holidays so BAM! Holiday manicure ;) 

I started off with a base of Lacquer Lust Velvet Rope (duhhhhhhh) and while it was drying I created stamped decals using Bundle Monster plate BM-314 and Mundo De Unas Light Gold. I applied the decals to my nails and sealed everything in with some Seche Vite. And that it! Super simple. 


I love love love this look! It's so simple but that red just brings it to life! I haven't done any stamped decals in a while and I have to say I'm a bit rusty.... but I think these turned out okay.

What do you guys think?

Thanks loves :) 

Thursday, November 12, 2015

Houndstooth Vinyls

Hey guys!

I'm super excited to share these nails with you because I am SO happy with them!

I've never created a houndstooth design besides stamping it on my nails, the idea of houndstooth vinyls were so intriguing to me I couldn't wait to give them a shot and MAN do I love them! 

I want to note that these vinyls are brand new from Stick It! Nail Vinyls and not released yet but keep an eye on her Instagram because I think they will be releasing soon! Let's get this look started :) 

I started with a base of Color Club Cosmic Fate and applied the vinyls onto each nail. Then I painted over the vinyls with Mundo De Unas Brown. I peeled off the vinyl and created a triangle shape near my cuticle with China Glaze Mingle With Kringle and outlined it with Wet n Wild Black Creme. I sealed it all in with some Seche Vite and that was it! 


I really am so in love with these! Houndstooth is such a fun design and I wish I used it more often. This look makes me feel so Thanksgiving-ish and SO ready for some turkey! ;)

What do you guys think?

Thanks loves :) 

Monday, October 5, 2015

Harvest Spikes

Hi guys!

I've been crazy about fall-esque nail designs and I think this one is my favorite to date! Something about golds, browns, and nudes together just make me ant to get my sweater and boots out! 

I started with a base of Enchanted Polish Flashing Lights and when it was dry I applied some Spike Vinyls from Stick It! Nail Vinyls and sponged over them with Mundo De Unas Brown and Lime Crime Milky Ways. I removed the vinyls and sealed it all in with a layer of Seche Vite to finish it off.


Dat sun pic doe <3 These photos don't do this Enchanted justice at all, it's absolutely stunning in real life!

What do you guys think?

Thanks loves :) 

Sunday, September 20, 2015

Squiggly

Oh hiiiiiiiii guys! Long time no talk!

Sorry I've been a bit MIA again, if you want to know why follow me on Instagram, I posted about it there ;) 

Anyways, my nails all broke, OF COURSE T.T so it's back to nubblies for a little while but hey, that's okay as long as I can still paint them ;) 

I wanted to do something simple today and I fell in love with a squiggly (yes, that's totally a word) design on the Expressionism stamping plate from the Winstonia Store... check it out!

I started with a base of Color Club Beyond. When it was dry I stamped over it using the Expressionism plate and Mundo De Unas Light Pink, and then again using Mundo De Unas Light Gold. I sealed it all in with some Seche Vite and that was it!


I'm loving this simple design SO much! It's kind of crazy and that's totally right up my alley ;)

Also, I'm trying a new set up for taking photos, I'm not sure how I feel about it yet but I think I like it LOL! What do you guys think?

Thanks loves :) 

Monday, August 24, 2015

Leopard Nail Art

Leopard is one of my absolute favorite animal prints so it's okay for me (and everyone else) to be absolutely OBSESSED with these vinyls from Stick It! Nail Vinyls, see for yourselves! 

I started with a base of China Glaze Pool Party and applied a layer of Seche Vite to speed up drying time. Then I applied the Leopard Vinyls on my nail and sponged over with Mundo De Unas Light Gold. I peeled off the vinyl, sealed it all in with one more layer of Seche Vite and added a black rhinestone by my cuticle to finish it off.


Oh gawd these are EVERYTHING! These Leopard Vinyls make it so incredibly easy to do leopard nails it's amazing! Not to mention, Stick It! Nail Vinyls recently moved to a new brand of vinyl and its perfect! Look at those clean lines and no sticky residue! 

If you want to get some for yourself you can check out Stick It! Nail Vinyls at: stickitnailvinyls.storenvy.com

What do you guys think? Would you give these a try?

Thanks loves :)


Friday, June 5, 2015

Blue Leopard

NUBBLIESSSSS!!

Yep while I had my sinus infection ALL of my nails snapped off T.T So, back to the nubbly farm we go.....

Anyways I've been loving animal print so much lately and have so many ideas, like this one, that I want to create. This blue leopard accent mani is so fun and works great even on short nails! 

I started with a base of LynBDesigns Absolutely Absolem. When it was dry I stamped over my ring and pinky nails with Bundle Monster plater BM-221 and PMTG White Undies. Then I filled in a few spots with China Glaze Mingle With Kringle. Finally I seal each nail in with a layer of Seche Vite.


I absolutely fell head over heels for this design. I love animal print and layered over on of my favorite polishes is just a match made in heaven <3 

What do you guys think?

Thanks loves :) 

Wednesday, April 1, 2015

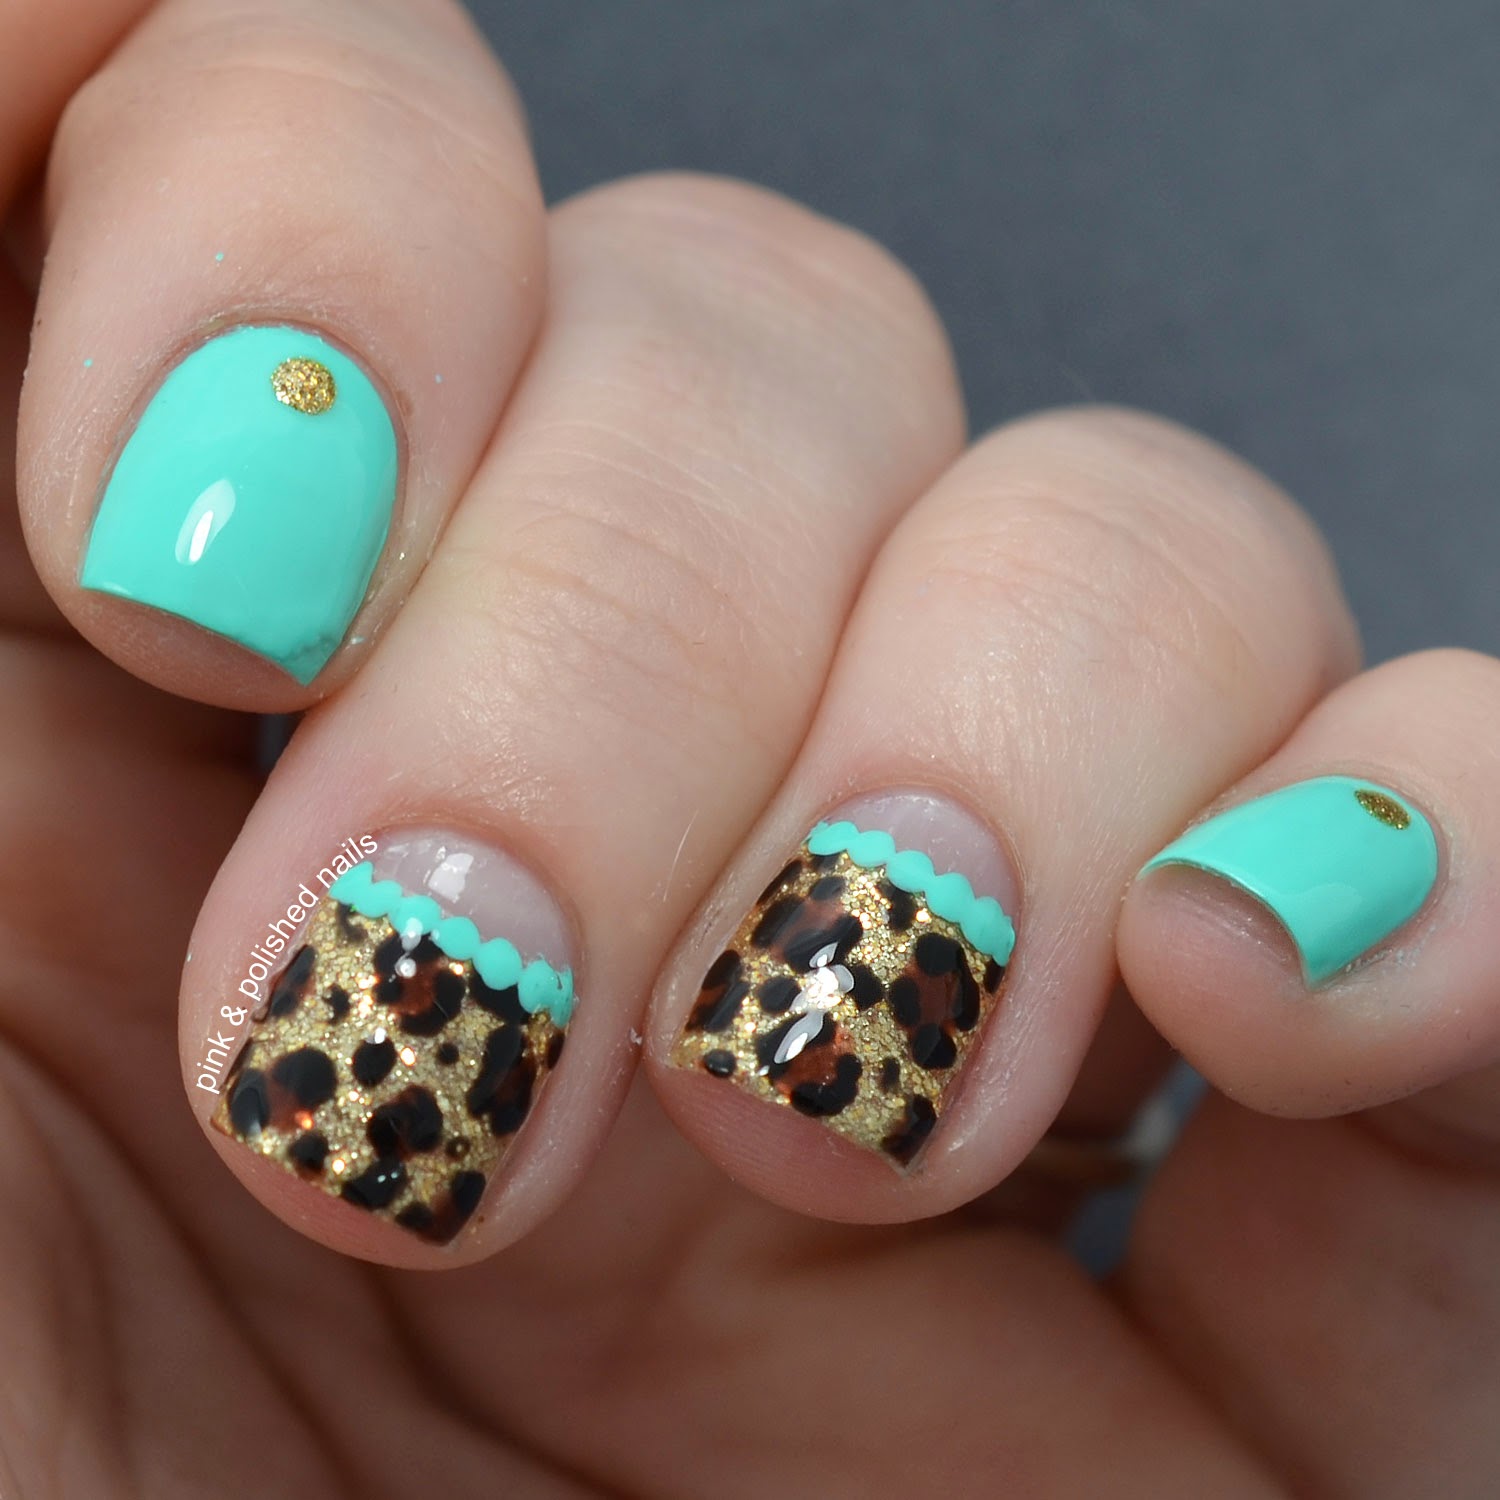
Minty Gold Leopard Nails

Mmmm there's nothing like a good mint polish to really get you excited about doing some nail art. LOL but really mint is such a flattering polish color and I've just been obsessed with it lately so of course I had to incorporate it in some animal print nails!

I started with a base of China Glaze Too Yacht To Handle on my index and pinky nails. On my middle and ring I used Sally Hansen Real Nail Polish Strips in the gold french tip design and placed them high to create a half moon. Then I sealed them in with the clear strips that came with the package to make sure they adhere to my nails nicely. Next I created the leopard print using TLLB Spiked Hot Chocolate and Wet n Wild Black Creme. I added a dotted outline to the half moons using China Glaze Too Yacht To Handle and added a dot of China Glaze Mingle With Kringle on my index and pinky nails. Finally I sealed everything in with a layer of Seche Vite and that was it.


I really feel like the mint compliments this gold so well. It adds the perfect amount of brightness and gives it such a sweet finish. 

What do you guys think?

Thanks loves :) 

Tuesday, March 17, 2015

Twinsie Tuesday: Happy St. Patrick's Day!

Happy St. Patrick's Day loves!

I hope you're having a great day whether you celebrate or not. For St. Patrick's Day this year I've created a fun clover design that I really hope you guys like! Keep reading to see what I came up with :) 

And guess what? It's Twinsie Tuesday too! So check out everyone else's St. Patrick's Day designs below!

I started with a base of Color Club Kismet. When that dried I applied some wave vinyls from TLLB and painted over them using China Glaze Angel Wings. I peeled off the vinyls and then created the clovers using a dotting tool and China Glaze Con-Fused?. Finally I sealed it all in with a layer of Seche Vite and that was it!


I really enjoy the way these came out, they were so fun and easy to create! 

What do you guys think?

Keep an eye on my Instagram and YouTube Channel for tutorials on this look!

Don't forget to see what everyone else came up with!


Alaina at The Little Canvas
Amanda at Amandalandish
Amanda at Fashion Footing 
Amber at Nails Like Lace 
Bridget at A Painted Nail 
Chelsea at Nailed Blog 
ChiChi at I'm Just Me...ChiChi 
Jessica at Blue Velvet Lacquer 
Kristine at Pink and Polished Nails 
Lakeisha at Refined and Polished 
​Lisa at The Polish Playground 
Marisa at Polish Obsession 
Róisín at Cuti-CLUE-les 
Savannah at Addicted to Polish 


Thanks loves :) 

Monday, March 16, 2015

St. Patrick's Day Inspired Water Marble

Oh water marble gods... THANK YOU!

I really wanted to do a St. Patrick's Day inspired water marble because I think that monotoned water marbles are just, perfection! I love the way that the shades meld together and, I don't know, maybe I'm just crazy ;) But for real, I'm loving on this design! I only wish that it didn't get ruined as soon as I was finished taking pictures T.T

Anyways, I started off with a base of China Glaze I'm With the Lifeguard. When that was dry I applied some liquid latex around my nails so clean up would be easier and proceeded to create the water marble using China Glaze I'm With the Lifeguard, China Glaze Con-Fused?, and China Glaze Mingle With Kringle. I created my design, dipped each finger and added a layer of China Glaze Fairy Dust because, fairy dust that shit. Then I sealed in everything with a coat of Seche Vite and the design was finished!


This water marble didn't come out exactly how I imagined it, the gold polish spread too much and basically just gave the design a gold shimmer instead of that stark gold ring that I wanted but you know what, I think I like it even better this way, sparkles are everything!

What do you guys think? What is your favorite water marble color combination?

Keep an eye on my Instagram and YouTube Channel for tutorials on this look!

Thanks loves :) 
Sunday, March 15, 2015

St. Patrick's Day Inspired Dotticure

Happy Sunday!

I hope you are all having a wonderful weekend! St. Patrick's Day is quickly approaching so I think it's time for some green nail designs don't you think?

Let's start off with a quick and easy design, the classic dotticure! I love creating dotticures because they are so easy and you can create any look you want. Keep reading to see what I came up with!

I started off with a base of Sinful Colors Snow Me White. When that was dry I created the dotted design with a dotting tool and China Glaze Con-Fused?, China Glaze I'm With The Lifeguard, OPI You Are So Outta Lime!, and China Glaze Mingle With Kringle. I sealed it all in with Seche Vite to finish this design.


I so love this look! I don't usually wear green polish so this is a great way to wear it and be festive without being overly green ;) 

What do you guys think? Do you have any plans for St. Patrick's Day?

Keep an eye out on  my Instagram and YouTube Channel for tutorials on this look!

Thanks loves :) 

Saturday, March 14, 2015

White to Gold Reciprocal Gradient Reverse Stamping

Talk about a mouthful of a title right?

LOL I swear these nails are way easier to create then they sound. I wanted to try some reciprocal gradient nails and I though what better way to try then to add in some stamping too. Bring it up a notch ya know? Keep reading to find out how I did it.

I started with a base of Sinful Colors Snow Me White. When that dried I created the gradient using Sinful Colors Snow Me White and Maybelline Color Show Bold Gold. Then I stamped over top of the gradient using the same colors and Bundle Monster Plate BM-408 making sure that the white half was stamped over gold and vice versa. Finally I sealed everything in with some Seche Vite and the design was finished. 


I know it sounds difficult but honestly this design was so easy to create. Time consuming? Yes but hard? No way! I encourage you guys to try it! And make sure you tell me so I can see all of the beautiful designs you come up with :) 

What do you think guys?

Make sure you keep an eye out on my Instagram and YouTube Channel for tutorials on this look! I will update this post with links once they are posted.

Thanks loves :) 

Thursday, March 12, 2015

Heart Fishtail Nails

Hi guys! 

I'm super excited about this post because I've tried another technique that I've never used before! Yay for new things!!! ;) I'm not sure exactly what to call this design so I'm going with heart fishtail nails... deal with it LOL Ready to get started?

Start off with a base of BaronessX Fairest Of All. When that dries use LynBDesigns Fishing With No Bait to create the first heart. Then use LynBDesigns Nightmare Revisited to create the second heart creating the heart fishtail effect. Seal everything with some Seche Vite and the design is finished!


This look is so pretty! I mean not to toot my own horn ;) But I'm really digging this color combination and this look was so incredibly easy to create I know I'm going to have to revisit it soon.

What do you guys think?

Keep an eye out on my Instagram and Youtube Channel for tutorials on this look, I'll update this post with links when they are posted!

Thanks loves :) 

Tuesday, March 3, 2015

Twinsie Tuesday: Endometriosis Awareness

Happy Tuesday!

I hope your week is going well, I'm counting down the days until Sunday because DAYLIGHT SAVINGS! I can't wait for it to be lighter out later, just one more step closer to summer ;) 

Anyways since today is Tuesday that means it's time for Twinsie Tuesday! The theme for today is Endometriosis Awareness. Now to be honest I know nothing about Endometriosis, so I decided to do a little research. From what I read I understand Endometriosis as a painful disorder that occurs when the tissue that normal lines the inside of the uterus grows outside of the uterus. This causes discomfort which can sometimes be severe and also fertility issues. Man, that sounds terrible. I'm glad that the theme for today is Endometriosis Awareness because I really don't think many people know about it, myself included, and I think it's important for everyone to know. The color for Endometriosis Awareness is yellow so I've got a bright yellow design below. Keep reading to see what I came up with!

I started with a base of Lime Crime Crema De Limon. When it was dry I stamped over it using Bundle Monster plate BM- 321 and Orly Glowstick for a subtle ribbon effect. When that was dry I used my cancer ribbon vinyls from The Little LacquerBean and painted over them with Maybelline Color Show Bold Gold. To finish this design off I sealed everything in with one coat of Seche Vite. 


I have to confess, I hate yellow nail polish. It's always difficult and I hate the way it looks with my skin! But I surprisingly didn't mind this mani, the two yellows really complimented each other and the outcome didn't close with my skin like I thought it would. Maybe I'll be trying out some more yellow designs in the future!

Don't forget to check out everyone else's Endometriosis Awareness manis for today, I'm super excited to see what everyone has come up with!


Alaina at The Little Canvas
Amanda at Amandalandish
Amanda at Fashion Footing 
Amber at Nails Like Lace 
Bridget at A Painted Nail 
Chelsea at Nailed Blog 
ChiChi at I'm Just Me...ChiChi 
Jessica at Blue Velvet Lacquer 
Kristine at Pink and Polished Nails 
Lakeisha at Refined and Polished 
​Lisa at The Polish Playground 
Marisa at Polish Obsession 
Róisín at Cuti-CLUE-les 
Savannah at Addicted to Polish 

Thanks loves :)