Showing posts with label The Little LacquerBean. Show all posts

Sunday, May 3, 2015

Born Pretty Store Beach Stamping Plate Review

Hello my chickens!

I've got another super cool review for The Born Pretty Store to share with you guys today! 

For those of you who don't know The Born Pretty Store is an online nail art supply store. Their prices are super low and the quality is superb. This is my first time testing their stamping plates and I have to say that I'm really impressed. The images are so crisp and even the thin lines like in this beach party design came out completely clear. I'll defintely be buying more of these babies! ;)

For this look I started off with a base of China Glaze Red-y To Rave. Then I applied a layer of TLLB Glow-Stly to give it some extra sparkle. Then I stamped over each nail using the seashell image and Essie Penny Talk. Then I stamped over just my middle nails with the beach party image and Born Pretty Store's Black Stamping polish (review coming soon and you don't want to miss it!) Finally I sealed it all in with some Seche Vite.


This look is so perfect for summer and heading off to the beach! 

You can buy this stamping plate HERE and countless other nail art tools at www.bornprettystore.com. 

Make sure you stay up to date with all new releases, tips and tricks by following them:


What do you guys think? Will you try out any of their stamping plates? Or have you already tried them? Let me know what you think in the comments!

Thanks loves
Kristine :) 

Friday, April 3, 2015

Black and Neon Abstract Square Nails

More abstract nails!!!

I also got the inspiration for the square design off of a pattern on Pinterest. Pinterest is such an awesome place to go if you're lacking nail inspiration, there are so many different and fun patterns on there it will destroy that road block and get you excited to do some nail art within 5 minutes I swear! 

I've been wanting to do this design for a while and I' so happy with the way that it came out! Tell me what you guys think!

I started off with a base of Wet n Wild Black Creme on my index and middle nails and China Glaze Pool Party (new version) on my ring and pinky nails. I created the square design with white acrylic paint and a thin, long bristled nail art brush. While those were drying I applied two layers of TLLB Glow-Stly on my ring and pinky nails and then two dots near my cuticle with Wet n Wild Black Creme. Finally I sealed all of my nails in with some Sech Vite and to add a little bit extra something I added a layer of NYC Matte Me Crazy on just my index and middle nails. And that was it!


I love the contrast between the flat and dark square nails against the bright, holographic, and shiny neon nails. I feel like it gives so much visual interest and I honestly didn't want to take this design off like.... ever. LOL

What do you guys think?

Keep an eye out on my Instagram and YouTube Channel for tutorials on this look!

Thanks loves :) 


Wednesday, April 1, 2015

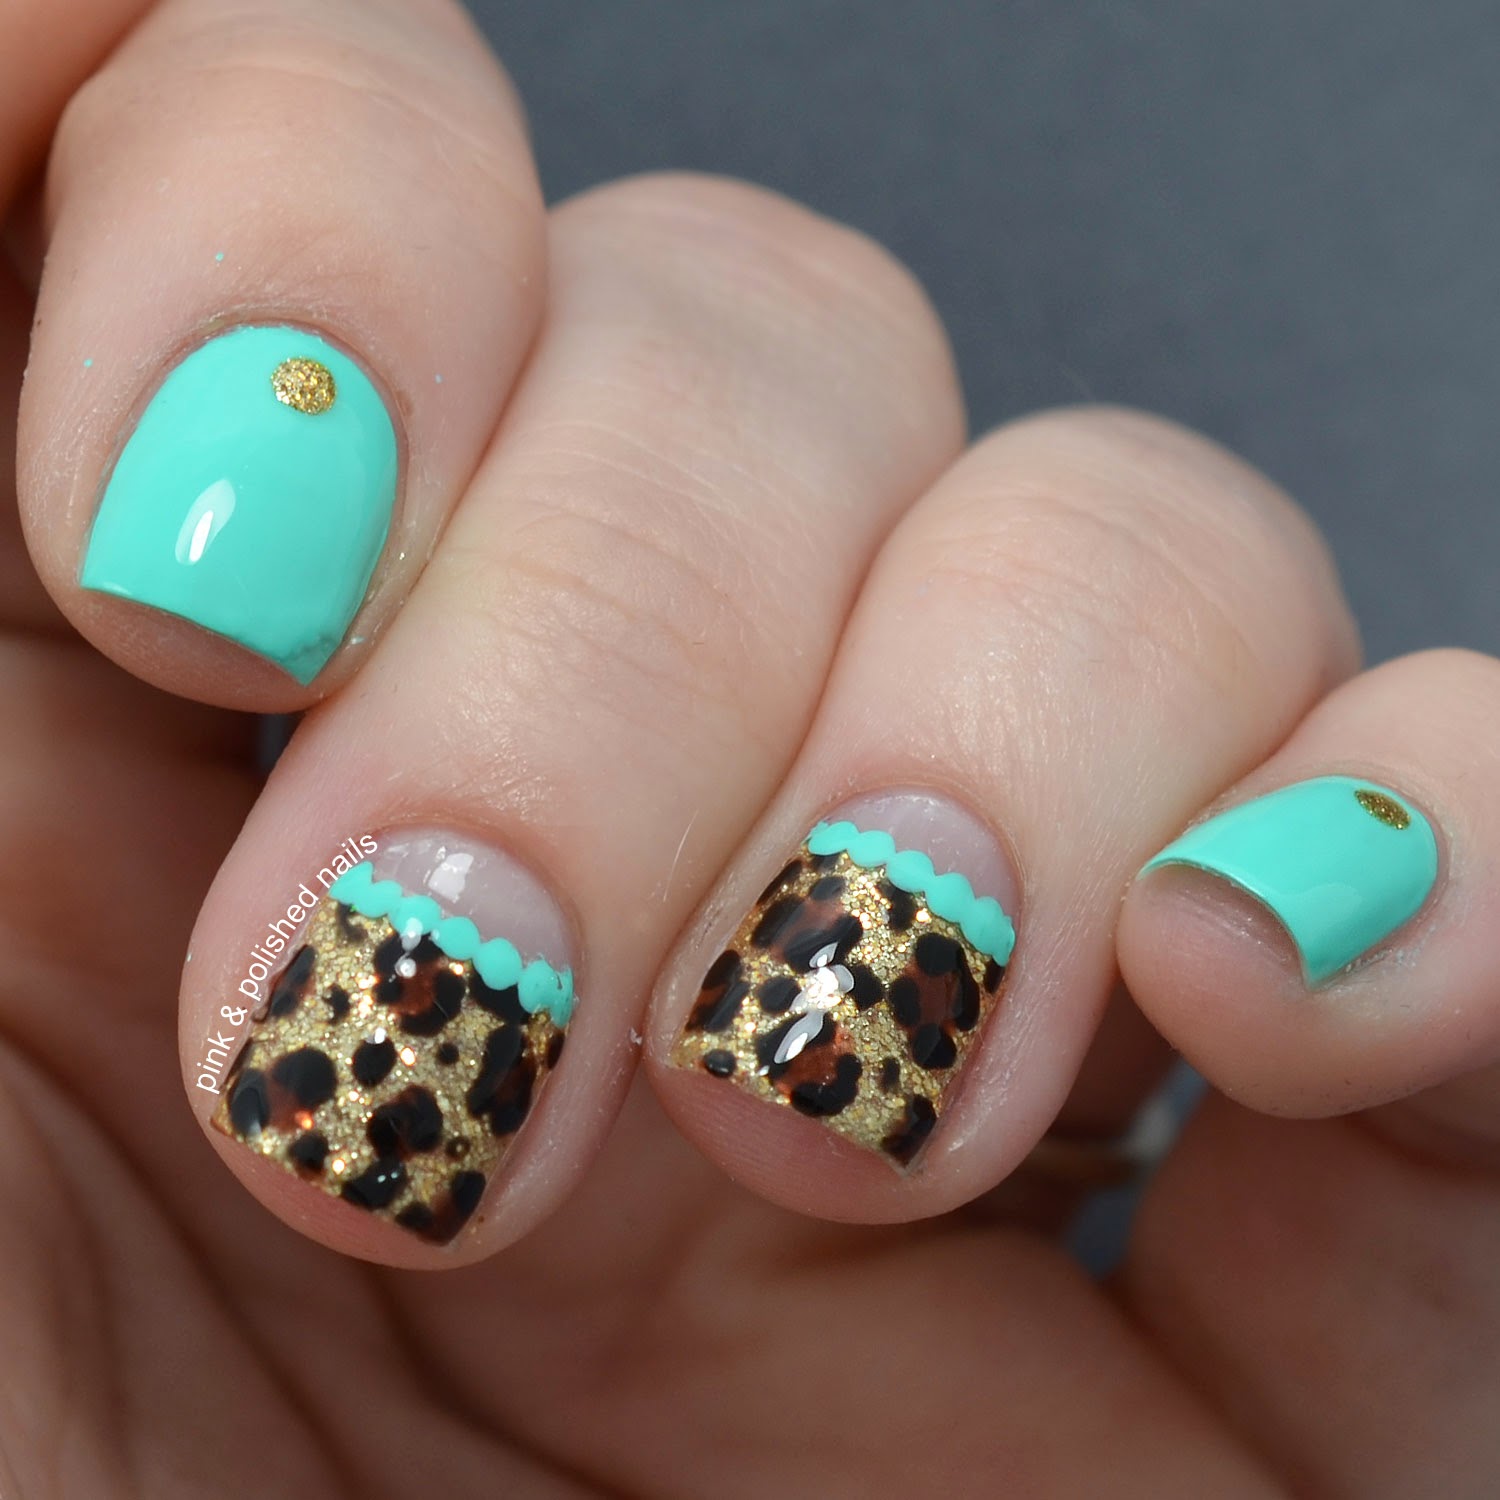
Minty Gold Leopard Nails

Mmmm there's nothing like a good mint polish to really get you excited about doing some nail art. LOL but really mint is such a flattering polish color and I've just been obsessed with it lately so of course I had to incorporate it in some animal print nails!

I started with a base of China Glaze Too Yacht To Handle on my index and pinky nails. On my middle and ring I used Sally Hansen Real Nail Polish Strips in the gold french tip design and placed them high to create a half moon. Then I sealed them in with the clear strips that came with the package to make sure they adhere to my nails nicely. Next I created the leopard print using TLLB Spiked Hot Chocolate and Wet n Wild Black Creme. I added a dotted outline to the half moons using China Glaze Too Yacht To Handle and added a dot of China Glaze Mingle With Kringle on my index and pinky nails. Finally I sealed everything in with a layer of Seche Vite and that was it.


I really feel like the mint compliments this gold so well. It adds the perfect amount of brightness and gives it such a sweet finish. 

What do you guys think?

Thanks loves :) 

Wednesday, March 18, 2015

Negative Space Single Chevron

I am in LOVE! 

This design is so simple and so easy and it gives such a stunning effect. I die!! 

Oh man you're just going to have to keep reading to see what I'm talking about ;)

I started off applying some single chevron nail vinyls to my bare nails, I'm using vinyls from TLLB. Then I painted over the vinyls with LynBDesigns Absolutely Absolem and quickly peeled off the vinyls before the polish was dry. I sealed it all in with some Seche Vite and the design was finished. Yes it was that easy!


I honestly can't get over how much I love these nails. The effect is just stunning and I really wish I had gotten a photo in the sun because this holographic polish is just blindingly perfect. I can't wait to do even more negative space nails soon, they really are so simple but so fascinating.

What do you guys think?

Keep an eye out on my Instagram and YouTube Channel for tutorials on this look! I will update this post when the links are available.

Thanks so much loves :) 

Tuesday, March 17, 2015

Twinsie Tuesday: Happy St. Patrick's Day!

Happy St. Patrick's Day loves!

I hope you're having a great day whether you celebrate or not. For St. Patrick's Day this year I've created a fun clover design that I really hope you guys like! Keep reading to see what I came up with :) 

And guess what? It's Twinsie Tuesday too! So check out everyone else's St. Patrick's Day designs below!

I started with a base of Color Club Kismet. When that dried I applied some wave vinyls from TLLB and painted over them using China Glaze Angel Wings. I peeled off the vinyls and then created the clovers using a dotting tool and China Glaze Con-Fused?. Finally I sealed it all in with a layer of Seche Vite and that was it!


I really enjoy the way these came out, they were so fun and easy to create! 

What do you guys think?

Keep an eye on my Instagram and YouTube Channel for tutorials on this look!

Don't forget to see what everyone else came up with!


Alaina at The Little Canvas
Amanda at Amandalandish
Amanda at Fashion Footing 
Amber at Nails Like Lace 
Bridget at A Painted Nail 
Chelsea at Nailed Blog 
ChiChi at I'm Just Me...ChiChi 
Jessica at Blue Velvet Lacquer 
Kristine at Pink and Polished Nails 
Lakeisha at Refined and Polished 
​Lisa at The Polish Playground 
Marisa at Polish Obsession 
Róisín at Cuti-CLUE-les 
Savannah at Addicted to Polish 


Thanks loves :) 

Wednesday, March 11, 2015

Spot Gradient with Water Marble Overlay

MOAR GRADIENTS!

I really forgot how much I absolutely love doing gradient manis. I've got a really fun one to share with you guys today, it's reminiscent of my Summer Neon Gradient and Watermarble but this time with a much more cool toned twist! Keep reading to see what I came up with :) 

I started off with a base of Sinful Colors Snow Me White. Then I applied some liquid latex around my nails to protect the skin and added random blobs of China Glaze Too Yacht To Handle, Sinful Colors Let's Talk, and TLLB Blue Ribbon Baby on a cosmetic sponge. I then lightly dabbed the sponge over all of my nails twice. I peeled off the liquid latex and added a layer of China Glaze Fairy Dust over each nail because it's Fairy Dust, duh. I then applied some more liquid latex around my nails for the water marble. I created the water marble with Sinful Colors Snow Me White and Maybelline Color Show Clear. I dipped each nail in, peeled off the liquid latex, and sealed them in with Seche Vite to finish the design off. 


Oh gosh I just LOVE these so much! They are so fun and the sparkle peeks through just enough when the sun shines. 

What do you guys think? Keep your eyes peeled on my instagram and youtube channel for video tutorials on this look! 

If you want a quick link to my YouTube video click HERE! Spoiler, this is a narrated video so you get to finally hear my super awkward voice!! ;) Give it a big thumbs up if you liked the video or think my voice is awkward as f@$* and if you like me then subscribe!!!

Thanks loves :) 


Friday, February 27, 2015

Jewel Toned Stained Glass

Jewel toned nail polish... YUM.

There's something so satisfying when jewel tone nail polishes come together. They compliment each other so well and the end result is so deep and gorgeous.

I've been wanting to try making decals using my stamping plates and I thought this stained glass idea would be a great idea to try. Besides taking FOREVER, I really enjoyed the process and I am in love with the outcome! Want to see what I came up with?

I started by painting my nails with Enchanted Polish June 2014... actually it was an old mani, but it still works ;) Then I used Bundle Monster plate BM-208 and WetnWild Black Creme to pick up the image. While it was still on my stamper I filled in some holes using Color Club Kismet, The Little LacquerBean Blue Ribbon Baby, LynB Designs Teal The Cows Come Home, and LynB Designs Nightmare Revisited. When I finished filling in the holes I took my Sech Vite and painted over the entire design. I let that dry completely and then took some tweezers and loosened up the edge of the image. When the edge was loose I used my tweezers again to grab it and slowly peel it off of my stamper. I put a coat of Seche Vite on my nails and laid the decal over top. I then got rid of the excess with my cuticle clippers and cleaned it up with a brush dipped in acetone. Finally I finished it off with one more layer of Seche Vite. 


So. In. Love. It was a bit more difficult then I anticipated to do, as you can see by my messy lines in my macro ;) But that was my first nail and the rest got progressively better I swear! The hassle was definitely worth it in the end though because I mean just look at it! Look at all those jewel toned polishes!! 

I know I'll be revisiting this technique again really soon, is there anything that you guys want me to do?

OH! And I've decided to start filming tutorials again! I love filming them for you guys but life got a little bit crazy and I just didn't have the time. Thankfully things seem to be settling down finally so I can start filming again and I started with this design! Look for a tutorial sometime today on my Instagram account <- click the link to be taken there. 

Thanks loves :) 


Sunday, February 1, 2015

Midnight Tips

There's something about winter that always makes me reach for a blue polish. Maybe because I associate blue with cold, or maybe because I just like the color blue. Whatever it is I love creating manicures with some blue in them like this pretty duo below! Wanna take a look?

I started out with a super secret polish from The Little LacquerBean, details to emerge soon! ;)  When it was dry I used some hole reinforcement stickers and placed them near the free edge of my nails. Then I used Sally Hansen Silver Sweep and painted over the exposed part. I peeled off the stickers, cleaned up, and top coated with some Seche Vite. 


I love the simplicity to this manicure, it makes it feel so clean. And this blue is just yummy! I usually find myself reaching for lighter blues but every once in a while a deep mysterious blue is just what I need!

What do you think?

Thanks loves :) 

Thursday, January 29, 2015

Gradiented Purple Chevron

Gradients, chevrons and sparkle... what more could a girl ask for?! 

I was looking through my drawers of untried polishes when I came upon a beauty. Unfortunately I have no idea what the name is, silly polish bottles without labels -_-. Anyways the brand is Icing and the polish is a stunning holographic glitter that seems to lean a bit pink or purple. I knew that I had to use it immediately, I'm not sure how a gorgeous polish like this went unnoticed for so long! Take a look at what I came up with ;)

I started off with a base of Color Club Wicker Park. When it dried I used my The Little LacquerBean mini chevron vinyls and placed them on each nail. I then used my Icing unnamed polish and painted it over my nails in a gradient fashion. I immediately peeled the vinyls off and top coated with Seche Vite to finish it off. 


I absolutely love the way these turned out! They are subtle but when they hit the sunshine watch out! Understated but they still pack a punch :) 

What do you think? What's your favorite understated nail design to wear?

Thanks loves :) 

Monday, January 19, 2015

You've been framed!

I feel like I've used this title before... with every single framed mani I've ever done. Damnit.

Anyways beside the lame-o title, I am LOVING this manicure. Moar blue please! And I get to showcase a super special polish. Keep reading to find out why!

Okay I started off with 2 coats of my super special polish, a polish from an upcoming collection from my brand The Little LacquerBean woohoo! It's a lovely green toned blue with a holographic finish. Yummy! When it was dry I used Zoya Liberty and a small nail art brush to outline all around each nail. When I was finished I sealed it all in with Essie Good To Go to make sure it had a super shiny and even finish. 


Just look at that sparkle! I really enjoy doing framed manicures, they can be frustrating at times when you're working with such thin lines but the effect it gives is totally worth the extra effort. So fun!

What do you think guys? What's your favorite framed mani you've ever done? Link it in the comments so I can take a look!

Thanks loves :) 

Thursday, December 25, 2014

Merry Christmas!

It's FINALLY here!!!

That's right, it's Christmas! I hope you are all having a wonderful day so far! It's probably really early right now, if you're reading this as soon as I post it. My sister and I have a tradition of getting up super early... we've done it since we were small and it was impossible to sleep when the magic of Christmas was still running through our veins! But early or not, I've got some super fun Christmas nails to share with you guys that I'm really proud of!

I started off with a base of The Little LacquerBean Sweet Irish Cream. I then created the ugly Christmas sweater / Christmas tribal design, using various red and green acrylic paints. I top coated everything with Essie Good To Go but then decided that I wanted to mattify everything so I used one coat of NYC Matte Me Crazy. I include a shiny pic too don't worry ;)

OH! And I had some fun photographing these so enjoy LOL 


What do you guys think? Let me know what you guys are wearing on your nails this Christmas, and if you wrote up a post link in it the comments so I can see!

I hope you guys have a wonderful, merry and safe Christmas filled with love, family, and laughs. And I hope Santa brought you everything you asked for... but only if you've been good this year ;)

Thanks loves :) 

Monday, December 22, 2014

Frosty Christmas Chevron

GUYS!

Hi there! Long time no talk huh? Man do I hate being away from this blog and trust me it was not on purpose. Thanks to my loving boyfriend (she says sarcastically ;)) I came down with a nasty cold at the very beginning of last week. It took me the entire week to finally get back on my feet, I couldn't get off the couch let alone edit photos and type up a blog post. Still working on 100% but I'm almost there, just in time for Christmas right?! 

So I've got some nails to share with you guys, are you excited?!?! LOL I've missed painting my nails and I'm hoping to have a few more Christmas designs up here before the season is over. Ready for this one?

I started off with a base of The Little LacquerBean Frosty Balls. When it was dry I used my TLLB mini chevron vinyls and red and green acrylic paint to create the design. I sealed it all in with Essie Good To Go and that was it!


I feel like the lighting is off in these photos.... maybe it's just me.... But anyways, I told you guys I'm crazy about chevrons this year and you guys haven't seen the last of them! ;) 

What do you think about this one?
Thanks loves :) 

Saturday, December 13, 2014

The December Glitter BOXES

Hi guys!

I'm super excited about this post partially because It actually involves my brand, The Little LacquerBean, and partially because it's just AWESOME! I was invited to be the guest for the month of December for The Glitter Box! For those of you who don't know what The Glitter Box is, it's a monthly box with polishes from Fat Lacquers and each month there's a new guest. I'm so excited about this month because it is their anniversary so there will be TWO boxes. And the theme is none other than FROZEN! Ah I love Disney's Frozen, I will forever be a child at heart ;) Keep reading and find out after the swatches how to get your hands on one or both of the boxes. 

Let's get on to the good stuff... SWATCHES!

Starting off with both polishes from Fat Lacquers.

- Conceal It, Don't Feel It -
A sheer blue jelly with platinum silver flakies, mini navy blue holo stars, and different sizes of navy and light blue hex glitters. WOW! This is simply stunning. It was actually way easier to work with then I anticipated. Formula is on the thicker side, as it expected with glitter bombs like this but like I said before it's extremely easy to work with. Swatch is two coats with top coat. 


- Do You Wanna Build A Snowman? -
Blue shimmer base with a few different shades of orange hex glitters, black hex glitters, black and white triangles, and some micro white square glitters. What a complex polish! SO fun! Formulas with thicker as expected but still easy to work with. Swatch is two careful coats with top coat. 


Now for the polishes from The Little LacquerBean

- The Cold Never Bothered Me Anyways -
A pale blue jelly packed with white flakies. Just like snow ;) Formula was smooth, a bit on the sheer side but it builds up quite nicely. Swatch is three simple coats with top coat. 


- Let It Go -
A medium blue holographic with a smattering of teal micro glitters. I'm a sucker for holographic shades and this blue is just the perfect shade of blue. Formula was very easy to work with. Swatch is three easy coats with top coat. The last three photos are with my cameras flash to capture a little of the holographic effect. 


I love, love, love all of these polishes! And I'm not being biased because a few of them are mine ;) They are all amazing! 

Want to get your hands on them? Here's how! The Glitter Box retails for $16USD for two polishes of $30USD for all four and are available starting December 5th (they're available NOW!) and will be available until December 23rd. All boxes will ship out the first week of January. You can purchase them at theglitterboxpolish.bigcartel.com. Make sure to get yours before the 23rd! Trust me you don't want to miss out on these beauties.

What do you think guys? Will you be picking up any of these polishes?

Talk to you soon!
Thanks loves :)