Showing posts with label glitter. Show all posts

Thursday, October 29, 2015

Skulls and Glitter

Hey guys!

I can't believe how close Halloween is! I feel like I had so many more spooky designs I wanted to create, but there's just not enough time in the day T.T But latest I got to do this one, a sparkly and spooky skull design! Want to check it out?

I started with a base of Color Club Beyond on my pointer and middle nails and a base of China Glaze Just Be Claws on my ring and pinky nails. When my pointer and middle nails were dry I applied some Skull Stencils from Stick It! Nail Vinyls and sponged over them with Mundo De Unas White. I peeled off the vinyl and added two red rhinestones on each for some creepy eyes. Then I sponged Milani Red Sparkle on my ring and pinky nails and I sealed them all in with some Seche Vite to finish it off! 


I absolutely LOVE how these came out! So sparkly and just perfect for Halloween. BUT, if you want to recreate the glitter part of this look I would highly suggest a peel off base coat... you guys DON'T want to know how long these took me to remove.... -_- LOL! 

Totally worth it though right?

Thanks loves :) 

Sunday, August 2, 2015

Bubbly, bubbly, bubbly

Hi guys! 

I was trying out some new vinyls from Stick It! Nail Vinyls and I was so excited to use these bubble ones. Whenever I think about bubbles I think about Finding Nemo... am I the only one? LOL Anyways, I really love this combination, check it out and let me know what you think!

I started off with a base of Goombay Girl Holy Holo and added a layer of Seche Vite to speed up the drying process. Then I placed the bubble vinyls from Stick It! Nail Vinyls on my index, middle, and pinky and painted over them with China Glaze Turned Up Turquoise. I quickly and carefully peeled the vinyls off while the polish was still wet and sealed them in with one more layer of Seche Vite. One my ring I added two coats of H&M Jo Is In The House and sealed it in with a layer of Seche Vite. 


This combination is so fun! I've been really loving turquoise and mint polishes lately so this is just perfect ;) 

What do you guys think?

Thanks loves :) 

Thursday, June 18, 2015

Orly Mirrorball

Yo are we for real right now?

Like really, really real? Anyone younger then 16 use your ear muffs er..... eye muffs for a minute.

---------------------

THIS SHIT IS FUCKING THE SHIT. Peace, I'm dead X.X

---------------------

Okay you can take your eye muffs off now I'll try to behave ;) 

So I've finally jumped on the Orly Mirrorball train and let me just tell you guys, if you're here and reading this and don't have one of your own Orly Mirrorballs.... GO GET ONE. 

Orly Mirrorball is a stunning silver holographic polish with small silver holographic glitters that combine into the sweetest of melodies. For being a mainstream brand I am extremely impressed with this polish, most mainstream companies don't do super holographic / glitters like this, Orly you've really outdone yourself with this one. With a formula as smooth as butter and full opacity in just two simple coats, this is one for the books I'm telling you.... whatever that means. My swatches below are two easy as pie coats with top coat, I'm warning you now though, proceed at your own risk, I am not responsible for empty wallets after you see these photos ;) 


Can you just look at it? Can you even stand it? GAWD I can't even. I can't get over this color honestly and the amazing formula is just the icing on the cake. 

Mirrorball is notoriously difficult to find, it's almost always sold out at Sally's Beauty Supply but if you're lucky, just lucky enough, you'll find one. And you better cherish it like it's your long lost child ;) 

What do you think guys? Is it beautiful?!


Tuesday, June 9, 2015

Neon Glitter Gradient

How long has it been since I posted a gradient on this little blog?

Wayne too long! I adore gradients so much I have no idea why I don't do them more often! I was feeling summery and what's more summery then neon? So this neon glitter gradient was BORN!

I started off with a base of Essie Blanc. When it dried I created the gradient using China Glaze DJ Blue My Mind and China Glaze PLUR-ple. Then I topped it off with China Glaze Can I Get An Untz Untz and finally sealed everything in with a layer of Seche Vite to finish off this design.


Mmmmmm neon gradient with neon glitter. SO MUCH NEON! So much awesomeness! I really need to do more gradients, I'm making it a goal to do at least once a month... what a sad little goal! Hopefully there will be more then that ;) 

What do you guys think?

Thanks loves :) 

Monday, March 23, 2015

Neon Holographic Glitter Gradient Nails

NEONNNNNNNNNNNNNN.

Neon and holographic glitter = everything I need in life. The end. Kthnxbye. 

I mean honestly though I actually think I cried a little taking these nails off because they were SO DAMN PRETTY. The pictures don't do the holographic glitter nearly enough justice, but you can see how sparkly and gorgeous it is in my tutorial vides with will be up later ;)

Let's get this thing started!

I started with a base of China Glaze Pool Party, my absolute favorite neon pink polish. When it was dry I applied some liquid latex around my nails and created the glitter gradient by applying H&M Jo Is In The House on a cosmetic sponge and spongeing it on my nails. When I was happy with the gradient I peeled off the liquid latex and sealed the design in with a generous layer of Seche Vite. To finish off the design I added a rhinestone to each nail. 


Like seriously though, did you see that macro?! I die! I know I'm being dramatic but I'm serious guys these nails were everything I've ever dreamed about and more! I think I need to recreate this look with every neon polish I own, wouldn't that make a fun collage?! 

What do you think guys?

Keep an eye out on my Instagram and YouTube Channel for tutorials on this look a little later today!

Thanks loves :) 

Friday, March 20, 2015

Rainbow Pastel Half Moon Nails

Hey guys! 

I'm so happy that I'm getting back into doing gradients. I really wish I didn't wait so long to go out and buy more cosmetic sponges because I honestly forgot how much I loved this technique. It's so versatile, there are so many different things you can do, radial gradients, vertical, horizontal, spot. The list goes on! I'm sure I'm probably boring you guys with my rambling so let's get on with the real reason you guys are here... NAILS!

Okay I started this look off by applying hole reinforcement stickers at the top of your nails near the cuticle. Then I placed a piece of tape over the small hole in the stickers so that no polish would leak through there. Then I applied my polishes to my cosmetic sponge to create the gradients. The colors I used were: Essie Boom Boom Room, Lime Crime Peaches <3 Cream, Lime Crime Crema De Limon, OPI You're Way Outta Lime, and Essie Rock The Boat. I sponged on the gradients, peeled off the stickers and applied a layer of H&M Jo is in the House over just the gradients. Then I outlined the top of the half moons with OPI This Gown Needs A Crown. I sealed all of that in with a coat of Seche Vite and finally added a heart rhinestone to each nail.  


These took FOREVER! But it was so worth it because I'm obsessed with the outcome! It's so girly and sparkly and just so many things that I love. They make me think of spring time and warmer weather and right now that's just what I need ;) 

Keep an eye out on my Instagram and YouTube channel for tutorials on this look a little later today!

What do you think guys?

Thanks loves :) 

Thursday, January 29, 2015

Gradiented Purple Chevron

Gradients, chevrons and sparkle... what more could a girl ask for?! 

I was looking through my drawers of untried polishes when I came upon a beauty. Unfortunately I have no idea what the name is, silly polish bottles without labels -_-. Anyways the brand is Icing and the polish is a stunning holographic glitter that seems to lean a bit pink or purple. I knew that I had to use it immediately, I'm not sure how a gorgeous polish like this went unnoticed for so long! Take a look at what I came up with ;)

I started off with a base of Color Club Wicker Park. When it dried I used my The Little LacquerBean mini chevron vinyls and placed them on each nail. I then used my Icing unnamed polish and painted it over my nails in a gradient fashion. I immediately peeled the vinyls off and top coated with Seche Vite to finish it off. 


I absolutely love the way these turned out! They are subtle but when they hit the sunshine watch out! Understated but they still pack a punch :) 

What do you think? What's your favorite understated nail design to wear?

Thanks loves :) 

Tuesday, October 14, 2014

Going Pink with Fierce and Hope

Hey guys!

As you know, October is Breast Cancer Awareness month. As a business owner I wanted to take this time to do something good towards breast cancer research and so I created Fierce and Hope. Fierce is a glitter topper packed with holographic pink, neon pink, and iridescent glitters and hope is a medium pink linear holographic polish. Both polishes are available in my store (click HERE to be redirected!) and one dollar of each polish purchased is donated to the Breast Cancer Foundation. It doesn't seem like much but trust me, every penny counts! 

Want to know something cool? Fierce and Hope also compliment each other super well! I've chosen to create a glitter gradient manicure using both Fierce and Hope so you guys can see their beauty together ;)

I started off with a base of The Little LacquerBean Hope. When it dried I used TLLB Fierce to create the glitter gradient on top. I sealed it all in with a coat of Essie Good To Go and that's it!


Oh and I know the photos look a bit different, I got a new lens for my camera and decided to change up my set up and do away with the light box for a more professional set up.... not sure I like it quite yet but I'm going to play around with it a little more ;) Let me know what you guys think! 

I just love how sparkly this manicure is!! The iridescent glitters capture even the smallest amount of light and create such a beautiful effect!

What do you guys think? What's your go to pink polish?

Thanks loves :) 

Wednesday, September 17, 2014

31DC2014 Day 17: Glitter

31 Day Challenge 2014 Day 17 is..... GLITTARRRRRR!!! *.*

Sparkle is my favorite color so I was super excited for this day! I had some iridescent glitter laying around from The Born Pretty Store and I've been wanting to try out some mermaid-esque nails for a while now and what better time or prompt?! 

I started off with a base of Essie Blanc. When it dried I created the gradient with Lime Crime Once In A Blue Mousse and Lime Crime Pastelchio. Then I took the iridescent glitter from The Born Pretty Store and placed each piece on my nail. Two generous coats of Essie Good To Go sealed the whole design in. 


The glitter on the edges of my nails are a bit too large to lay flat, they probably should have been trimmed but trimming pieces of glitter makes me want to slam my head into a wall, repeatedly ;) LOL But I'm really digging the final look it was SO SPARKLY! And anything sparkly is a-okay in my book!

Okay guys I'm dying to see your glitter manis! Post a link to your 31DC2014 glitter nails in the comments so I can see!! 

Thanks loves :)

Thursday, July 24, 2014

Mint chocolate chip marbled

I don't know about you guys but this summer I've been crazy for mint! Mint clothes, mint makeup, mint nail polish.... mint everything!!! 

Up until recently though I didn't have much for mint colored nail polish, a shame I know! So I went on the hunt for two specific colors, China Glaze For Audrey and China Glaze Too Yacht Too Handle. And can I say, best purchases I've ever made!! For today, my manicure showcases the gorgeousness that is China Glaze For Audrey. Ready to take a look?

I started off with a base of Essie Blanc on all of my nails. For the watermarble nails I used Essie Blanc, China Glaze For Audrey, and Wet n Wild Black Creme. For the gradient nails I used Essie Blanc and China Glaze For Audrey and I added a coat of Hard Candy Black Tie Optional on top. I topped everything off with Essie Good To Go and then added NYC Matte Me Crazy for a flat finish. 


I'm definitely loving the matte finish on these!! Although I wish I didn't smudge my marble on my middle finger :( *sigh* What can ya do though?! 

OH! And I've been getting pretty good at these 15 second Instagram video tutorials!! I have two for this particular design and they should be posted shortly so make sure you head over to my IG account and check them out!! ;) 

Thanks loves :) 

Friday, July 18, 2014

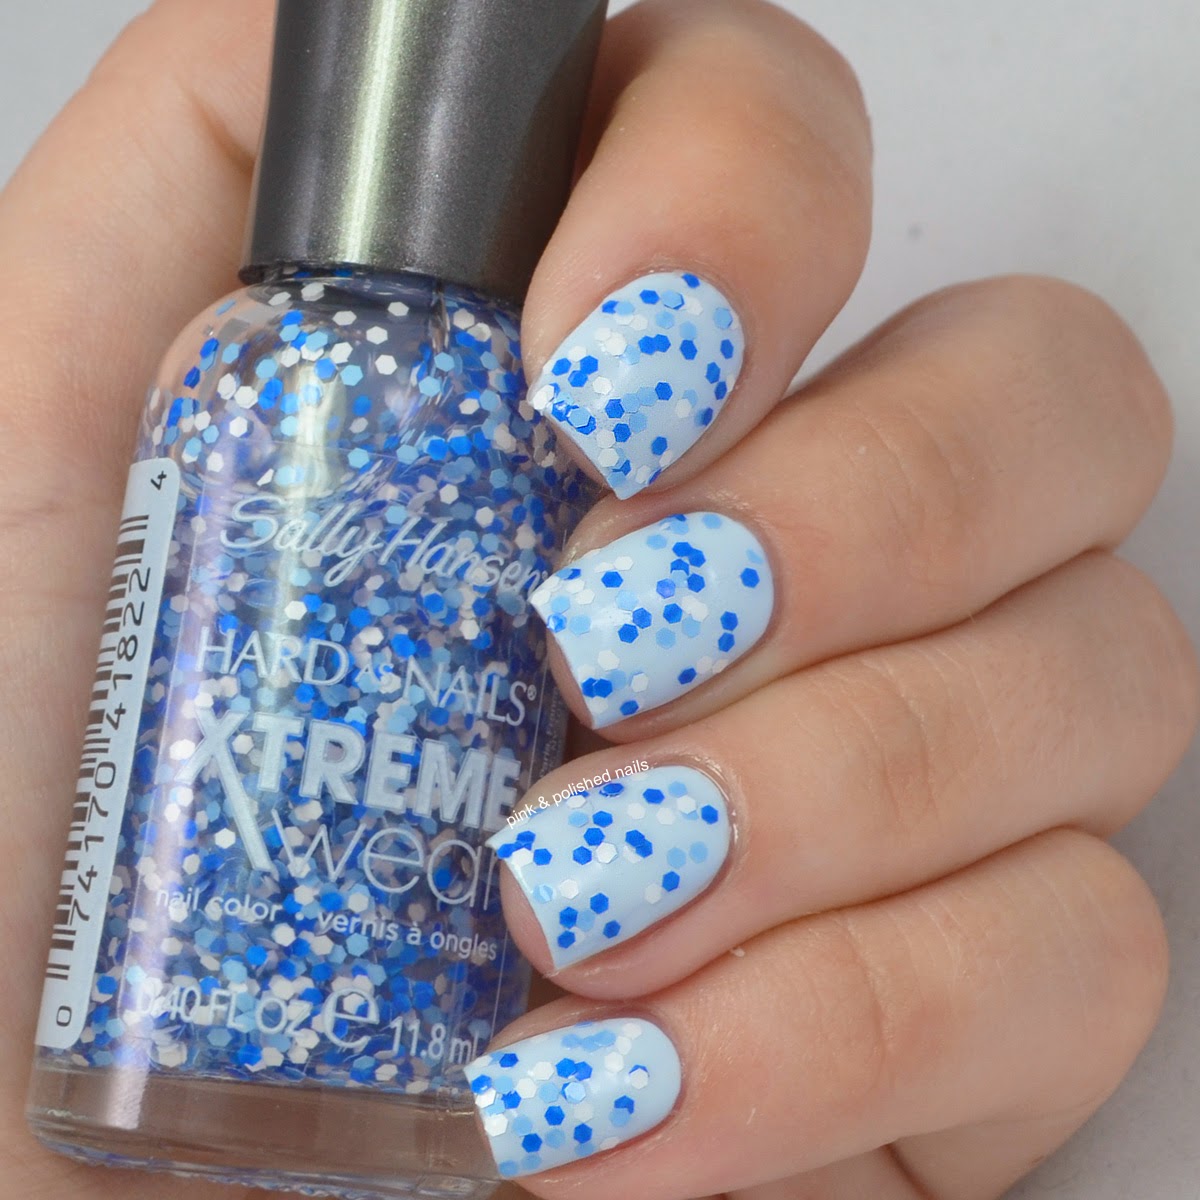
Sally Hansen Hard As Nails Xtreme Wear Rio Collection partial swatches


Sally Hansen is introducing some new confetti glitter polishes,"With the new Rio collection, head to Brazil's premier party destination anytime with eight color burst sensations. Channeling the bright colors and dazzling sequins of Carnival, throw your own personal masquerade ball with this must-have collection of multi-tones blue, green, and purple glitter palettes." I've got four of the eight pretties to share with you guys so take a look!

I should note that all polishes are swatched on a colored base and they are two coats each applied with a makeup sponge. I found that the glitter was too sparse in the base to get good coverage without making the nail polish way too thick. But applying them with a sponge fixes the problem and lets you see the glittery goodness! Since all of the polishes have the same formula the descriptions may get a bit redundant. ;) 

Fiesta - Red, black, and white medium hex glitters in a clear base. Formula was thicker. Two sponged coats over OPI Big Apple Red. 


Fruit-ta-ta - Red, pink, white, and black medium hex glitters in a clear base. Formula was thicker. Two sponged coats over Lime Crime Parfait Day.


Samba - Green, blue, and yellow medium hex glitters in a clear base. Formula was thicker. Two sponged coats over Lime Crime Once In A Blue Mousse. 


Splash - Royal blue, light blue, and white medium hex glitters in a clear base. Formula was the same as above. Two sponged coats over Color Club In De-Nile.


Sally Hansen Hard As Nails Xtreme Wear retails for $2.99USD for an 11.8mL polish. These colors and so many more can be purchased at www.sallyhansen.com and various retail stores. Stay up to date with new polishes, products, promos, and sales by following Sally Hansen: 


*Products in this post were provided by Sally Hansen in exchange for my honest opinion. For more information see my disclosure policy.

What do you guys think? Will you be picking up any of the Rio collection?

Thanks loves :)