Friday, December 18, 2015

Duochrome Herringbone

Hi guys!

I am in LOVE with these nails! I always love the way duo chrome polishes look over black and it just pops with this design, so lovely <3

I started with a base of Wet n Wild Black Creme. When it dried I applied Herringbone Stencils from Stick It! Nail Vinyls and sponged China Glaze Unpredictable over top. I removed the stencils while the polish was still wet and sealed it all in with some Seche Vite to finish it off!


I'm serious guys, the pictures don't even do this mani justice! 

What do you think?

Thanks loves :) 

Thursday, December 10, 2015

Whats Up! Triangle Swirl Nail Vinyls

Hi guys!

So recently I was contacted by Whats Up Nails to give their vinyls a try and of course I said yes! You know how I love me some nail vinyls ;) I was really excited to try out their swirl vinyls and this fall inspired look was just perfect! Wanna see what I created? 

I started with a base of Enchanted Polish Vampires Suck because it is the greatest brown holo polish EVAR! When it dried I applied the Triangle Swirl vinyls and on my pointer, middle, and pinky nails I only painted inside of the triangle and on my ring I painted my entire nail with China Glaze Mingle With Kringle. I removed the vinyls while my polish was still wet and sealed everything in with some Seche Vite to finish this look off.


I am so LOVING this look! So fall-y, so neutral-y, so gorgeous-y :) and I was really happy with the vinyls, they applied easily and removed like a breeze with no sticky residue left over!

You can get these vinyls along with 36784593 more and some amazing nail art tools (I HIGHLY recommend the water marbling tool) at http://store.whatsupnails.com. Keep up with all of their sales and new releases by following them:


What do you guys think? Have you tried and of Whats Up Nails vinyls?
**Products in this post were provided to me by Whats Up Nails in exchange 
for my honest opinion. For more information please see my disclosure policy.

Thanks loves :) 

Tuesday, December 8, 2015

Bear Pawlish Neverending Story

Hi guys!

I've been a little sporadic lately and I'm sorry for that but I promise it's for good reason. Wanna know what it is? My boyfriend and I have bought our first house! YEAH! Our official move in date is in about a month so expect my posts to be a little bit all over the place while we get ready to move. I will do my best to keep up as much as possible but those boxes aren't going to pack themselves ;)

Anyways, I thought I'd show off another pretty polish that's been sitting in my untrieds pile for a while, and I really think you're going to like this one!

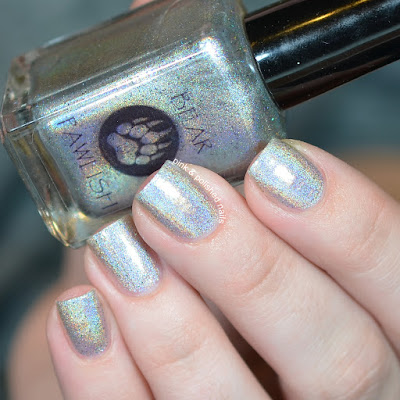
Bear Pawlish Neverending Story
An absolutely stunning silver holographic polish with a slight hint of a duo chrome shift and purple/blue/green multi chrome micro glitters. Just. Stunning! I've yet to be disappointed with any of Bear Pawlish's polishes and this is no exception. The formula was super smooth and built up to complete opacity in three easy coats. Watched below are three coats with Seche Vite top coat.


Now this is a polish I can wear time and time again, it's simple but so complex at the same time. I LOVE IT!

What do you guys think? Do you have any Bear Pawlishes? Are there any other colors you want me to swatch?

Thanks loves!

Monday, November 30, 2015

An Early Holiday Manicure

Hi guys!

So I know it's a bit early for holiday designs but I've been obsessing over Lacquer Lust Velvet Rope and it's just such a perfect color for the holidays so BAM! Holiday manicure ;) 

I started off with a base of Lacquer Lust Velvet Rope (duhhhhhhh) and while it was drying I created stamped decals using Bundle Monster plate BM-314 and Mundo De Unas Light Gold. I applied the decals to my nails and sealed everything in with some Seche Vite. And that it! Super simple. 


I love love love this look! It's so simple but that red just brings it to life! I haven't done any stamped decals in a while and I have to say I'm a bit rusty.... but I think these turned out okay.

What do you guys think?

Thanks loves :) 

Friday, November 20, 2015

Lacquer Lust Swatches!

Hi guys!

It's been a while since I've done some swatches and I just bought these gorgeous polishes from Lacquer Lust and they are just too pretty not to ;) I really think you're going to LOVE them all! 

Ready to drool?

A dark blue, almost but not quite navy, suede/matte polish with some teeny tiny blue micro glitters. I am loving the suede/mattes from Lacquer Lust because she always manages to make sure that just enough sparkle is peeking out! Formula was on the thicker side but not difficult to work with at all. Swatches are three thin coats, although you could definitely get away with two careful coats. Bottom photos are with Seche Vite Top Coat, the sparkle really comes to life! 


A stunning bright red suede/matte polish with the most drool-worthy red shimmer. I am SO impressed with this one, and the best part? NO STAINING! Not even the smallest little bit.  The formula was a bit thicker even then Out of the Blue, but it is completely opaque in two coats, just make sure to let them dry in between and you won't have any problems. Swatches below are two coats and the bottom swatches are with Seche Vite Top Coat. I don't know which way I like this polish better, matte and shiny are just incredible!


A bright blue jelly base absolutely packed with blue holographic micro glitter. Dat holographic sparkle doe B) Lovely! Formula was surprisingly not as thick as I expected, super easy to work with and the glitter pay off was fantastic. Definitely not a base heavy glitter. Swatch is three coats with Seche Vite Top Coat.


A purple jelly base packed full of dark blue and dark purple holographic micro glitters. WOW! This is the purple of my DREAMS! I'm always searching for a purple thats truly purple and this one is just beautiful! Formula was the same as Blue in the Face, super easy to work with and a great glitter pay off. Swatch is three coats with Seche Vite Top Coat.


This is my first time giving Lacquer Lust a try and wow, I'm really impressed. From the formula, to the colors, to the bottle, it's clear that there is a lot of work and creativity that goes into these polishes.

Lacquer Lust retails for $9.00-$10.00USD for a 15mL polish. You can purchase these polishes and tons of other pretties at lacquer-lust.com

What do you guys think? Have you tried this brand before?

Thanks loves :) 

Wednesday, November 18, 2015

Autumnal Ruffian

Happy Wednesday!

We made it halfway though the week and just think... we'll be preparing to eat turkey this time next week! If you celebrate it that is :) 

Any who, I've been digging through my untrieds and trying to incorporate them into some manis when I came across this gem! Vampires Suck from Enchanted Polish, like WTF why haven't I used this yet?! It is the most stunning chocolate brown holo, EVER! Expect to see this a lot more in the future ;) 

I started with a base of Enchanted Polish Vampires Suck and when it dried I applied some Half Moon Vinyls from Stick It! Nail Vinyls just below the cuticle. I painted over the space near my cuticle with Lime Crime Milky Ways, removed the vinyl, and sealed it all in with a layer of Seche Vite. No really, it's that easy! 


Now tell me you aren't swooning over this color?! If I could add a heart face emoji here there would be about 478392062 of them ;) 

What do you guys think?

Thanks loves! 

Thursday, November 12, 2015

Houndstooth Vinyls

Hey guys!

I'm super excited to share these nails with you because I am SO happy with them!

I've never created a houndstooth design besides stamping it on my nails, the idea of houndstooth vinyls were so intriguing to me I couldn't wait to give them a shot and MAN do I love them! 

I want to note that these vinyls are brand new from Stick It! Nail Vinyls and not released yet but keep an eye on her Instagram because I think they will be releasing soon! Let's get this look started :) 

I started with a base of Color Club Cosmic Fate and applied the vinyls onto each nail. Then I painted over the vinyls with Mundo De Unas Brown. I peeled off the vinyl and created a triangle shape near my cuticle with China Glaze Mingle With Kringle and outlined it with Wet n Wild Black Creme. I sealed it all in with some Seche Vite and that was it! 


I really am so in love with these! Houndstooth is such a fun design and I wish I used it more often. This look makes me feel so Thanksgiving-ish and SO ready for some turkey! ;)

What do you guys think?

Thanks loves :) 

Tuesday, November 10, 2015

Almost Mono-Marble Nails

Oh hi guys!!!

Sorry I've fallen off since last week, I have some very important family affairs happening at the moment... I can't talk about them yet, but you'll know soon ;) 

Anyways, I thought it was right about time for some more nails art and I decided to tackle the watermarble monster again! Take a look and let me know if you think I succeeded!

I started with a base of Lacquer Lust Unicorn's Brew and applied some liquid latex around my nails while it was drying. I created the marble using Wet n Wild Black Creme and Pipe Dream Polish Clearwater. I finished it off with a layer of Seche Vite and that was it!


I haven't water marbled in a while and I forgot how much I love it.... when it's working well anyways ;) 

What do you guys think?

Thanks loves! :) 

Saturday, October 31, 2015

Happy Halloween!

It's Halloween! Can you guys even believe it?

I can't believe tomorrow is November like I'm in some serious denial LOL! 

You may have seen this final look already on my Instagram because I posted a sneak peek of it last week when I headed out to Salem. I got so many compliments on this look and it was so easy to create! Wanna take a look?

I started with a base of Serum No5 Dayglow, my FAVORITE glow in the dark polish! When it dried I stamped over it using a black stamping polish from the Born Pretty Store and Bundle Monster plate BM-H08. I sealed it all in with some Seche Vite and that was it!


I love how easy this look was to create, it's perfect for that last minute halloween design!

What do you guys think? What are you doing for Halloween?

Thanks loves :) 

Thursday, October 29, 2015

Skulls and Glitter

Hey guys!

I can't believe how close Halloween is! I feel like I had so many more spooky designs I wanted to create, but there's just not enough time in the day T.T But latest I got to do this one, a sparkly and spooky skull design! Want to check it out?

I started with a base of Color Club Beyond on my pointer and middle nails and a base of China Glaze Just Be Claws on my ring and pinky nails. When my pointer and middle nails were dry I applied some Skull Stencils from Stick It! Nail Vinyls and sponged over them with Mundo De Unas White. I peeled off the vinyl and added two red rhinestones on each for some creepy eyes. Then I sponged Milani Red Sparkle on my ring and pinky nails and I sealed them all in with some Seche Vite to finish it off! 


I absolutely LOVE how these came out! So sparkly and just perfect for Halloween. BUT, if you want to recreate the glitter part of this look I would highly suggest a peel off base coat... you guys DON'T want to know how long these took me to remove.... -_- LOL! 

Totally worth it though right?

Thanks loves :) 

Monday, October 26, 2015

Halloween Mini Dotticure

Hi guys!

More Halloween nails woohoo! I love this look so much because it's not scary, it's not creepy, it's not gory, it's just... cute ;) Sometimes simple nail designs are my absolute favorite designs to do, and this one is classy and still quite festive. Wanna check it out?

I started off by taking a toothpick, dipping it into some Nasty Nails Boink! and adding dots to the bottom portion of my nail focusing heavily on the very bottom edge. When those dots were dry I went back in and added some more dots with Wet N Wild Black Creme. I filled in any bald spots with some more Nasty Nails Boink! and added a layer of TLLB Glow-Stly for some good holo measure ;) Finally I sealed it all in with a layer of Seche Vite and that's it!


I love how simple this look is, and it honestly took me about 15 minutes to create. It's perfect for a last minute halloween manicure, or you can even change it up and use different colors. The possibilities are endless ;) 

What do you guys think?

Thanks loves :)