Showing posts with label mundo de unas. Show all posts

Monday, February 22, 2016

And They Call It Puppy Love

PUPPIES! 

I mean I know we all love nails here but I have another love too... PUPPIES! I have such a sorf spot in my heart for puppies, big or small, old or young, I love them all :) So when I stumbled upon the Furry Best Friends stamping plate by UberChic Beauty I just KNEW I needed to have it! And good news... I was right, it is as amazing as I thought it would be!

I decided to start off with a simple look with a few paw prints and a puppy face. What I like about these is that they are so unique, along with all of the  images on this plate, they aren't like everything I've seen before and I love that!

I started with a base of CBL Berries in the Snow. When it was dry I stamped over each nail with the paw print/puppy face images form the Furry Best Friends plate form UberChic Beauty and Mundo de Unas Light Gold. I sealed it all in with some Seche Vite and that was it!


I absolutely adore the way these came out! I hope they brough a smile to your face as they did to mine :) 

What about you? Do you love puppies? Or maybe you're a kitty person? Share you loves with me in the comments!

Thanks loves :) 

Wednesday, February 17, 2016

The Fickle French

I usually love french manicures SO MUCH! 

Except for this one...

UGH! 

I had such high hopes for this cute mani and it just fell flat for me :( The idea was great but the execution... definitely needed more work. Well, OH WELL! I thought I'd show you guys anyways! YOLO right? ;) 

I started with a base of OPI Bubble Bath. Then I created the french tips using Stick It! Nail Vinyls Half Moon Vinyls and Mundo De Unas White. Then I stamped over the ring finger using Mundo De Unas Hot Pink, my Clear Jelly Stamper, and Bundle Monster Plate BM-H18. I sealed it all in with some Seche Vite and that was it!


I will most defintely revisit this mani one day.... some day anyways ;) But I still think its kinda cute :) What do you guys think?

Thanks loves :) 

Thursday, February 11, 2016

L-O-V-E

Hi guys!

Valentine's Day is coming up soon so I thought I'd cook up some Valentine's Day inspired designs. I LOVE this look.... ;) 

I started off with a base of Nasty Nails One Night Stand. When it was dry I stamped over each nail using Mundo De Unas Light Pink and Bundle Monster plate BM-711. Then I used my Clear Jelly Stamper and stamped the letters over each nail using Born Pretty Store Black and Bundle Monster plate BM-426. I sealed everything in with some Seche Vite to finish it off!


I am so happy with the way these came out! The Clear Jelly Stamper has really revolutionized how we stamp, it has made placing specific designs, like the LOVE letters, SO much easier! I can't wait to create more!

What do you think about this look for Valentine's Day? Would you rock it?

Thanks loves!

Tuesday, February 9, 2016

HEART beat

Hi guys!

I'm loving on these Valentine's Day looks! The one is super unique and it was so much fun to create!

I started with a base of Color Club Miss Bliss. Then I stamped over each nail using Mundo De Unas White and Pink and Bundle Monster plate BM-319. Then I stamped over each nail using my Clear Jelly Stamper, Born Pretty Store Black and Bundle Monster plate BM-411. Finally I sealed everything in with Seche Vite and that was it!


I know a lot of people have mixed feelings about Valentines Day but I hope that we can all agree that pink nails and hearts can be worn all year long! ;) 

What do you guys think?

Thanks loves :) 

Monday, November 30, 2015

An Early Holiday Manicure

Hi guys!

So I know it's a bit early for holiday designs but I've been obsessing over Lacquer Lust Velvet Rope and it's just such a perfect color for the holidays so BAM! Holiday manicure ;) 

I started off with a base of Lacquer Lust Velvet Rope (duhhhhhhh) and while it was drying I created stamped decals using Bundle Monster plate BM-314 and Mundo De Unas Light Gold. I applied the decals to my nails and sealed everything in with some Seche Vite. And that it! Super simple. 


I love love love this look! It's so simple but that red just brings it to life! I haven't done any stamped decals in a while and I have to say I'm a bit rusty.... but I think these turned out okay.

What do you guys think?

Thanks loves :) 

Thursday, November 12, 2015

Houndstooth Vinyls

Hey guys!

I'm super excited to share these nails with you because I am SO happy with them!

I've never created a houndstooth design besides stamping it on my nails, the idea of houndstooth vinyls were so intriguing to me I couldn't wait to give them a shot and MAN do I love them! 

I want to note that these vinyls are brand new from Stick It! Nail Vinyls and not released yet but keep an eye on her Instagram because I think they will be releasing soon! Let's get this look started :) 

I started with a base of Color Club Cosmic Fate and applied the vinyls onto each nail. Then I painted over the vinyls with Mundo De Unas Brown. I peeled off the vinyl and created a triangle shape near my cuticle with China Glaze Mingle With Kringle and outlined it with Wet n Wild Black Creme. I sealed it all in with some Seche Vite and that was it! 


I really am so in love with these! Houndstooth is such a fun design and I wish I used it more often. This look makes me feel so Thanksgiving-ish and SO ready for some turkey! ;)

What do you guys think?

Thanks loves :) 

Wednesday, October 7, 2015

Totally Wavy Dude

 Hi guys!

If you haven't noticed yet, I've been using a lot of vinyls from Stick It! Nail Vinyls lately. That's because I am watching the entire collection so there are a lot more to come... they are SO fun though so I hope you don't mind! I think there will be a lot of designs you will love! 

So on to the next one ;)

I started this look off with a base of Color Club Beyond. When it was dry I applied some Wave Stencils from Stick It! Nail Vinyls and sponged over them using Mundo De Unas White. I removed the vinyls and added small hearts near my cuticle using turquoise acrylic paint. I sealed it all in with a layer of Seche Vite and that's it!


I always love the way black and white nail designs stand out, so clean! And that little pop of turquoise really make it awesome!

What do you guys think?

Thanks loves :) 

Monday, October 5, 2015

Harvest Spikes

Hi guys!

I've been crazy about fall-esque nail designs and I think this one is my favorite to date! Something about golds, browns, and nudes together just make me ant to get my sweater and boots out! 

I started with a base of Enchanted Polish Flashing Lights and when it was dry I applied some Spike Vinyls from Stick It! Nail Vinyls and sponged over them with Mundo De Unas Brown and Lime Crime Milky Ways. I removed the vinyls and sealed it all in with a layer of Seche Vite to finish it off.


Dat sun pic doe <3 These photos don't do this Enchanted justice at all, it's absolutely stunning in real life!

What do you guys think?

Thanks loves :) 

Saturday, October 3, 2015

Spiked

Hi guys,

I was feeling like I wanted to create something a little edgy lately so I grabbed my Spike Vinyls from Stick It! Nail Vinyls and went to work!

I started with a base of Victorias Secret Mischief. When it was dry I applied some Spike Vinyls in a half moon pattern on my nails and sponged over it with Mundo De Unas Light Blue and Lilac. I removed the vinyls and sealed everything in with some Seche Vite to finish it off.


This look was super fun to create and I love how crisp the vinyls removed! 

What do you guys think?

Sorry for the short post ;) Thanks loves!

Sunday, September 20, 2015

Squiggly

Oh hiiiiiiiii guys! Long time no talk!

Sorry I've been a bit MIA again, if you want to know why follow me on Instagram, I posted about it there ;) 

Anyways, my nails all broke, OF COURSE T.T so it's back to nubblies for a little while but hey, that's okay as long as I can still paint them ;) 

I wanted to do something simple today and I fell in love with a squiggly (yes, that's totally a word) design on the Expressionism stamping plate from the Winstonia Store... check it out!

I started with a base of Color Club Beyond. When it was dry I stamped over it using the Expressionism plate and Mundo De Unas Light Pink, and then again using Mundo De Unas Light Gold. I sealed it all in with some Seche Vite and that was it!


I'm loving this simple design SO much! It's kind of crazy and that's totally right up my alley ;)

Also, I'm trying a new set up for taking photos, I'm not sure how I feel about it yet but I think I like it LOL! What do you guys think?

Thanks loves :) 

Monday, August 24, 2015

Leopard Nail Art

Leopard is one of my absolute favorite animal prints so it's okay for me (and everyone else) to be absolutely OBSESSED with these vinyls from Stick It! Nail Vinyls, see for yourselves! 

I started with a base of China Glaze Pool Party and applied a layer of Seche Vite to speed up drying time. Then I applied the Leopard Vinyls on my nail and sponged over with Mundo De Unas Light Gold. I peeled off the vinyl, sealed it all in with one more layer of Seche Vite and added a black rhinestone by my cuticle to finish it off.


Oh gawd these are EVERYTHING! These Leopard Vinyls make it so incredibly easy to do leopard nails it's amazing! Not to mention, Stick It! Nail Vinyls recently moved to a new brand of vinyl and its perfect! Look at those clean lines and no sticky residue! 

If you want to get some for yourself you can check out Stick It! Nail Vinyls at: stickitnailvinyls.storenvy.com

What do you guys think? Would you give these a try?

Thanks loves :)


Wednesday, July 8, 2015

Reverse Stamping Negative Space

I am in La-La-La-La-LOVE!

So I wanted to try a new way to reverse stamp. I had heard that if you use a silicone mat you can work on multiple designs at once making creating these designs so much quicker! If you've ever reverse stamped before then you definitely know what I'm talking about (P-A-T-I-E-N-C-E) T.T

The verdict? Yeah it's a LOT quicker... but it definitely takes some practice, the technique is a little different. I had to redo these nails about 8 times before I finally got it right. But it was SO worth it! You'll see what I mean ;) 

I started off by picking up this honeycomb design from Bundle Monster BM-422 using Mundo De Unas White. Then I stamped it onto my silicone mat which I had already primed with a layer of top coat. Then I filled in the honeycombs, leaving the outlines blank with Color Club Over The Moon, Eternal Beauty, and Miss Bliss. I added another layer of top coat and waited for it to dry, then I used some tweezers and carefully pulled it off of the mat. I applied a base coat on my nails and popped on the design. I pressed it down firmly and removed the excess with an angled brush dipped in acetone. Finally I sealed it all in with one more layer of Seche Vite.


I know it sounds like a lot of work, and it is, but being able to work on more then one design at a time really does make it so much faster. And when you get an end result like this? So worth it.

What do you guys think? Have you tried this method for reverse stamping? Got any tips or tricks for me? 

Thanks loves :) 

Monday, July 6, 2015

Neutral-ish stamping

Okay so this TOTALLY didn't come out the way I planned it to... the yellow stamp turned greenish making the base look brownish but...... I'm kinda digging it ;)

It was out of my normal color scheme but I kind of really like it, it's neutral but still fun. Look for yourselves!

I started with a base of Glam Polish Without Love. Then I stamped over it using Mundo De Unas Neon Yellow and Born Pretty plate BP-L020. I sealed it all in with some Seche Vite and that was it!


It's so weird how the neon yellow stamping totally changed my base. Glam Polish Without Love is a beautiful berry polish! 

But it's still kind of cool!

What do you guys think?

Thanks loves :) 


Friday, July 3, 2015

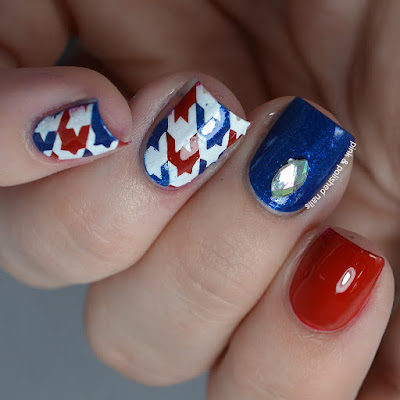
Happy Fourth of July! (almost)

Happy almost Fourth of July guys!

I know I'm a day early but I think this weekend may be pretty busy and I didn't want to miss out on posting these nails! 

Let me just say, these nails were a royal pain in the ASS! T.T But I absolutely had to finish them and I'm so happy I did because I love them! I think it's a fun take on the classic red, white, and blue manicure... let's see what you guys think :) 

I started off with a base of OPI Big Apple Red on my pointer, Zoya Song on my middle, and no base on my ring, pinky, and thumb. I picked up the houndstooth image (BM-322) on my stamper using Mundo De Unas White. While it was still on my stamper I filled in the holes with OPI Big Apple Red and Zoya Song. I let it sit for about a minute and then I stamped it on my ring nail. I repeated the same process on my pinky and thumb nails. I added a pretty rhinestone to my middle nail and sealed them all in with a layer of Seche Vite. And finally this design was finished!


Oh I am SO happy with these! I had to redo them so many times but I'm telling you it's so worth it. 

And I know I'm pretty bad at explaining things, so I have a video tutorial going up on my YouTube Channel tomorrow so stay tuned for that! ;)

What do you guys think? What are you doing for the Fourth of July this year?

Thanks loves :) 


Wednesday, July 1, 2015

The Subtlest of Stamps

When your stamped design is almost too subtle to see..........

Whoops!

I swear it's way more visible in real life ;)

I'm actually quite smitten with this look, I can't remember the last time I did a pastel pink to pastel purple gradient, if I ever have but it's so cute and girly and dainty I LOVE IT T.T 

For this look I started with a base of Lime Crime Parfait Day. Then I created the gradient using Lime Crime Parfait Day and Mundo De Unas Lilac. When the gradient was dry I grabbed Mundo De Unas Lilac again and stamped over my entire nail with plate BP-L020. I finished off with a layer of Seche Vite to seal everything in.


Okay tell me you can see it! LOL don't you hate when things are so pretty in real life and just refuse to show up on camera? Stubborn -_-

Anyways what do you guys think?

Thanks loves :)