Thursday, November 28, 2013

Happy Thanksgiving!

Happy Thanksgiving to all my little turkeys that celebrate!! :) 

Thanksgiving is one of my favorite holidays, food and family always go so well together! You know what else goes great together? Teddy bear pilgrims and turkeys!! Yes, you heard [read?] me right! LOL! I wanted to do some cool nail art for Thanksgiving and I saw THIS photo online and knew I had to use it as inspiration! 

I started with a gradient of Azature White and Pure Ice Gold Dust. I painted the teddy bear pilgrim and turkey using acrylic paints and the leaf designs with China Glaze Harvest Moon. I used NYC Matte Me Crazy for a flat finish and viola! Finished :) 


AND you guys get a special Thanksgiving treat, my 'Cinderella hand' ;) My nails are super short on my right hand because I broke one yesterday :( But oh well I loved this design too much to resist!!


What do you think?! 

I like to take times like these and reflect on what I'm grateful for. I'm so grateful for my family, friends, and my boyfriend but there is another thing, or things, that takes a special place in my heart. I am so truly grateful for all of YOU. Every one of you that comes here and reads my little blog are the reason I do what I do. I paint my nails because I want to share with all of you my love for polish. Your comments and just the pure fact that you stick with me through all of my ramblings and my slightly crazy moments makes all of the time I put in to this blog worth it. I don't ever want to take any of you for granted because without all of you this blog wouldn't be the source of true happiness that it is. So thank YOU from the bottom of my heart :) 

I hope you all have a wonderful Thanksgiving and I hope you stop by again soon ;) 

Thanks lovelies!


Wednesday, November 27, 2013

Mish Mash Challenge: Card or Board Game

Hello cupcakes!!

Can I just say that I am super pumped that I'm actually getting this post up on time ;) I hope you are all having a wonderful Wednesday and maybe preparing for Thanksgiving tomorrow?? All I know is I'm SO ready to stuff my face with some turkey and all the fixings!! LOL!

Anyways on to the mish mash challenge! Today's theme is card or board game. I really wanted to do some Sorry nails but I was multitasking when I was doing these trying to figure out my Thanksgiving nails so I went with something a little easier: LIFE nails :) Now I've never actually played the game LIFE but the cover of the board game was super pretty and I instantly knew what I wanted to do.

I started this design with a gradient of Azature White and Orly Gumdrop on all of my nails besides my thumb. On my thumb I started with a base of Lime Crime Crema de Limon. All of the other details were painted on using acrylic paint. I used Poshe as a top coat and I was finished! 


I ended up really liking this design. It's simple and really colorful! And not that the game has anything to do with it, I like it too because I'm finally getting my life back in order and it's kind of a bright little happy message on my nails :) 

I hope you all have a wonderful day! I'm going to start working on my Thanksgiving nails shortly after I post this so look for some awesome nails on the blog tomorrow ;) And while you're here make sure you check out everyone else's card or board game nails!! 

See ya later loves! 


Monday, November 25, 2013

Zebra marble

Hi loves

So, I've had this idea for a while and only recently have I been able to act on it. Some of you may remember my first challenge day of the Mish Mash Challenge where I did a purple holographic water marble... I noted on that post that the stripes were so skinny they kind of reminded me of zebra stripes. Well that put a little thought in my head of doing a holographic white and black marble. Then it would really look like zebra stripes right?! Well it didn't exactly happen that way -_- The black lines didn't get as skinny as the purple ones did but I still really like it and it looks zebra-ish.... sort of anyways ;)

I started with a base of OPI My Boyfriend Scales Walls. I think I need to pick up another bottle of this... or 12 since I use it so much ;) Anyways, I used OPI My Boyfriend Scales Walls and Color Club Beyond for the marble on my middle, ring, and thumb. Then I just did two coats of Color Club Beyond on my index and pinky finger and after some top coat I was all done :) 


What do you think? Kind of zebra-ish right? Either way I wore this for a solid 4 days before I took it off. I'm so sad that some of the pictures decided to be a little blurry -_- Oh well though right? I can't control when my camera wants to have little hissy fits!!! 

Have you tried marbling with holographic polishes yet? Which ones work best for you?
Thanks guys :) 

Friday, November 22, 2013

Supah Supah Late Mish Mash Challenge: Grey

fjlcsbjklvdajvdfjnkvalkjlnrkl!!!!!!!!!!!

HELLO!

Ack I'm so sorry guys! I told you I wouldn't run away and then what did I do? Got up and ran away -_- I truly am sorry that I haven't posted guys, this past week that I've been gone I was struggling with some personal issues, nothing bad, just basically life decided to pile up and slap me in the face. I just had to take a step back, do some deep breathing, and put me first again [and a good cry session never hurt anyone ;)]. I hated being away from the blog because you guys don't know how important this blog is to me. All of you lovely readers, whether you comment or not, are the reason I do this. You all are what keep me going and it makes me sad when I can't be here. But not to worry I'm back and better then ever! Enough with the mushy stuff now it's time for some super late mish mash nails!!!

I've literally been trying to get these up since Wednesday but I haven't had a moment to spare! The theme for this week was gray and I knew exactly what I wanted to do. Among all of the very talented nail artists on instagram THIS manicue from @kgrdnr has made me drool ever since I saw it. I really wanted to do it in pink but alas, grey is the theme so it will have to do ;) I'm really happy with the way these turned out so make sure you take a look :) 

I started with a base of Azature White and then sponged on the gradient using the same and ELF Misty Haze. Then I used gray acrylic paint to paint on the design. For my accent nail I used OPI This Gown Needs A Crown and placed a pearl at the base. 


I've got to say I love this! It doesn't do justice to @kgrdnr's original design but I'm definitely still happy with it. 

So thanks again for sticking with me everyone!! Muah!!! <3 


Thursday, November 14, 2013

Swatch: China Glaze Happy HoliGlaze Holiday Collection 2013

Hi loves!

So this has taken me WAY too long to get up here but the time keeps slipping through my fingers somehow! I know, I know, not an excuse but they are here now and that's what matters right? 

I've got six of the 12 colors of China Glaze's 2013 Happy HoliGlaze collection reviewed below and man are they pretty! ;)  


All Wrapped Up is a blurple (blue/purple) micro glitter. This one is one of my favorites, the glitter is so fine it gives such a great depth to the polish. The formula was a bit thick as usual with glitter but easy to work with. It built up quite nicely, below is three thin coats, enough for full opacity, with two generous coats of top coat. Yep, this one is definitely a top coat eater ;) But totally worth it! Actually if you don't want to top coat it dries to a slightly textured look which is really pretty as well. 


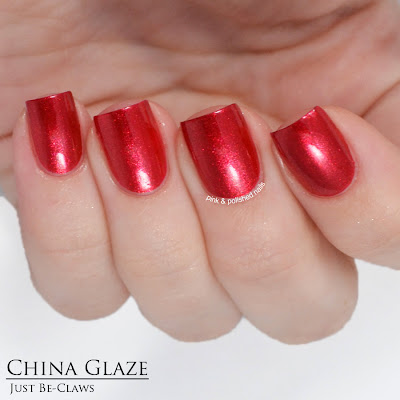
Just Be-Claws is a gorgeous Christmassy red foil. I know there will be so many reds out this holiday season but something about this one just stands out to me. It really is the perfect Christmas red. The formula was super smooth and easy to work with. Below is two thin coats with top coat. 


Put A Bow On It is a magenta/berry micro glitter. Similar to All Wrapped Up and just as pretty! There is a great mix of glitter giving a good depth to the polish. The formula was the same as All Wrapped Up and was fully opaque in three thin coats. Below I have three thin coats and two coats of top coat. Again, if you don't want to top coat this one it dries to a slightly textured look which is gorgeous too! 


So Blue Without You is a bright blue foil. All I can say about this one is WOW! What a seriously gorgeous color, and still perfect for the holiday season. The formula was great and was opaque in two coats. Below is two thin coats and top coat. What a blue! 


Santa Red My List is a cranberry/pink foil. In the bottle it looked similar to Just Be-Claws but it couldn't be more different! Santa Red My List is such a gorgeous color, and a bit more toned down if you don't like those in-your-face reds ;) The formula was smooth and only required two thin coats for opacity. Below is two thin coats and top coat. 


There's Snow One Like You is a textured white with some white hexagon glitters. Now this one's a funny one. It has gotten some mixed reviews because it is so unusual. I have to say though, I actually quite like it. I can definitely say there is nothing even close to this in my collection. The formula is pretty difficult to work with, it's thick and bumpy but if you work carefully you can apply two thin-ish coats and dab on some more in spaces that look bare. After it dries though it's really kind of fun to look at, it reminds me of that fake snow you put around your house :) Below is two coats plus a little extra dabbed in some places and no top coat. 


So what do you think? Do these polishes get you in the holiday mood? They certainly did for me! I think China Glaze has really hit the mark on this holiday collection with some really unique and gorgeous colors. There are 6 other polishes in the collection plus a traveling top coat. I think I'll definitely be picking some of the others up so keep watch on the blog for some more pretty holiday colors ;) 

Keep up with more news from China Glaze on their website www.chinaglaze.com and follow them on social media to stay up-to-date! :) 


Thanks so much loves! 


Wednesday, November 13, 2013

Mish Mash Challenge: Faux Stone

Hellooooooo cupcakes!

Whew! Sorry guys I didn't mean to take a little break! I'm on vacation this week so I haven't been able to find the time to do my nails or edit any pictures :( BUT! I made sure that I would be able to post my mish mash challenge post today. 

The theme is faux stone.... what? LOL I literally had the hardest time coming up with inspiration for this one. I googled faux stone, faux stone nails, stone, pretty stones, etc... and finally after an hour of searching I came up with this picture of malachite. I'm not sure exactly what malachite is but it's so pretty! 

To create this look I started with a base of China Glaze Running in Circles. Then I used a few different greens, white and black acrylic paint to create some random patterns. When that was dry I did a layer of China Glaze Fairy Dust and one coat of Poshe and I was finished!


blurred to show that sparkle ;) 


I really liked doing this design surprisingly, it was really easy because you don't have to be so precise. That's the beauty of stones, they are so random, and I think that was the whole point of this theme to really expand our creative visions ;) Deep enough for ya? LOL

Thanks so much lovelies and I'll try really hard not to go missing again! Make sure you check out everyone else's faux stone designs :) 


Wednesday, November 6, 2013

Mish Mash Challenge: Holographic

Hello lovlies!!

Happy hump day says every camel ever! ;) It's time for another mish mash challenge day and I was super excited about the theme: holographic. It's no secret that holographic polishes are some of my favorite! I desperately wanted to bring you guys a holographic watermarble but Miss Watermarble being the fickle bitch that she is said "ain't no way in hell you're getting a holographic marble today". UGH! I literally tried for 3 hours yesterday and got a big fat NOTHING! Damn you Miss Watermarble!!! So sad :( 

But I decided to try out a maze gradient nail again inspired by the lovely Sarah from Chalkboard Nails. She always has such amazing nails and she does these gradients and paints a maze design over them that I just drool over every time. I decided to give is a go and loved it! It was surprisingly much easier then I anticipated! 

I started with a base of Color Club Over the Moon and sponged a gradient over that using Color Club Over the Moon and Eternal Beauty. When that was dry I took Color Club Beyond and a nail art brush and painted the maze design on top. Top coat with some Poshe and it was finished! 

OH! And watch out guys I'm experimenting with my photos AGAIN! -_- I just can't settle LOL! I'm loving this crisp white background though... but the edges came out far too blurry :( What do you guys think about it? 


Too bad the holographic effect didn't shine as bring in the photos as it did in real life :( But you can see a little sparkle below.


Well, these weren't exactly what I expected, again thank you Miss Watermarble -_-, but I really do love this design! And come on... everything is better with some holographic-ness mixed in! ;) 

What do you think? What's your favorite brand for holographic polishes?
Thanks dolls! Don't forget to check out everyone else's holographic nails! 


Tuesday, November 5, 2013

From ruined to revived

Hi chickies

So what do you do when you aren't happy with a design??? You stamp over it of course! ;) Just the other day I showed you THIS design, and while I liked it it came out super thick and I messed it up almost immediately after I took photos of it. I really loved the way the gradient came out so I decided to do a quick fix.

I removed the black chevrons off of my middle, ring, and thumb nail. I repainted the half and half design with Lime Crime Pastelchio and Once in a Blue Mousse. Then I stamped over them with L.A Colors  Striping Polish in Black using Bundle Monster plate BM-201. 


The change took me about a half and hour from start to finish and I'm super pleased with the outcome :) So hey, there's no such thing as a ruined manicure, just new opportunities! ;)

How about you guys? What do you do to fix a mani that gets smudged? 
Thanks loves :) 

Saturday, November 2, 2013

Black chevrons

Hello dears,

How is your week going so far? I hope it has been a good one! I've got some black chevron nails to share with you today inspired by the lovely @lacquertude on Instagram! 

So let's cut to the chase shall we? :) 

I started with a base of Azature White on my index and pinky. For the gradients I used Lime Crime Crema de Limon, Pastelchio, and Once in a Blue Mousse. I topped the gradients off with China Glaze Fairy Dust. For the chevron nails, I did a half and half base of Lime Crime Pastelchio and Once in a Blue Mousse. I freehanded the chevrons on with Wet n Wild Black Creme. I top coated everything with Poshe and the design was finished. 


And this is the photo I was inspired by from the talented @lacquertude 


These were so much fun to create and I love how the black stands out over the pastel background. What do you guys think?