Friday, July 31, 2015

Bear Pawlish Peek A Boo!

I've done it.

I've finally done it.

I've found the polish to end ALL polishes. May I please introduce you all to Bear Pawlish Peek A Boo! the most stunning, gorgeous, blindingly bright neon pink holo that ever lived.

And. She's. PERFECT.

I can't even try to control myself here guys LOL it's pretty obviously that pink is my favorite color.... (Pink & Polished Nails?!) and this is everything that I have ever dreamed of in a polish.... and dare I say, even more? I know not everyone will have the same opinion as me because everyone likes different colors (DUH!) but for you pink lovers out there, you absolutely NEED this in you life! Don't believe me? Check it out for yourselves ;)

Bear Pawlish Peek A Boo! is an intense neon pink linear holographic polish. The formula was so buttery smooth. Bright pinks like these can be known for staining but I was pleasantly surprised to find that Peek A Boo! didn't at all. Swatches below are two coats with top coat. Go forth and drool!


Dat flash doe
 Well? Did it blow your mind? Because it most certainly did for me! 

You can purchase Bear Pawlish Peek A Boo! HERE, though I think it may be out of stock she restocks the first Friday of every month.

What do you guys think?

Thanks loves :) 

Wednesday, July 29, 2015

Watermarble Nails using Watermarble VINYLS

Chickadees!

I'm so super excited about this post! I get to show you guys some watermarble nail VINYLS! Yep, that's right, vinyls. These vinyls are from Stick It! Nail Vinyls with creative credit going to the wonderful +Lifeisnails. These are so much fun and I'm absolutely obsessed with how much easier they are to used then actually water marbling. Ready to check it out!

I started with a base of Wet n Wild Black Creme and applied a layer of Seche Vite. When my nails were completely dry I applied my vinyls and sponged over top of them with Color Club Eternal Beauty and Over the Moon. Then I removed the vinyls and sealed everything in with one more layer of Seche Vite.


Just LOOK at how pretty they are!!!! *.* I'm so happy with the way these came out and I've got so many more color combinations in my head!

Note: these vinyls can be a bit tricky to use because they are so intricate but I've got a video coming out on my YouTube Channel shortly that will teach you how to use them with ease every single time! I'll leave a link here once it's posted.

These watermarble vinyls are from Stick It! Nail Vinyls and they retail for $5.00 USD for 15 vinyls. Only $1.00 domestic shipping and $2.00 International! These vinyls along with so many more, and most recently some leopard vinyls! <3, can be purchased HERE

What do you guys think? Will you give watermarble vinyls a try?

Thanks loves :) 

Sunday, July 26, 2015

Girly Nautical Nails

Summer is the perfect time for some nautical nails and lately I just can't get enough! Especially when they're cute and girly like these ones <3

Let's just get right to it because I'm SO excited to show you guys these!

I started with a base of Essie No Baggage Please and applied a layer of Seche Vite to protect my polish from the vinyls. Then I used Stick It! Nail Vinyls Wave Stencils and painted over it using China Glaze Too Yacht To Handle. I removed the vinyls and then added Stick It! Nail Vinyls Heart Anchor Vinyls to my middle and ring nails. Finally I sealed it all in with one more layer of Seche Vite and that was it!


Oh goodness I am just in LOVE with these! This is one of my all time favorite color combinations and I think it works so well with this design.

What do you guys think?

Thanks loves :) 

Thursday, July 23, 2015

Gradiented Hearts

Hearts, hearts everywhere!

I'm loving these Multi Heart Stencils from Stick It! Nail Vinyls, they are incredibly easy to use and my favorite part? The insides of the stencils don't lift up when you remove the stencil from the paper. I can't tell you how frustrating it is, though a lot of you probably know, when you are trying to use a nail vinyl and you have to pick out the insides. So aggravating! That's why I like these vinyls so much, aside form having a great variety, the vinyls are nice and stick and the insides stay where they are supposed to ;) 

For this fun heart look I started with a base of Sally Hansen Insta Dri Tag, Ur It! and applied a layer of Seche Vite over each nail to protect the polish from the vinyls. I applied the multi heart stencils to my nails, protected my skin with a layer of liquid latex and created the gradient using Lime Crime Parfait Day and Glam Polish Without Love and a cosmetic sponge. I removed the vinyls and liquid latex and sealed it all in with one final layer of Seche Vite.


I absolutely LOVE how fun this look is! And it's so easy to create and use whatever color combination you want. I especially love the purple glitters in Glam Polish Without Love, such a perfect finishing touch ;) 

What do you guys think?

Have you tried Stick It! Nail Vinyls? What did you think?

Thanks loves :) 

Tuesday, July 21, 2015

Classic French featuring Goombay Gal Nail Charms

Ah, there's nothing like a clean and classic french manicure.

Especially when it's so quick and easy to create with the help of Stick It! Nail Vinyls French Tip Vinyls <3 

A french manicure can be just what you need to get those creative juices flowing again, or it can be all you need with the addition of this beautiful tree charm from Goombay Gal! I am in love with this charm! It's slightly curved so that it fits on the nail bed comfortably and just big enough without being too large for my small nails! Take a look for yourselves :) 


This charm is the absolute perfect addition to this simple french manicure, so classic, so pretty. What do you guys think?

Goombay Gal carries a wide variety of nail charms, they retail for a wonderful price of 1.99USD and can be purchase HERE! Make sure you stay up to date with Goombay Gal by following her:

*products in this post were provided by Goombay Gal Nail Lacquer in exchange for my honest opinion. For more information see my disclosure policy.

Thanks loves :) 

Saturday, July 18, 2015

Sail Away With Me

Hi guys!

I haven't done nautical nails on this blog in a really long time, but that's about to change right now with the help of Stick It! Nail Vinyls Straight Vinyls and Sail Boat Vinyls

Let's get this look started!

I started with a base of Zoya Song on all of my nails and sped up the drying process with a layer of Seche Vite. I used Stick It! Nail Vinyls straight vinyls to create the stripes on my index, middle, and pinky nails and painted over them with Sally Hansen Insta Dri Tag, Ur It!. I removed the vinyls and added two dots on the edge of my nails with a dotting tool and LOOK! Nail Color Rockets Red Glare. On my ring nail I placed a straight vinyl vertically on my nail and painted half of my nail with Sally Hansen Insta Dri Tag, Ur It!. I removed the vinyl and added a sail boat vinyl, also from Stick It! Nail Vinyls and painted over it with LOOK! Nail Color Rockets Red Glare. I removed the vinyl and sealed all of my nails in with some Seche Vite and that was it!


I am absolutely in love with these! They were so easy to creat with the help of Stick It! Nail Vinyls (purchase HERE). Nautical nails can be so fun and you can use almost any color combination you can think of! I'm glad I decided to go with the classic color scheme, but I can definitely see myself switching things up in the future!

What do you guys think?

Thanks loves :) 


Thursday, July 16, 2015

Goombay Gal Nail Lacquer Holy Holo

Hoooooly Holo! *.*

No for real guys! I've got a polish that I can't wait to show you, it's from Goombay Gal Nail Lacquer and it's called Holy Holo and I have to say it's so aptly named! 

Holy Holo is a stunning silver holographic polish that just seems to glow from within. Even in the shade this polish has so much depth to it it's incredible! The formula was buttery smooth and it was fully opaque in just two easy coats. I'm very impressed, and slightly obsessed ;) Swatches below are two coats with top coat.

*UPDATE* after doing some research I've found that Holy Holo is actually a mood changing thermal polish! Mine never changed but I'll keep you updated as try to see if I can get it to ;) 


GAWD! I can't even get over it, this polish is so gorgeous! You can see the depth so well in the first swatch photo which was taken in indirect light, look how it almost sparkles right in front of your eyes! 

This is my first experience with Goombay Gal Nail Lacquer and I have to say that I am really pleasantly impressed. Goombay Gal Nail Lacquer retails for 9.99USD and can be purchase HERE! Make sure you stay up to date with Goombay Gal Nail Lacquer by following her:


What do you guys think?
*products in this post were provided by Goombay Gal Nail Lacquer in exchange for my honest opinion. For more information see my disclosure policy.

Thanks loves! :) 

Tuesday, July 14, 2015

Mermaids or Dragons?

Mermaid stencils have been super on trend lately in the nail art community and I decided to finally get in to it and man, am I glad I did. 

These vinyls are from Stick It! Nail Vinyls and they are the mermaid stencils, they also carry large mermaid stencils for a larger print. 

I started with a bast of Wet n Wild Black Creme on all of my nails. Then I placed the stencil on my nail and sponged over it using Color Club Over The Moon, Color Club Kismet and a cosmetic sponge. I removed the stencils and sealed it all in with a layer of Seche Vite


Okay these are SO FREAKING COOL! I can't believe I waited so love to try these out! My only problem is I can't decide if they look more like mermaid scales or dragon scales ;) 

Which on do you think they are?

Thanks loves :) 


Sunday, July 12, 2015

Anchors Away!

Okay guys, I've gotta admit... I am OBSESSED with nail vinyls lately! I've been using vinyls from Stick It! Nail Vinyls and they are so easy to use! 

I decided to use the anchor vinyls today and I'm in love! Anchors are one of my absolute favorite symbols and have been for years now. These ones are just TOO CUTE! Wanna see?

I started with a base of Color Club Over The Moon on my middle ring and pinky and a base of Wet n Wild Black Creme on my index. I applied the anchor stencils on my index middle and ring nails and painted over them with Color Club Over the Moon on my index and Wet n Wild Black Creme on my middle and ring. On my pinky I added dots and a tiny bow with a toothpick and Wet n Wild Black Creme. I added the opening back in the anchors with a toothpick and the same colors. Finally I sealed it all in with some Seche Vite!


I may never take these off.... like seriously! I can't believe how incredibly easy these vinyls were to use! My one tip would be to stick them on you skin first because they are quite sticky but that's never a bad thing!

What do you guys think?
Thanks loves :) 

Friday, July 10, 2015

NYC and Sally Hansen Review

Hi guys! 
*press sample

While the Fourth of July is over, wearing red, white, and blue on your nails doesn't have to be! These colors are in any time of the year and I'm excited to share these Sally Hansen Insta-Dri polishes with you!

But first, NYC has come out with a new product, well it's not quite new to a lot of us in the nail art community but it is most definitely new to big companies like this. NYC Strip Me Off is a peel of base coat that's designed to help with the removal of glitter or really any polish. You apply it on your nails and wait for it to dry (it turns clear) then you polish your nails as normal. Then when you want to change your manicure you simply lift up an edge using an orange wood stick and peel it off! A few things I'd like to say, it smells kind of like glue... no, it smells exactly like glue ;) And while its not the most satisfying peel ever it most certainly does peel off quite nicely. I have to admit it took me a lot of grown up will power not to paint this on my hands and peel it off when it dried... TELL me you don't know what I'm talking about >.<
Wet
    
Dry
On to some red, white, and blue!

Sally Hansen Tag, Ur It! Is a pure white creme polish. Ahhhh I love me a good white polish, especially when it dries super quick! The formula was extremely smooth for a white polish and it only took two coats for full opacity. Those with shorter nails may even be able to get away with one coat. Swatch is two coats with top coat. 


Sally Hansen Quick Brick is a bright brick red creme... wait is that an oxymoron? I love this red polish, opaque in two creamy coats and quick drying. This one does stain the cuticles though so be extra careful. Swatch is two coats with top coat. 


Sally Hansen Vandal Eyes is a pretty baby blue polish with a gorgeous shimmer that seems to show up a bit better in the bottle then on the nails. This one was much thinner then the others requiring three coats for full opacity. Despite being thin the formula was quite smooth and my swatch below is three coats with top coat. 


I really enjoyed these colors, patriotic and always in style. NYC Strip Me off retails for $1.49USD and can be purchased at various retail stores such as Walmart and CVS. Sally Hansen retails for $3.99USD and can also be purchase a various retail stores. Make sure you stay up to date with both NYC and Sally Hansen by following them:


NYC

Sally Hansen 

What do you guys think? 
*Products in this post were provided by Sally Hansen and NYC in exchange for my honest opinion. For more info see my disclosure policy.
Thanks loves :) 

Wednesday, July 8, 2015

Reverse Stamping Negative Space

I am in La-La-La-La-LOVE!

So I wanted to try a new way to reverse stamp. I had heard that if you use a silicone mat you can work on multiple designs at once making creating these designs so much quicker! If you've ever reverse stamped before then you definitely know what I'm talking about (P-A-T-I-E-N-C-E) T.T

The verdict? Yeah it's a LOT quicker... but it definitely takes some practice, the technique is a little different. I had to redo these nails about 8 times before I finally got it right. But it was SO worth it! You'll see what I mean ;) 

I started off by picking up this honeycomb design from Bundle Monster BM-422 using Mundo De Unas White. Then I stamped it onto my silicone mat which I had already primed with a layer of top coat. Then I filled in the honeycombs, leaving the outlines blank with Color Club Over The Moon, Eternal Beauty, and Miss Bliss. I added another layer of top coat and waited for it to dry, then I used some tweezers and carefully pulled it off of the mat. I applied a base coat on my nails and popped on the design. I pressed it down firmly and removed the excess with an angled brush dipped in acetone. Finally I sealed it all in with one more layer of Seche Vite.


I know it sounds like a lot of work, and it is, but being able to work on more then one design at a time really does make it so much faster. And when you get an end result like this? So worth it.

What do you guys think? Have you tried this method for reverse stamping? Got any tips or tricks for me? 

Thanks loves :) 

Monday, July 6, 2015

Neutral-ish stamping

Okay so this TOTALLY didn't come out the way I planned it to... the yellow stamp turned greenish making the base look brownish but...... I'm kinda digging it ;)

It was out of my normal color scheme but I kind of really like it, it's neutral but still fun. Look for yourselves!

I started with a base of Glam Polish Without Love. Then I stamped over it using Mundo De Unas Neon Yellow and Born Pretty plate BP-L020. I sealed it all in with some Seche Vite and that was it!


It's so weird how the neon yellow stamping totally changed my base. Glam Polish Without Love is a beautiful berry polish! 

But it's still kind of cool!

What do you guys think?

Thanks loves :) 


Friday, July 3, 2015

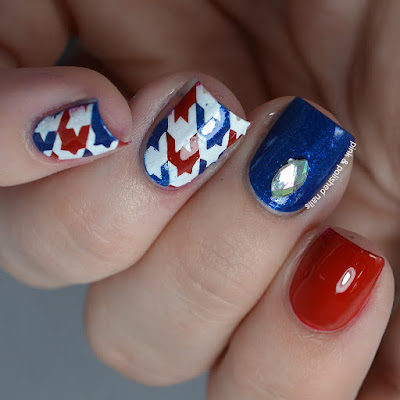
Happy Fourth of July! (almost)

Happy almost Fourth of July guys!

I know I'm a day early but I think this weekend may be pretty busy and I didn't want to miss out on posting these nails! 

Let me just say, these nails were a royal pain in the ASS! T.T But I absolutely had to finish them and I'm so happy I did because I love them! I think it's a fun take on the classic red, white, and blue manicure... let's see what you guys think :) 

I started off with a base of OPI Big Apple Red on my pointer, Zoya Song on my middle, and no base on my ring, pinky, and thumb. I picked up the houndstooth image (BM-322) on my stamper using Mundo De Unas White. While it was still on my stamper I filled in the holes with OPI Big Apple Red and Zoya Song. I let it sit for about a minute and then I stamped it on my ring nail. I repeated the same process on my pinky and thumb nails. I added a pretty rhinestone to my middle nail and sealed them all in with a layer of Seche Vite. And finally this design was finished!


Oh I am SO happy with these! I had to redo them so many times but I'm telling you it's so worth it. 

And I know I'm pretty bad at explaining things, so I have a video tutorial going up on my YouTube Channel tomorrow so stay tuned for that! ;)

What do you guys think? What are you doing for the Fourth of July this year?

Thanks loves :) 


Wednesday, July 1, 2015

The Subtlest of Stamps

When your stamped design is almost too subtle to see..........

Whoops!

I swear it's way more visible in real life ;)

I'm actually quite smitten with this look, I can't remember the last time I did a pastel pink to pastel purple gradient, if I ever have but it's so cute and girly and dainty I LOVE IT T.T 

For this look I started with a base of Lime Crime Parfait Day. Then I created the gradient using Lime Crime Parfait Day and Mundo De Unas Lilac. When the gradient was dry I grabbed Mundo De Unas Lilac again and stamped over my entire nail with plate BP-L020. I finished off with a layer of Seche Vite to seal everything in.


Okay tell me you can see it! LOL don't you hate when things are so pretty in real life and just refuse to show up on camera? Stubborn -_-

Anyways what do you guys think?

Thanks loves :)