Showing posts with label rhinestones. Show all posts

Thursday, October 29, 2015

Skulls and Glitter

Hey guys!

I can't believe how close Halloween is! I feel like I had so many more spooky designs I wanted to create, but there's just not enough time in the day T.T But latest I got to do this one, a sparkly and spooky skull design! Want to check it out?

I started with a base of Color Club Beyond on my pointer and middle nails and a base of China Glaze Just Be Claws on my ring and pinky nails. When my pointer and middle nails were dry I applied some Skull Stencils from Stick It! Nail Vinyls and sponged over them with Mundo De Unas White. I peeled off the vinyl and added two red rhinestones on each for some creepy eyes. Then I sponged Milani Red Sparkle on my ring and pinky nails and I sealed them all in with some Seche Vite to finish it off! 


I absolutely LOVE how these came out! So sparkly and just perfect for Halloween. BUT, if you want to recreate the glitter part of this look I would highly suggest a peel off base coat... you guys DON'T want to know how long these took me to remove.... -_- LOL! 

Totally worth it though right?

Thanks loves :) 

Thursday, October 15, 2015

Quilted Bling

Hey guys!

So when I was trying out the Expressionism plate and the Say I Do plate from the Winstonia Store, I got really excited about this quilted image on the Say I Do plate. I've tried this look free hand before and failed miserably... which is why you guys haven't seen it LOL! SO I was super pumped about being able to stamp it instead! Ready to check it out?

I started with a base of Lime Crime Milky Ways. I applied a layer of Seche Vite over top to speed up the drying process and when my nails were dry I stamped over each on using the quilted image form the Winstonia Store Say I Do plate and a black stamping polish from the Born Pretty Store. I applied Seche Vite one more time and while it was still wet I carefully placed one rhinestone over a larger dot on each nail. Finally I applied a layer of NYC Matte Me Crazy to bring it all together.


I am LOVING this look! SO classy and simple with just the right amount of sparkle to catch your eye. I can't wait to try this one out in different color combinations! 

What do you guys think?

Thanks loves :) 

Saturday, June 6, 2015

Mani Swap!!

IT'S THE WEEKEND! 

Hallelujah! 

I've got a super fun post to share with you today. I've done my first ever mani swap! Yeah yeah I know I'm behind on the times T.T But for those of you who don't know what a mani swap is, it's when two people on instagram essentially swap mani designs, I recreate one of her's and she recreates one of mine. So fun!

I've swapped manis today with Barbara from @lets_get_polished_my_journey_t and I've recreated her it mani. I absolutely fell in love with it when she posted it and was so super excited to give it a shot myself! 

I started with a base of Azature Light Blue Diamond on my index and ring finger and a base of Essie Boom Boom Room. Then I created the it design on my index and ring using Essie Blanc, Essie Boom Boom Room, and Wet n Wild Black Creme. I added a rhinestone on my middle and pinky nail and seal each nail in with a layer of Seche Vite to finish the design!


I really love how these came out! I haven't done it nails for at least two year I think! I've definitely gotta do some more. What color combinations would you guys like to see?

Don't forget to check out @lets_get_polished_my_journey_t on instagram! She's so super sweet and her nails are beautiful!!

Thanks loves :) 

Monday, March 23, 2015

Neon Holographic Glitter Gradient Nails

NEONNNNNNNNNNNNNN.

Neon and holographic glitter = everything I need in life. The end. Kthnxbye. 

I mean honestly though I actually think I cried a little taking these nails off because they were SO DAMN PRETTY. The pictures don't do the holographic glitter nearly enough justice, but you can see how sparkly and gorgeous it is in my tutorial vides with will be up later ;)

Let's get this thing started!

I started with a base of China Glaze Pool Party, my absolute favorite neon pink polish. When it was dry I applied some liquid latex around my nails and created the glitter gradient by applying H&M Jo Is In The House on a cosmetic sponge and spongeing it on my nails. When I was happy with the gradient I peeled off the liquid latex and sealed the design in with a generous layer of Seche Vite. To finish off the design I added a rhinestone to each nail. 


Like seriously though, did you see that macro?! I die! I know I'm being dramatic but I'm serious guys these nails were everything I've ever dreamed about and more! I think I need to recreate this look with every neon polish I own, wouldn't that make a fun collage?! 

What do you think guys?

Keep an eye out on my Instagram and YouTube Channel for tutorials on this look a little later today!

Thanks loves :) 

Friday, March 20, 2015

Rainbow Pastel Half Moon Nails

Hey guys! 

I'm so happy that I'm getting back into doing gradients. I really wish I didn't wait so long to go out and buy more cosmetic sponges because I honestly forgot how much I loved this technique. It's so versatile, there are so many different things you can do, radial gradients, vertical, horizontal, spot. The list goes on! I'm sure I'm probably boring you guys with my rambling so let's get on with the real reason you guys are here... NAILS!

Okay I started this look off by applying hole reinforcement stickers at the top of your nails near the cuticle. Then I placed a piece of tape over the small hole in the stickers so that no polish would leak through there. Then I applied my polishes to my cosmetic sponge to create the gradients. The colors I used were: Essie Boom Boom Room, Lime Crime Peaches <3 Cream, Lime Crime Crema De Limon, OPI You're Way Outta Lime, and Essie Rock The Boat. I sponged on the gradients, peeled off the stickers and applied a layer of H&M Jo is in the House over just the gradients. Then I outlined the top of the half moons with OPI This Gown Needs A Crown. I sealed all of that in with a coat of Seche Vite and finally added a heart rhinestone to each nail.  


These took FOREVER! But it was so worth it because I'm obsessed with the outcome! It's so girly and sparkly and just so many things that I love. They make me think of spring time and warmer weather and right now that's just what I need ;) 

Keep an eye out on my Instagram and YouTube channel for tutorials on this look a little later today!

What do you think guys?

Thanks loves :) 

Tuesday, January 27, 2015

Twinsie Tuesday: Recreate A Celebrity Manicure

Hi guys!

My Twinsie Tuesday post is a little late today I'm sorry! I'm in Massachusetts and as most of you know we're getting slammed with a blizzard right now and it's been keeping me pretty busy shoveling and all that good stuff. But, I've got some down time now so I have my post up finally!

The theme for this Twinsie Tuesday is Recreate A Celebrity Manicure. One of my absolute favorite celebrities for nail art is Katy Perry. She always has something crazy on her nails and I fell in love with THIS disco ball design. It seemed pretty easy, but it was a little time consuming ;) Ready to check out my version?!

I started off with a base of Sally Hansen Silver Sweep. When it was dry I used my small silver rhinestones and Essie Good To Go and applied each one. I didn't top coat after because I quite liked the rough look! 


So.... things not to do: DON'T use a fast drying top coat to apply the rhinestones, it takes a lot longer.... -_- LOL Oh well I really actually love the way that these came out! I'm a notorious picker though so I knew they wouldn't last long on my nails. But they sure were fun while they lasted ;) 

What do you think guys? Are you braving the blizzard too?! Show me some pics of the snow! And don't forget to check out everyone else's Twinsie Tuesday posts! I can't wait to see them!

Thanks loves :) 


Savannah at Addicted to Polish
Róisín at Cuti-CLUE-les
Marisa at Polish Obsession
Lakeisha at Refined and Polished
Jessica at Blue Velvet Lacquer
Chelsea at Nailed Blog
Bridget at A Painted Nail
Amber at Nails Like Lace
Amanda at Fashion Footing
Amanda at Amandalandish
Alaina at The Little Canvas

Tuesday, December 16, 2014

Silver and Gold

So you've been looking for a holiday manicure to rock this season but you're sick of the green and red and cutesy designs? Do you want something more punk-ish? Want to spice it up a bit? I totally have the design for you! Keep reading to find out how to get this super fun and spunky silver and gold design.

Wow, is it just me or did I really sound like I was trying to sell you guys something up there? I should totally become a sales person! LOLOL 

Selling isn't for me, but this design certainley is! I mean don't get me wrong I love red and green and cutesy Christmas nails but sometimes I just crave a little more spice.

I started off with a base of Wet N Wild Black Creme. When it dried I used Maybelline Color Show Bold Gold and Sally Hansen Silver Sweep and created a water spotted design. Instead of top coating for a shiny finish I opted for NYC Matte Me Crazy. Finally I added some small tear drop shaped rhinestones. 


I love how this design looks, punk rock but still totally in the holiday spirit. 

If you want a better look at how I created these nails, because come on I'm really not that good at explaining myself, head on over to my Instagram (@pinkandpolishednails) I will be posting a video tutorial shortly.

What do you guys think?

Thanks loves :) 

Monday, January 6, 2014

Never let anyone dull your sparkle!

Sparkles.

Does anything else really need to be said? I mean who doesn't love sparkly things?! I was really excited about this prompt because sparkle should literally be my middle name. I add sparkle whenever I can, why? Because sparkles make me smile and smiling is my favorite! ;)
So moving on with the prompt, I was surprised at how much I actually struggled with this one. It's not that I didn't have any ideas, I just didn't know which direction I wanted to go in. I actually had a different mani in mind but once I got half way through and messed it all up I decided that I should go for a simpler route. I really enjoy sparkly gradients so let's do that shall we?! 

I started off with a base of Orly Gumdrops. When that was dry I taped off around my nails and did a glitter gradient using Orly Sparkling Garbage and Orly Bubbly Bombshell. I added a rhinestone on top and finished up with two generous coats of Poshe top coat to give it a great shine. 


My favorite color is definitely SPARKLES! I stared at these nails for so long but unfortunately had to take them off shortly after they were finished... I didn't want to but there was so much glitter on there I knew if I let it dry I'd NEVER get it off lol! 

Take another look at the challenge picture to see what's coming up soon on the blog! 


Thanks lovelies :) 

Tuesday, December 24, 2013

Christmas Eve-icure

What the heck?

How did Christmas sneak up on me so quickly!?!? There are so many Christmas nail designs to be done that will never get done!! T.T I really don't even understand! *sigh* Christmas slow down please! 

At least I have a design for Christmas Eve Day right?! 

I started this look with a bast of Azature White on all or my nails. On the striped nails I used striping tape with China Glaze Santa Red My List, China Glaze Con-Fused?, and China Glaze Angel Wings. For my thumb and ring finger I did a glitter gradient using China Glaze Angel Wings and then applied a red and green rhinestone to the top. I topped is all off with some Poshe and the design was finished! 


Totally digging this look! I'm so sad I have to take it off but sadly I haven't even thought about what my Christmas nails are going to be so I must find time today to figure them out! Suggestions welcome!!! :) 

I hope you are all having a wonderful Christmas season and hopefully you're more prepared then I am!! ;) 

Wednesday, August 14, 2013

Mish Mash Challenge: Metallic

Hi cupcakes!

It's Wednesday so you know what that means right?! Another challenge day for the Mish Mash Challenge hosted by Kimber's Lacquer Korner. :) Today's challenge day theme is metallic. I know exactly what you guys are going to say when you see mine... "another tape mani really?" But hey I didn't know what else to do! And I always love how tape manicures end up so... deal with it yo! ;) 

Anyways, I don't actually own very mani metallic polishes because I don't like them. I don't like being able to see brush strokes and generally I'm just not a big fan of the way they look. But I do have a few and decided to go with a gold, silver, bronze look here.

To start off I painted all of my nails with Sally Hansen InstaDri Silver Sweep. Then I taped off my nails and painted with Maybelline Color Show Bold Gold and ELF Copper. After that I took all three colors and free handed some more triangles on the sides and inside the other ones. Then I used NCY Matte Me Crazy because I like the way metallics look mattified better and added a rhinestone to each and I was done! 


What do you think? I'm so iffy on metallics but I actually kind of liked how these turned out! I think the matte top coat made me like it more too it made the brush strokes less visible in my opinion. 

I can't wait to see what everyone else comes up with don't forget to check them out!
Thanks guys :) 


Sunday, December 2, 2012

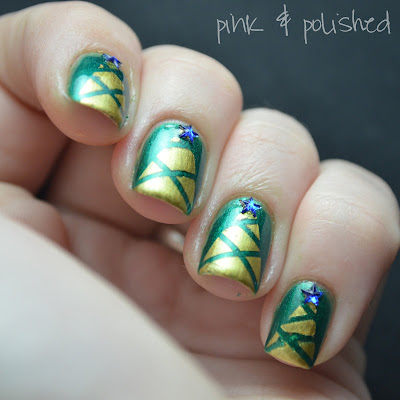
12 Days of Christmas: Christmas Tree

Good morning everyone!!

Today is December 2nd so do you know what that means?! The nail art challenge that Lorene at Over Polished Nails and myself created officially starts!! Woohoo! The first challenge of the 12DoC challenge is Christmas Trees and I knew exactly what I wanted to do. The Christmas tree tape mani that Nailside did a wonderful tutorial of was what I really wanted to try so I gave it a shot!! Check it out :)


Colors used:
- Sinful Colors San Francisco 
- Maybelline Color Show Bold Gold


I didn't even realize my pinky got a little messed up until I started editing these pictures   -_- Oh well! I still think they came out so cute! I wish I had red star rhinestones for the toppers but blue still works well :) 

So what do you guys think?! 

Don't forget to enter my GIVEAWAY! And make sure you check out all of the other bloggers amazing designs today!! I know I can't wait to see them!! 

Thanks for reading :)

Saturday, December 1, 2012

Swirls with Color Club Gift of Sparkle

Happy Saturday guys!

I hope you all are well, I've got a packed day of Christmas shopping and then my family and I are going to get our Christmas tree!! SO excited! Let me tell you there is no better smell then a Christmas tree!

On to the mani! This was another day when I sat down and had no idea what I was going to come up with. The idea spurred off of my mom saying she wanted some doodles on her nails. The first thing I thought of was swirls! So I drew a couple out and came to an idea I really liked! And it gave me a chance to use another one of the Color Clubs Winter Affair polishes woo! So take a look!


Colors used:
- Color Club Gift of Sparkle
- White Acrylic Paint


Loving this one! I don't know if all of you know... but the line of Color Club polishes that Sally's carries is scented... Some of you may like it and some of you, like me, can't stand it! I LOVE the polishes but the scents always give me the biggest headache! Oh well the price of beauty right? LOL

So what do you guys think? 

Once again I'll remind you of my GIVEAWAY and my 12 DAYS OF CHRISTMAS nail art challenge! Press the links and make sure you enter!!!! 

Thanks for reading guys :)