Showing posts with label zoya. Show all posts

Saturday, July 18, 2015

Sail Away With Me

Hi guys!

I haven't done nautical nails on this blog in a really long time, but that's about to change right now with the help of Stick It! Nail Vinyls Straight Vinyls and Sail Boat Vinyls

Let's get this look started!

I started with a base of Zoya Song on all of my nails and sped up the drying process with a layer of Seche Vite. I used Stick It! Nail Vinyls straight vinyls to create the stripes on my index, middle, and pinky nails and painted over them with Sally Hansen Insta Dri Tag, Ur It!. I removed the vinyls and added two dots on the edge of my nails with a dotting tool and LOOK! Nail Color Rockets Red Glare. On my ring nail I placed a straight vinyl vertically on my nail and painted half of my nail with Sally Hansen Insta Dri Tag, Ur It!. I removed the vinyl and added a sail boat vinyl, also from Stick It! Nail Vinyls and painted over it with LOOK! Nail Color Rockets Red Glare. I removed the vinyl and sealed all of my nails in with some Seche Vite and that was it!


I am absolutely in love with these! They were so easy to creat with the help of Stick It! Nail Vinyls (purchase HERE). Nautical nails can be so fun and you can use almost any color combination you can think of! I'm glad I decided to go with the classic color scheme, but I can definitely see myself switching things up in the future!

What do you guys think?

Thanks loves :) 


Friday, July 3, 2015

Happy Fourth of July! (almost)

Happy almost Fourth of July guys!

I know I'm a day early but I think this weekend may be pretty busy and I didn't want to miss out on posting these nails! 

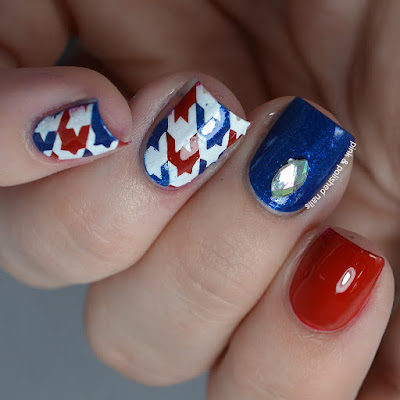
Let me just say, these nails were a royal pain in the ASS! T.T But I absolutely had to finish them and I'm so happy I did because I love them! I think it's a fun take on the classic red, white, and blue manicure... let's see what you guys think :) 

I started off with a base of OPI Big Apple Red on my pointer, Zoya Song on my middle, and no base on my ring, pinky, and thumb. I picked up the houndstooth image (BM-322) on my stamper using Mundo De Unas White. While it was still on my stamper I filled in the holes with OPI Big Apple Red and Zoya Song. I let it sit for about a minute and then I stamped it on my ring nail. I repeated the same process on my pinky and thumb nails. I added a pretty rhinestone to my middle nail and sealed them all in with a layer of Seche Vite. And finally this design was finished!


Oh I am SO happy with these! I had to redo them so many times but I'm telling you it's so worth it. 

And I know I'm pretty bad at explaining things, so I have a video tutorial going up on my YouTube Channel tomorrow so stay tuned for that! ;)

What do you guys think? What are you doing for the Fourth of July this year?

Thanks loves :) 


Monday, January 19, 2015

You've been framed!

I feel like I've used this title before... with every single framed mani I've ever done. Damnit.

Anyways beside the lame-o title, I am LOVING this manicure. Moar blue please! And I get to showcase a super special polish. Keep reading to find out why!

Okay I started off with 2 coats of my super special polish, a polish from an upcoming collection from my brand The Little LacquerBean woohoo! It's a lovely green toned blue with a holographic finish. Yummy! When it was dry I used Zoya Liberty and a small nail art brush to outline all around each nail. When I was finished I sealed it all in with Essie Good To Go to make sure it had a super shiny and even finish. 


Just look at that sparkle! I really enjoy doing framed manicures, they can be frustrating at times when you're working with such thin lines but the effect it gives is totally worth the extra effort. So fun!

What do you think guys? What's your favorite framed mani you've ever done? Link it in the comments so I can take a look!

Thanks loves :) 

Monday, January 12, 2015

Swirly twirly with Zoya Liberty

MOAR untrieds!

Ready for another Zoya PixieDust? Today it's Liberty's turn to shine! Zoya Liberty is just a stunning medium blue. It has a sparkle that is so gorgeous I don't even know how to describe it! This one was in my untrieds for so long because I have heard that it can be a stainer. I doubled up on my base coat before I applied Liberty and had no staining. Just be careful around your cuticles ;) Ready to see what I came up with?

I started off with a base of Zoya Liberty (2 coats). When it was dry I stamped randomly over each nail using Bundle Monster plate BM-426 and Sally Hansen Silver Sweep. I'm not sure what exactly this image is supposed to be but I sure do love it ;) I cleaned everything up and didn't apply top coat because it would ruin the textured effect but after I took my first photos I did end up top coating with Essie Good To Go so you guys can see the shiny smooth yumminess.


This polish. I actually don't even know what to say except I love it SO MUCH. I'm a sucker for blues, when I was younger blue was my favorite color, and this one is just the blue of my dreams. And when it's top coated the sparkly really comes alive. Definitely drool worthy.

What do you guys think? What's your favorite blue polish?

Thanks loves :) 

Thursday, January 8, 2015

An orange a day with Zoya Destiny

Moving on with my untrieds, I have Zoya Destiny. I'm not going to lie I was SO excited to use this color. It's actually not necessarily an untried since i've used it once before but I never posted it up on the blog so it doesn't really count right? LOL

Zoya Destiny is a juicy golden orange polish, so sparkly! Destiny is a PixieDust polish so it dries textured and I actually quite like that. This was also my very first textured polish I ever bought and it was the perfect one to start off with. I love that it doesn't feel really gritty, and it doesn't catch on stuff like some textured polishes do. And if you top coat it, the depth of this polish is amazing! Want to take a look at what I came up with?

I started off with a base of Zoya Destiny (2 coats). When it dried I stamped over it using Bundle Monster BM-308 and Maybelline Color Show Bold Gold. I cleaned up and didn't apply top coat because that would ruin the textured effect. But after I took my first photos I did end up top coating it with Essie Good To Go so you guys can see the depth that this polish has. 


I'm not really an orange person. Unless it's neon orange I probably won't use it. But this is the exception to that. Zoya Destiny is really such a beautiful orange you can't help but fall in love with it. And when it's top coated, man it's just stunning! I thought that an orange stamp would be perfect to compliment this polish because I mean... orange... oranges... perfect right?! LOL 

What do you guys think? What's your favorite orange polish, if you have one that is. 

Thanks loves! :)

Tuesday, January 6, 2015

Golden Chevrons with Zoya Feifei

As I sat down to paint my nails the other day I really wanted to use some colors that I haven't tried before. I always seem to reach for the same colors so my untried list is rather large and when I opened up my drawers I realized that my Zoyas get almost no love. What?! Why don't we change that, like NOW.

The first shade that I grabbed was Zoya Feifei. What a wonderful and unique polish. It's an icy blue foil with so many different gold / copper based micro glitters which gives this polish an almost duo chrome effect. So lovely. I knew I wanted to pair this up with some gold art so I hope you guys like what I came up with!

I started of with a base of Zoya Feifei (3 coats for full coverage). When it was dry I used Bundle Monster plate BM-423 and Maybelline Color Show Bold Gold and stamped over each nail. For a little extra fun I used plate BM-317 and Sally Hansen Silver Sweep and stamped the little bow image on my ring finger. I sealed it all in with Essie Good To Go and that was it. 


I love how well the gold stamping compliments this polish. It's a little difficult to see in the photos but the copper / gold micro glitters were really prominent in real life. And I just think that little bow is too damn cute ;) 

What do you think guys? What is your most untried brand?

Thanks loves :) 

Sunday, September 28, 2014

31DC2014 Day 28: Inspired By A Flag

Ahoy!!!

The prompt for today's 31 Day Challenge 2014 is Inspired By A Flag. I was going to do the American flag but looking back on my manicures I've done at least two American flag manicures so I really wanted to change it up this time so......... PIRATE FLAG! I can't believe I never thought of doing this before, I love pirates and pirate flags! Want to see what I came up with? Keep on reading then :)


I started with a base of Essie Blanc on my pointer nail, Maybelline Color Show Bold Gold on my middle, Wet n Wild Black Creme on my ring, and OPI You Don't Know Jacques! on my pinky. On my pointer I used OPI Big Apple Red for the stripes and then I took Zoya 18K and E.L.F Gold Star to create the "gold" on my middle. I painted the skull flag on my ring using white and light grey acrylic paint and finally I painted the peg leg wood pattern with NYC Royal Chick. I sealed everything in with a generous layer of Essie Good To Go and that was it!


Love, love, love this! The only thing that I don't like is that my pirate skull looks a bit too happy... ;) LOL But really, I need to do more pirate themed manicures, it's just too much fun! 

But now it's your turn! Post a link to your 31DC2014 Inspired By A Flag nails in the comments so I can see!! 

Thanks loves :) 

Friday, July 11, 2014

Primary color block negative space nails

I've been itching to do some more negative space nails and what's more fun then using some bright, bold colors?! 

I know these nails don't really look much like negative space nails, trust me I know lol. But there is a tiny little sliver of naked space between each color so I guess that counts right?! I meant to make the spaces bigger but I kept having to go back and straighten out lines and well, this happened ;) 

I started with some good old nekkid nails and then took some white acrylic paint and drew out the 'blueprint' of my design. When the paint dried I went back with OPI Big Apple Red, Sally Hansen InstaDri Lightening, Zoya Song, and China Glaze Orange Knockout. I cleaned up the lines and made sure there was still some naked nail showing through and finished off with a generous coat of Essie Good To Go


These nails were so fun to wear! I loved the bright primary (besides orange ;)) colors! I just wish I made the spaces a little wider but oh well, better luck next time right?! 

What's your favorite negative space manicure?

Thanks loves :) 

Sunday, July 6, 2014

Design Seeds inspired watermarble

So I forget which blog I read this on, but they mentioned something about this site called Design Seeds. Clearly curiosity killed that cat and I couldn't live with myself if I didn't check it out and I'm so glad that I did.

Design Seeds is a color palette site. It shows you what colors work well together and helps give you inspiration for different color combinations. It has been my saving grace! I always used to have trouble trying to figure out what colors went well together and what colors did not. As a result I usually mixed colors with neutrals and it made me sad because I would always see these beautiful colorful manis everywhere and just wanted mine to be that colorful! Well now, with the help of Design Seeds my manicures will me more colorful then ever ;) 

It's funny I say that though because this particular design only combines one color and a bunch of neutrals.... hey they can't all be crazy right?! LOL! Let's get on with it shall we?

I started with a base of Lime Crime Milky Ways for the base of my water marble. Then I marbled using Maybelline Color Show Clear, Essie Penny Talk, Orly Gumdrop, and Zoya Zuza. I really love how Essie Penny Talk separated, I think all metallic polishes may do that, but it creates such a cool effect! I sealed it all in with some Essie Good To Go and the design was finished. 


I really enjoyed the look of this watermarble, it's so unique. And so what if the lines aren't perfectly smooth! That's what gives it character ;) 

What's your favorite watermarble color combination?

Thanks loves :) 

Monday, March 17, 2014

St. Patrick's Day Pot O'Gold Mini Leopard Nails

Happy St. Patrick's Day cupcakes!

I don't really celebrate the holiday myself but it sure is fun to create some nail art for the occasion! Green is not usually a color that I reach for... I don't know why really, I love green, but it's not my first choice for manicures, weird. 

But, St. Patrick's Day is the perfect time to remedy that situation :)

For this particular design I really wanted to try my hand at some mini leopard print, and surprisingly enough it didn't turn out too bad! 

I started with a base of Essie Blanc and then created the gradient using Zoya Mitzi, China Glaze I'm With The Lifeguard, and China Glaze Con-Fused?. When that was dry I created the mini leopard print with black acrylic paint and the spots with Essie Penny Talk. I top coated with some Poshe and I'm ready for St. Patty's Day!


I'm actually really surprised that these didn't take that long, I finished them in around an hour and a half. And as far as this being my first attempt, I'm very happy with them! But there's plenty of room for improvement and I'm looking forward to tacking these again. :)

What do you think guys? What are you doing for St. Patrick's Day?
Thanks loves :) 

Tuesday, December 31, 2013

New Year's Eve dotticure

The end of 2013 is finally here...

With the new year comes looking back upon the life we've lived the year before and new resolutions for the year ahead. Me? I have to say I'm more then ready to see 2013 go. I seem to reflect a lot around this time of year and they don't say 13 is unlucky for nothing. This year has been the luckiest unlucky year of my life (if that makes any sense ;)). 2013 has been the biggest life changing year I've had. My ex-boyfriend of 5 years committed suicide in February and that was the hardest thing I've ever had to deal with. I went from being on top of the world to having nothing. Then when I tried to make something from all of the nothing his family turned on me. There was a whole lot on my plate, and no one to help me clean it. But it made me a stronger person and through the pain I found something precious, love. I found someone who takes my pain and fears away and always knows the right thing to say when I'm feeling like the world is crushing me. He is honestly the most caring, thoughtful, and loving man I have ever met and I consider myself one of the luckiest girls alive. I'm sure you all don't want to hear the sappy ;) but there's something very special about him, he's the one who showed me how to smile and laugh again when I thought I never would. He is the one who shoved me in the right direction and inspired me to follow my dreams; dreams that lead me to getting my nail tech license and never letting me give up on this blog. He knows me, and he knows what I love most, nail polish! 

Speaking of nail polish, I'm sure you guys are done listening to my little reflection so let's move on to what you're here for! For my New Year's Eve manicure I wanted to do something a little different from the usual, black, gold, and silver... even though I absolutely love that combination! I've been feeling teal colors lately so I decided to switch out the silver for some teal and I haven't done a dotticure in far too long so I'm going to fit one more in before the year is finished!

I started with a base of Wet'n'Wild Black Creme. When that was dry I added the dots using China Glaze Mingle With Kringle and Zoya Zuza. For my ring I made a stripe of China Glaze Mingle With Kringle down the center of my nail and lined it with Zoya Zuza on either side. Then with acrylic paint I painted "MMXIV" [2014 in roman numerals]. I top coated it all with Poshe and I'm ready to partay!! ;) 


And here's a little extra picture, just because I'm in the sappy mood ;) When my boyfriend asked me out he actually painted it on his short little nails in pink polish! He used China Glaze Pool Party, my favorite neon pink! Awwwwww ;) Excuse the poor condition of his hands, he's a diesel mechanic and this is about as clean as they get with scrubbing LOL! 


2013 has come and almost gone, I'm much stronger then I was when it started and I'm jumping into 2014 and chasing my dreams. Who knows, maybe I'll catch some this year ;) 

Thanks for always sticking it out with me guys, my blog is a source of true happiness for me and I hope that sometimes I can brighten your day too. :) 

What's your New Year's resolution?

Wednesday, October 30, 2013

Mish Mash Challenge: Pink

Hello pumpkins!

Happy Wednesday!!! I don't know about you guys but this week is literally FLYING by! My blogging schedule is all messed up, I usually have Tuesday and Wednesday off so I paint my nails and get prepared for the challenge on Tuesday and work on blog stuff on Wednesday. Well, I went to a hair and nails expo with my school on Monday so I had to work Tuesday to make up for lost time and man am I all over the place today! So I'm sorry that this post is a bit late :( I had to paint them, edit them, and write the post right now! At least they are up now because I love them! 

Todays theme is pink and with Halloween being tomorrow I really wanted to do a cute pink Halloween design. What's cuter than girl skulls with bows?!? Nothing that's what! ;) 

I started this design with a base of Lime Crime Parfait Day. I painted the skulls and chest with black and white acrylic paint. I painted the bows and heart along with my thumb with Zoya Kimber and OPI This Gown Needs A Crown. And I painted the bones with black and white acrylic paint as well! :) 


Even though this design was kind of rushed I still really love it! It's so cute and girly but still Halloween-y! I'm really glad that I managed to get this design out on time and I can't wait to see what everyone else does for today's challenge! Make sure you check them all out! :) 

Thanks so much loves!! :) 


Sunday, August 25, 2013

Inspiration Nation: Glitter Tips

Hey chickies!

Ready for another Inspiration Nation post? My inspiration this time comes from another blogger that I follow like... religiously lol! She's super sweet and her nails are always flawless! Not to mention she's so talented!! I'm talking about the lovely Marta from Chit Chat nails :) Marta is pretty well known for her skittlette manis but she does something else that I really love.. faded glitter tips! She's done a bunch of them and every time I see one I drool all over my keyboard! She's actally written up a tutorial for how she does them too. 

To start this mani I did two coats of an unnamed sheer pink polish... It was just one of those weird ones I got in a package at some store. But it works great to make my nails look unstained so I'll take it! ;) Then I took a make up sponge and ripped it in half so I had a little bit of a jagged edge. I do this so the color gradient part isn't such a straight, cut off line. Then I did the gradient tip with Zoya Zuza, a beautiful shimmery teal. When that was dry it took Orly Mermaid Tale and placed the glitter from the tip of my nail all the way to the middle. Finish off with some top coat and you're good to go!


Not only is the final result super pretty but it's actually really easy and not time consuming. Tips like these will definitely be making a repeat appearance on Pink & Polished so I hope you like them! ;) 

Thanks loves!

Wednesday, August 21, 2013

Mish Mash Challenge: Nail Art Technique You've Never Tried

Hi chickies!

Happy hump day! You know why I like Wednesdays so much? Because it means another challenge day from the Mish Mash Challenge hosted by Kimber's Lacquer Korner! Yay!!! Today's theme was something kind of cool: a nail art technique you've never tried before. There's a million and one different nail art techniques I haven't tried yet so I was pretty excited for this day. I knew whatever I chose would be challenging, and it was ;), but I always love a good challenge!

I've been seeing water spotted nails floating around the blogosphere a lot lately and knew I had to try it out. Water spotted nails always seem to make me think of one idea, turquoise stone nails. YES! 

I was correct in thinking that this would be difficult though -_- I followed the tutorial from Lacquerstyle she made it super easy to follow! And even though they didn't really end up looking like turquoise stones I still quite like them! ;)

I started with a base of Zoya Zuza on all of my nails. Then I ripped up a makeup sponge and lightly sponged Sinful Colors Mint Apple randomly. When that was dry I used a new piece of the sponge to dab on Sally Hansen Golden-I randomly as well. Then I put a drop of Wet n Wild Black Creme in a cup filled with water and sprayed some hairspray on it to create all the holes in the water. I dipped each finger in quick to get my design. Top coat with some Poshe and this design was ready to go! 


Why is this so blurry?!?!? -_-
And to make it look even more rock-like I added NYC Matte Me Crazy to take away the shine. I really like it this way!


I wouldn't necessarily call this a 'fail', more like a 'needs improvement' ;) But that's ok because practice makes perfect right? And even though it was a bit frustrating and they didn't really turn out looking like turquoise stones I still think the final effect is pretty cool!

Have you tried water spotted nails yet? What's your favorite color combination? 
Thanks guys and don't forget to check out everyone else's designs I can't wait to see what everyone comes up with!