Showing posts with label silver. Show all posts

Sunday, August 2, 2015

Bubbly, bubbly, bubbly

Hi guys! 

I was trying out some new vinyls from Stick It! Nail Vinyls and I was so excited to use these bubble ones. Whenever I think about bubbles I think about Finding Nemo... am I the only one? LOL Anyways, I really love this combination, check it out and let me know what you think!

I started off with a base of Goombay Girl Holy Holo and added a layer of Seche Vite to speed up the drying process. Then I placed the bubble vinyls from Stick It! Nail Vinyls on my index, middle, and pinky and painted over them with China Glaze Turned Up Turquoise. I quickly and carefully peeled the vinyls off while the polish was still wet and sealed them in with one more layer of Seche Vite. One my ring I added two coats of H&M Jo Is In The House and sealed it in with a layer of Seche Vite


This combination is so fun! I've been really loving turquoise and mint polishes lately so this is just perfect ;) 

What do you guys think?

Thanks loves :) 

Thursday, July 16, 2015

Goombay Gal Nail Lacquer Holy Holo

Hoooooly Holo! *.*

No for real guys! I've got a polish that I can't wait to show you, it's from Goombay Gal Nail Lacquer and it's called Holy Holo and I have to say it's so aptly named! 

Holy Holo is a stunning silver holographic polish that just seems to glow from within. Even in the shade this polish has so much depth to it it's incredible! The formula was buttery smooth and it was fully opaque in just two easy coats. I'm very impressed, and slightly obsessed ;) Swatches below are two coats with top coat.

*UPDATE* after doing some research I've found that Holy Holo is actually a mood changing thermal polish! Mine never changed but I'll keep you updated as try to see if I can get it to ;) 


GAWD! I can't even get over it, this polish is so gorgeous! You can see the depth so well in the first swatch photo which was taken in indirect light, look how it almost sparkles right in front of your eyes! 

This is my first experience with Goombay Gal Nail Lacquer and I have to say that I am really pleasantly impressed. Goombay Gal Nail Lacquer retails for 9.99USD and can be purchase HERE! Make sure you stay up to date with Goombay Gal Nail Lacquer by following her:


What do you guys think?
*products in this post were provided by Goombay Gal Nail Lacquer in exchange for my honest opinion. For more information see my disclosure policy.

Thanks loves! :) 

Friday, June 26, 2015

Patriotic Dotticure

July 4th is quickly approaching and you know that that means, red, white, and blue nails!!! Whoop whoop I love me a good patriotic manicure.

And anyone can create this one!

I started off with a base of OPI Bubble Bath. Then I used LOOK Nail Color Rockets Red Glare, Broad Stripes Bright Stars, and Oh Say Can You See, OPI This Gown Needs A Crown, and a dotting tool to create the dotticure. I sealed it all in with a layer of Seche Vite and that was it!


This was so super easy to create and I'm absolutely in love with the final results! This is a great design to do if you're short on time because it took me about 20 minutes from start to finish. And come on, they're SO COOL! 

What do you guys think?

Thanks loves :) 

Friday, June 19, 2015

Holographic neon tribal

Hi guys! 

I can't handle this much awesomness! Holo, neon, glitter, tribal, pink.... WHAT DO I DO?! 

This is the manicure of all manicures that I've created, I've never had so many things that I love in one single design. I DIE! 

Whoops, I went all crazy nail polish lady on you guys for a minute there ;) 

But for real doe, this design is killer!

I started off with a base of Orly Mirrorball (shield your eyes from the beauty T.T) When Mirrorball was dry I applied some tribal nail vinyls from Snail Vinyls and painted over them with China Glaze Pool Party. I peeled off the vinyls and sealed everything in with Seche Vite to finish it off!


These nails are so incredibly simple but crowd stopping! If they don't notice the blindingly bright neon they'll definitely notice that rainbow sparkle! 

What do you guys think? Do you think I'm crazy yet? Or just crazy enough?

Talk to you next time loves :)

Thursday, June 18, 2015

Orly Mirrorball

Yo are we for real right now?

Like really, really real? Anyone younger then 16 use your ear muffs er..... eye muffs for a minute.

---------------------

THIS SHIT IS FUCKING THE SHIT. Peace, I'm dead X.X

---------------------

Okay you can take your eye muffs off now I'll try to behave ;) 

So I've finally jumped on the Orly Mirrorball train and let me just tell you guys, if you're here and reading this and don't have one of your own Orly Mirrorballs.... GO GET ONE. 

Orly Mirrorball is a stunning silver holographic polish with small silver holographic glitters that combine into the sweetest of melodies. For being a mainstream brand I am extremely impressed with this polish, most mainstream companies don't do super holographic / glitters like this, Orly you've really outdone yourself with this one. With a formula as smooth as butter and full opacity in just two simple coats, this is one for the books I'm telling you.... whatever that means. My swatches below are two easy as pie coats with top coat, I'm warning you now though, proceed at your own risk, I am not responsible for empty wallets after you see these photos ;) 


Can you just look at it? Can you even stand it? GAWD I can't even. I can't get over this color honestly and the amazing formula is just the icing on the cake. 

Mirrorball is notoriously difficult to find, it's almost always sold out at Sally's Beauty Supply but if you're lucky, just lucky enough, you'll find one. And you better cherish it like it's your long lost child ;) 

What do you think guys? Is it beautiful?!


Thursday, June 11, 2015

Geometric Color Blocking

Color Blocking. Is. AMAZING!

I love this technique. It's so simple but you can create such amazing designs with it. Versatility at it's best. 

I decided to take the simpler route this time, wanna see?

I started out with a base of Essie Blanc. When that was dry I painted half of each nail Essie Boom Boom Room and then applied a layer of Seche Vite to speed up the drying process. Once my nails were fully dry I tape off each nail leaving a long triangle in the center. I painted over it with OPI This Gown Needs A Crown and immediately peeled off the tape. To finish it off I added a layer of NYC Matte Me Crazy to give this design a fun matte look.


I love how simple this look is but SO many people noticed them! Sometimes simpler is better right?

What do you guys think?

Thanks loves! :) 

Monday, June 8, 2015

Fan Brushed

I don't know why I don't use the fan brush technique more often. It's so easy and the final results are always too freaking cool! 

I decided to try out the LOOK Nail Color polished for nail art, I'd like to see how they marble but I had this idea in my head first and man I'm so glad I gave it a shot because I'm in LOVE!

I started with a base of LOOK Nail Color Broad Stripes Bright Stars. When it was dry I used the fan brush technique with LOOK Nail Color Rocket's Red Glare and Oh Say Can You See. And because I thought it needed just a little extra something, I added a ruffian of dots with OPI This Gown Needs A Crown. I sealed everything in with a layer of Seche Vite and that was it!


This look is so fun and I absolutely love this color combination! I great way to wear red, white, and blue without looking like it's 4th of July every day, not that that's ever a bad thing ;) 

What do you guys think?

Thanks loves! :) 

Monday, May 18, 2015

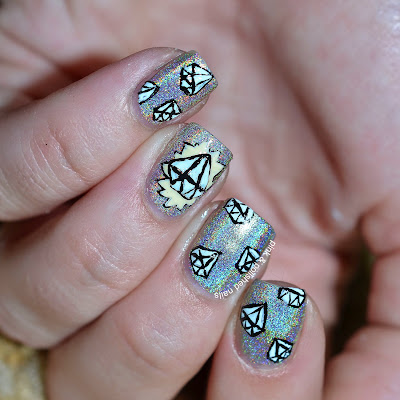
Shine Bright Like A Diamond

I am obsessed with this nail polish!

DUH! I mean I'm obsessed with all nail polish but this one is special. ILNP Mega(S) has been on my need to have list forever and I finally got my hands on it! And guess what?! It's everything I ever dreamed of and more! <3

ILNP Mega(S) is an intenst linear holographic silver polish. It's sheer on the first coat build builds up nicely to completely opaque in three coats. The formula is so buttery smooth and, this being my first polish from ILNP ( I know shocking right?!) I have to say I'm super impressed. 

This polish was just screaming for some diamond nail art because it's so insanely sparkly! So give it what it wants right? 

I started with a  base of ILNP Mega(S) and when it dried I created the diamonds using various acrylic paints. I sealed everything in with a layer of Seche Vite and that was it! 


Don't ever forget to always shine bright like diamonds <3

Thanks loves :)

Monday, March 30, 2015

Tear Drop Patterned Nails

I've been so into abstract / patterned nails lately. It's really renewed my love of free hand nail art and I'm so glad because I am SO proud of these nails! I got my inspiration for this abstract tear drop design from a pattern on Pinterest, are you ready to see what I came up with?!

I started this design off with a base of Color Club Nail Robi on my middle and ring fingers, Maybelline Color Show Iced Queen on my index, and OPI This Gown Needs A Crown on my pinky. I created the tear drop design using white and light purple acrylic paints and a small flat nail art brush. I sealed everything in with a layer of Seche Vite and that was it.


I really am just so in love with these nails! I realize that I say that with almost every design but I'm totally serious this time!!! I definitely want to try this pattern again in some different color combinations. When kind of colors would you guys like to see?! I'm thinking a pretty mint with black and white tear drops!

Keep an eye out on my Instagram and YouTube Channel for tutorials on this look a little bit later!!

Thanks loves :) 


Tuesday, February 17, 2015

Twinsie Tuesday: Match Your Nails to Your Purse

UGH.

I'm late for Twinsie Tuesday.... again -_- I was so hoping that I would be on time today but things got in the way of me making this post up yesterday and I had to work today so I'm writing it up now at 530pm.... sigh. I'm sorry guys but hey, at least I got it up in the same day! LOL 

The theme for today's post is match your nails to your purse. I got super excited about this post because I love my purse and then super sad because I realize that I don't have a polish that matches my purse. Boooooooooo! But I matched it up at close as I could so I hope you guys like it!

I started off with a base of Sally Hansen Presto Pink. When it was dry I took a small nail art brush and OPI This Gown Needs A Crown and painted on my small curved 'C' shapes. I sealed it all in with some Seche Vite and that was it!


I didn't think that I would like these nails because I wasn't a huge fan of this pink polish but I was actually surprised to find that I really enjoyed wearing these. I love the way the silver curves and snakes it's way through the pink, it's very visually aesthetic to me. But I'm probably base ;) Let me know what you guys think in the comments!

And don't forget to check out everyone else's purse matching nails, I know I can't wait to see what everyone has done!


Alaina at The Little Canvas
Amanda at Amandalandish
Amanda at Fashion Footing 
Amber at Nails Like Lace 
Bridget at A Painted Nail 
Chelsea at Nailed Blog 
ChiChi at I'm Just Me...ChiChi 
Jessica at Blue Velvet Lacquer 
Kristine at Pink and Polished Nails 
Lakeisha at Refined and Polished 
​Lisa at The Polish Playground 
Marisa at Polish Obsession 
Róisín at Cuti-CLUE-les 
Savannah at Addicted to Polish 


Thanks loves :)

Sunday, February 1, 2015

Midnight Tips

There's something about winter that always makes me reach for a blue polish. Maybe because I associate blue with cold, or maybe because I just like the color blue. Whatever it is I love creating manicures with some blue in them like this pretty duo below! Wanna take a look?

I started out with a super secret polish from The Little LacquerBean, details to emerge soon! ;)  When it was dry I used some hole reinforcement stickers and placed them near the free edge of my nails. Then I used Sally Hansen Silver Sweep and painted over the exposed part. I peeled off the stickers, cleaned up, and top coated with some Seche Vite


I love the simplicity to this manicure, it makes it feel so clean. And this blue is just yummy! I usually find myself reaching for lighter blues but every once in a while a deep mysterious blue is just what I need!

What do you think?

Thanks loves :) 

Tuesday, January 27, 2015

Twinsie Tuesday: Recreate A Celebrity Manicure

Hi guys!

My Twinsie Tuesday post is a little late today I'm sorry! I'm in Massachusetts and as most of you know we're getting slammed with a blizzard right now and it's been keeping me pretty busy shoveling and all that good stuff. But, I've got some down time now so I have my post up finally!

The theme for this Twinsie Tuesday is Recreate A Celebrity Manicure. One of my absolute favorite celebrities for nail art is Katy Perry. She always has something crazy on her nails and I fell in love with THIS disco ball design. It seemed pretty easy, but it was a little time consuming ;) Ready to check out my version?!

I started off with a base of Sally Hansen Silver Sweep. When it was dry I used my small silver rhinestones and Essie Good To Go and applied each one. I didn't top coat after because I quite liked the rough look! 


So.... things not to do: DON'T use a fast drying top coat to apply the rhinestones, it takes a lot longer.... -_- LOL Oh well I really actually love the way that these came out! I'm a notorious picker though so I knew they wouldn't last long on my nails. But they sure were fun while they lasted ;) 

What do you think guys? Are you braving the blizzard too?! Show me some pics of the snow! And don't forget to check out everyone else's Twinsie Tuesday posts! I can't wait to see them!

Thanks loves :) 


Savannah at Addicted to Polish
Róisín at Cuti-CLUE-les
Marisa at Polish Obsession
Lakeisha at Refined and Polished
Jessica at Blue Velvet Lacquer
Chelsea at Nailed Blog
Bridget at A Painted Nail
Amber at Nails Like Lace
Amanda at Fashion Footing
Amanda at Amandalandish
Alaina at The Little Canvas

Saturday, January 17, 2015

Pink & Patterned

I'm still obsessing over Seche Audacious...

I mean come ON did you even see what a gorgeous bright fuchsia it is?!? Seriously it could be one of my all time favorite polishes and it's not even holographic so that means a lot!

Anyways I knew as soon as I put it on my nails that I wanted to pair it with a sliver polish because pink and silver is just, my life. Pathetic? Maybe but YOLO! ;) (sorry I swore I would never use that word on here.... OOPS) Okay it's time for why you guys are really here, nails!!!

I started off with a base of Seche Audacious. When it dried I stamped over each nail using Bundle Monster plate BM-319 and Sally Hansen Silver Sweep. I cleaned up the excess, top coated with Seche Vite and that was it. Simple and easy!


I am loving this manicure so much! It's so simple, it took me literally a half hour to complete, but the final product is just wonderful. The silver really pops against the bright fuchsia for a super fun effect. 

What do you think?

Thanks loves :)