Showing posts with label nautical. Show all posts

Sunday, July 26, 2015

Girly Nautical Nails

Summer is the perfect time for some nautical nails and lately I just can't get enough! Especially when they're cute and girly like these ones <3

Let's just get right to it because I'm SO excited to show you guys these!

I started with a base of Essie No Baggage Please and applied a layer of Seche Vite to protect my polish from the vinyls. Then I used Stick It! Nail Vinyls Wave Stencils and painted over it using China Glaze Too Yacht To Handle. I removed the vinyls and then added Stick It! Nail Vinyls Heart Anchor Vinyls to my middle and ring nails. Finally I sealed it all in with one more layer of Seche Vite and that was it!


Oh goodness I am just in LOVE with these! This is one of my all time favorite color combinations and I think it works so well with this design.

What do you guys think?

Thanks loves :) 

Saturday, July 18, 2015

Sail Away With Me

Hi guys!

I haven't done nautical nails on this blog in a really long time, but that's about to change right now with the help of Stick It! Nail Vinyls Straight Vinyls and Sail Boat Vinyls

Let's get this look started!

I started with a base of Zoya Song on all of my nails and sped up the drying process with a layer of Seche Vite. I used Stick It! Nail Vinyls straight vinyls to create the stripes on my index, middle, and pinky nails and painted over them with Sally Hansen Insta Dri Tag, Ur It!. I removed the vinyls and added two dots on the edge of my nails with a dotting tool and LOOK! Nail Color Rockets Red Glare. On my ring nail I placed a straight vinyl vertically on my nail and painted half of my nail with Sally Hansen Insta Dri Tag, Ur It!. I removed the vinyl and added a sail boat vinyl, also from Stick It! Nail Vinyls and painted over it with LOOK! Nail Color Rockets Red Glare. I removed the vinyl and sealed all of my nails in with some Seche Vite and that was it!


I am absolutely in love with these! They were so easy to creat with the help of Stick It! Nail Vinyls (purchase HERE). Nautical nails can be so fun and you can use almost any color combination you can think of! I'm glad I decided to go with the classic color scheme, but I can definitely see myself switching things up in the future!

What do you guys think?

Thanks loves :) 


Tuesday, September 17, 2013

Feeling crabby

Crabby?

Nahhh I don't mean I'm a grump today but there's a cute little visitor on my ring finger ;) 

I haven't done nautical nails in almost a year. Back when I first started I came out with these babies and I was darn proud of them!! So I figured it was time for another go at some nautical nails and I'm wondering why I waited so long!

I started with a base of OPI My Boyfriend Scales Walls and then painted some free hand thick stripes with some navy blue acrylic paint. On my ring finger I took some red, white, and black acrylic paint to draw out my little crabby friend :) Top coat it all with some Poshe and I was good to go! 


I like how the lines aren't really crisp this time because I feel like it gives is a more 'sea-like' feel.... if that makes any sense at all -_- I'm definitely going to do some more nautical nails in the future... maybe with some anchors! ;) 

Thanks lovelies!

Friday, September 28, 2012

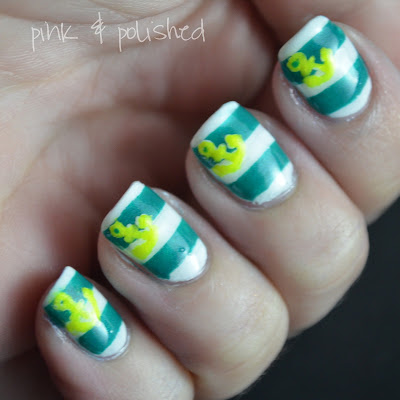
Nautical-ish?

Hello!

I've got some nautical-ish themed nails for you guys today :) I say ish because they aren't the normal colors many people use for nautical themes but oh well! I really like how they came out take a look for yourselves :)


I used some striping tape to make the stripes and a toothpick to make the anchors.


Colors used:
- Finger Paints Paper Mache
- Spoiled Distant Memory
- China Glaze Sun-Kissed


My free-hand art is getting a little better right?? :) What do you guys think??

Thanks for reading :)