Showing posts with label teal. Show all posts

Friday, May 15, 2015

Simple Cool Dotticure

Ever create a refreshing mani? One that reminds you of splashing in the water on a hot summers day? Yeah.... this is it for me! I love this blue teal purple and black color combination it's so delicious and perfect for the sweet summertime.

I started off with a base of China Glaze Too Yacht To Handle and then created the dots using Wet n Wild Black Creme, China Glaze DJ Blew My Mind, and China Glaze PLUR-ple. I sealed everything in with some Seche Vite and that was it!


You really can never go wrong with a dotticure, there's so many different looks you can create with just one simple tool. It's also a great way to get some creative juice flowing if you've run into a nail art block because it's so easy and mindless and you can create stunning designs!

This look is no exception either, this color combination just screams summertime!

What do you guys think?
Thanks loves :) 

Saturday, April 11, 2015

Watercolor Nails

Happy Saturday! We've made it through another work week hallelujahhhhh.

I've had 0 time to paint my nails lately and I'm dying on the inside! I've got so many ideas floating around and just absolutely no time to try them out T.T But one idea I did have a chance to create was this watercolor design, and thank goodness ;)

I started off with a base of Sinful Colors Snow Me White on all of my nails. When my base was dry I thinned out some blue, purple, and teal acrylic paints with water and painted them all over my middle and ring nails. When they started to dry I used a brush and q-tip to suck up the remaining watered down acrylics leaving a watercolor effect and then added three small dots on the sides. I taped off my index and pinky and repeated the same process. I sealed everything in with a layer of Seche Vite to finish this design.


Oh watercolor nails how I love you so! I'm not sure I got the technique down the best this time so I'm absolutely going to be trying this design out again. I really enjoyed the way that they came out though, even if they were TOTALLY a pain in my ass. -_- 

Pain is beauty that's what they say right? ;)

What do you guys think?

Keep an eye out on my Instagram and YouTube Channel for tutorials on this look later today!

Thanks loves :) 

Tuesday, March 10, 2015

Twinsie Tuesday: Soft and Feminine

I'm late for Twinsie Tuesday AGAIN T.T

This time it's not entirely my fault I swear! I've been sick this weekend and I was going to write up my post yesterday but my computer decided that it didn't want to work. I was trying to download the new version of iMovie and it just completely shut down my computer. Technology right?? But it's all settled now so I'm finally writing up my Twinsie Tuesday post woohoo!

The theme for today is soft and feminine. I'm super excited about this post too because I really wanted to try out this one stroke ribbon method I saw Madamluck do on Instagram. Man, it's way harder then I thought it would be to do! But I figured it out and I can't wait for you guys to see what I've come up with!

I started out with a base of Sinful Colors Snow Me White. Then I created the ribbons using a pink and lighter pink acrylic paint. I outlined the edge with a slightly lighter pink acrylic paint and created the dots using two different teal acrylic paints. Finally I sealed everything in with a coat of Seche Vite and that was it!


So they OBVIOUSLY didn't come out as good as Madamluck's did (she's a goddess!!) But I'm quite proud of these ribbon nails and really want to revisit this technique again soon.

What do you guys think? What color combination would you like to see?

Don't forget to check out everyone else's Soft and Feminine nails, I can't wait to see what they've all come up with!


Róisín at Cuti-CLUE-les
Marisa at Polish Obsession
Lakeisha at Refined and Polished
Jessica at Blue Velvet Lacquer
Chelsea at Nailed Blog
Bridget at A Painted Nail
Amber at Nails Like Lace
Amanda at Fashion Footing
Amanda at Amandalandish
Alaina at The Little Canvas

Thanks loves :) 

Monday, March 2, 2015

Squared Ruffian

Ruffian manicures are fun, but squared ruffian manicures are even better!!

I'm always on the lookout for new ways to do different designs and recently I saw a post from The Nailasaurus and her nails were a gorgeous squared off ruffian design and I absolutely fell in love! I knew I needed to try my hand at it and I have to be honest, it's amazing! So many different color combinations are running through my head now and I can't wait to use this technique again! Keep reading to see what I came up with.

I started off with a base of Essie Bikini So Teeny. When it was dry I used a small nail art brush to map out the square with Color Club Miss Bliss and then filled in the inside of the square, you can also just use the brush that is with the nail polish to fill in the square, it's much faster LOL!  I then took the same small nail art brush to create the outline of the square with Essie Trophy Wife. I finished this design off with a layer of Seche Vite to seal everything in.


I am really so happy with the way these came out. It's such a fun and geometrical design and I love the way the straight lines contract with the small curve of my free edge. What do you guys think of this look? Do you have any color combinations you would like to see?

Thanks loves :) 

Friday, February 27, 2015

Jewel Toned Stained Glass

Jewel toned nail polish... YUM.

There's something so satisfying when jewel tone nail polishes come together. They compliment each other so well and the end result is so deep and gorgeous.

I've been wanting to try making decals using my stamping plates and I thought this stained glass idea would be a great idea to try. Besides taking FOREVER, I really enjoyed the process and I am in love with the outcome! Want to see what I came up with?

I started by painting my nails with Enchanted Polish June 2014... actually it was an old mani, but it still works ;) Then I used Bundle Monster plate BM-208 and WetnWild Black Creme to pick up the image. While it was still on my stamper I filled in some holes using Color Club Kismet, The Little LacquerBean Blue Ribbon Baby, LynB Designs Teal The Cows Come Home, and LynB Designs Nightmare Revisited. When I finished filling in the holes I took my Sech Vite and painted over the entire design. I let that dry completely and then took some tweezers and loosened up the edge of the image. When the edge was loose I used my tweezers again to grab it and slowly peel it off of my stamper. I put a coat of Seche Vite on my nails and laid the decal over top. I then got rid of the excess with my cuticle clippers and cleaned it up with a brush dipped in acetone. Finally I finished it off with one more layer of Seche Vite


So. In. Love. It was a bit more difficult then I anticipated to do, as you can see by my messy lines in my macro ;) But that was my first nail and the rest got progressively better I swear! The hassle was definitely worth it in the end though because I mean just look at it! Look at all those jewel toned polishes!! 

I know I'll be revisiting this technique again really soon, is there anything that you guys want me to do?

OH! And I've decided to start filming tutorials again! I love filming them for you guys but life got a little bit crazy and I just didn't have the time. Thankfully things seem to be settling down finally so I can start filming again and I started with this design! Look for a tutorial sometime today on my Instagram account <- click the link to be taken there. 

Thanks loves :) 


Sunday, July 6, 2014

Design Seeds inspired watermarble

So I forget which blog I read this on, but they mentioned something about this site called Design Seeds. Clearly curiosity killed that cat and I couldn't live with myself if I didn't check it out and I'm so glad that I did.

Design Seeds is a color palette site. It shows you what colors work well together and helps give you inspiration for different color combinations. It has been my saving grace! I always used to have trouble trying to figure out what colors went well together and what colors did not. As a result I usually mixed colors with neutrals and it made me sad because I would always see these beautiful colorful manis everywhere and just wanted mine to be that colorful! Well now, with the help of Design Seeds my manicures will me more colorful then ever ;) 

It's funny I say that though because this particular design only combines one color and a bunch of neutrals.... hey they can't all be crazy right?! LOL! Let's get on with it shall we?

I started with a base of Lime Crime Milky Ways for the base of my water marble. Then I marbled using Maybelline Color Show Clear, Essie Penny Talk, Orly Gumdrop, and Zoya Zuza. I really love how Essie Penny Talk separated, I think all metallic polishes may do that, but it creates such a cool effect! I sealed it all in with some Essie Good To Go and the design was finished. 


I really enjoyed the look of this watermarble, it's so unique. And so what if the lines aren't perfectly smooth! That's what gives it character ;) 

What's your favorite watermarble color combination?

Thanks loves :) 

Tuesday, December 31, 2013

New Year's Eve dotticure

The end of 2013 is finally here...

With the new year comes looking back upon the life we've lived the year before and new resolutions for the year ahead. Me? I have to say I'm more then ready to see 2013 go. I seem to reflect a lot around this time of year and they don't say 13 is unlucky for nothing. This year has been the luckiest unlucky year of my life (if that makes any sense ;)). 2013 has been the biggest life changing year I've had. My ex-boyfriend of 5 years committed suicide in February and that was the hardest thing I've ever had to deal with. I went from being on top of the world to having nothing. Then when I tried to make something from all of the nothing his family turned on me. There was a whole lot on my plate, and no one to help me clean it. But it made me a stronger person and through the pain I found something precious, love. I found someone who takes my pain and fears away and always knows the right thing to say when I'm feeling like the world is crushing me. He is honestly the most caring, thoughtful, and loving man I have ever met and I consider myself one of the luckiest girls alive. I'm sure you all don't want to hear the sappy ;) but there's something very special about him, he's the one who showed me how to smile and laugh again when I thought I never would. He is the one who shoved me in the right direction and inspired me to follow my dreams; dreams that lead me to getting my nail tech license and never letting me give up on this blog. He knows me, and he knows what I love most, nail polish! 

Speaking of nail polish, I'm sure you guys are done listening to my little reflection so let's move on to what you're here for! For my New Year's Eve manicure I wanted to do something a little different from the usual, black, gold, and silver... even though I absolutely love that combination! I've been feeling teal colors lately so I decided to switch out the silver for some teal and I haven't done a dotticure in far too long so I'm going to fit one more in before the year is finished!

I started with a base of Wet'n'Wild Black Creme. When that was dry I added the dots using China Glaze Mingle With Kringle and Zoya Zuza. For my ring I made a stripe of China Glaze Mingle With Kringle down the center of my nail and lined it with Zoya Zuza on either side. Then with acrylic paint I painted "MMXIV" [2014 in roman numerals]. I top coated it all with Poshe and I'm ready to partay!! ;) 


And here's a little extra picture, just because I'm in the sappy mood ;) When my boyfriend asked me out he actually painted it on his short little nails in pink polish! He used China Glaze Pool Party, my favorite neon pink! Awwwwww ;) Excuse the poor condition of his hands, he's a diesel mechanic and this is about as clean as they get with scrubbing LOL! 


2013 has come and almost gone, I'm much stronger then I was when it started and I'm jumping into 2014 and chasing my dreams. Who knows, maybe I'll catch some this year ;) 

Thanks for always sticking it out with me guys, my blog is a source of true happiness for me and I hope that sometimes I can brighten your day too. :) 

What's your New Year's resolution?

Sunday, August 25, 2013

Inspiration Nation: Glitter Tips

Hey chickies!

Ready for another Inspiration Nation post? My inspiration this time comes from another blogger that I follow like... religiously lol! She's super sweet and her nails are always flawless! Not to mention she's so talented!! I'm talking about the lovely Marta from Chit Chat nails :) Marta is pretty well known for her skittlette manis but she does something else that I really love.. faded glitter tips! She's done a bunch of them and every time I see one I drool all over my keyboard! She's actally written up a tutorial for how she does them too. 

To start this mani I did two coats of an unnamed sheer pink polish... It was just one of those weird ones I got in a package at some store. But it works great to make my nails look unstained so I'll take it! ;) Then I took a make up sponge and ripped it in half so I had a little bit of a jagged edge. I do this so the color gradient part isn't such a straight, cut off line. Then I did the gradient tip with Zoya Zuza, a beautiful shimmery teal. When that was dry it took Orly Mermaid Tale and placed the glitter from the tip of my nail all the way to the middle. Finish off with some top coat and you're good to go!


Not only is the final result super pretty but it's actually really easy and not time consuming. Tips like these will definitely be making a repeat appearance on Pink & Polished so I hope you like them! ;) 

Thanks loves!

Tuesday, February 12, 2013

Zoya gradient

Happy Tuesday!

Am I the only one who is thrilled that Monday is over?! Lol! It was busy and rainy and just yuck, but most Mondays are aren't they? ;)

I was going through my pictures I have backed up and came across a Zoya gradient I did when I got some of my new Zoyas and I knew it was just bright enough to make sure today is better than yesterday :) Check it out!


Colors used:
- Zoya Kimber 
- Zoya Zuza


*Sigh* Definitely missing those longer nails! It seems like every time they start to grow out lately one snaps! Damn you winter!!! I'm really enjoying this color combo though it reminds me of summer and that's totally where I want to be!

So what do you think?

Don't forget the multi-blogger Valentine's Day giveaway is ending Thursday! Make sure you get your entries in!!! Click HERE to enter!! 

Thanks for reading guys :) 

Saturday, December 8, 2012

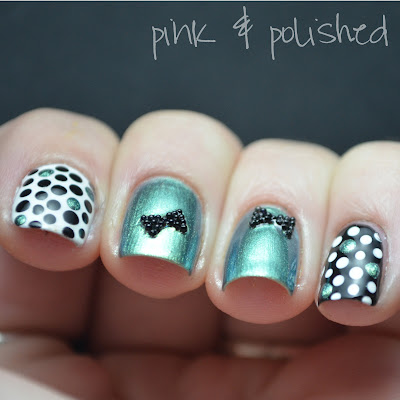
Playing with micro beads :)

Happy Saturday all!!

So if you guys follow me on twitter, I tweeted out a picture of getting my first set of micro beads yay! LOL That was a little while ago so if you don't remember that's ok ;) I'm finally getting around to posting pics of my manis that I did using the microbeads and I've got a full on caviar mani in the works too! 

The idea for this mani actually came from my lovely blogger friend Emma over at Nailed Into You. She did THIS mani and I knew I had to try it!! She is so freaking creative you all should definitely go give her some love! :) 

So here's my verison!


Colors used:
- Finger Paints Paper Mache
- Sinful Colors Black on Black 
- China Glaze Unpredictable
- White Acrylic Paint


I wish I had used more festive colors like she did but I still love the way this came out!! I seriously would never had thought to do anything like this if it weren't for Emma LOL! 

The micro beads were a slight pain to work with -_- They kept sticking to the toothpick I was using to apply them... Oh well the things we do for beauty right?! :) Oh and by the way I am in LOVE with China Glaze Unpredictable it's so pretty!!! 

So what do you guys think?

Don't forget to check out Emma's blog Nailed Into You you won't regret it!! 

Thanks for reading all :) 

Friday, November 9, 2012

The Lazy 15: Water Marble

Hello everyone! 

Today's challenge is water marble woooo! :) I have to confess I actually quite enjoy doing water marble but the night I did these I must have done something really bad to royally piss off the polish gods T.T No matter what I did my water did NOT want to marble lol!! I literally tried my marble 4 different times all with different colors -_- I'm satisfied with the outcome... It's not the best I could do but my fingers were screaming for a break :( Butttt it's still pretty so don't worry :) Take a look!


Colors used:
- Spoiled Distant Memory
- Sinful Colors Black on Black


Yeah yeah I got air bubbles and stuff blah I knoww :( Don't get me wrong they are still pretty I think but I jut know I could have done them better. Oh well there's always next time!! :)

What do you guys think?

Thanks for reading and remember to check out everyone else's they are all awesome!! :)