Wednesday, July 10, 2013

Inspiration Nation: Sunset by the Palms

Hi cupcakes!

So being a nail blogger can get to be a lot sometimes. Sometimes I run out of ideas of what to paint on my nails. Terrible right? Well when this happens I love to look to my favorite bloggers for inspiration because there are so many amazing designs out there. One of my favorite bloggers is One Nail To Rule Them All. I love her nails she does such amazing designs. One of her designs immediately caught my eye and I knew I was going to have to try it. She did this beautiful sunset gradient and painted palm trees over it and you guys know I can't resist anything with a gradient in it! ;) 

So I had the day off from work today and figured it would be a good time to try this design and I'm so happy with how it came out! 

I started with a base of China Glaze Sun-Kissed and sponged a gradient using China Glaze Roguish Red and Bend Over Backwards. Then I painted the palm trees using black acrylic paint and a small striping brush. 


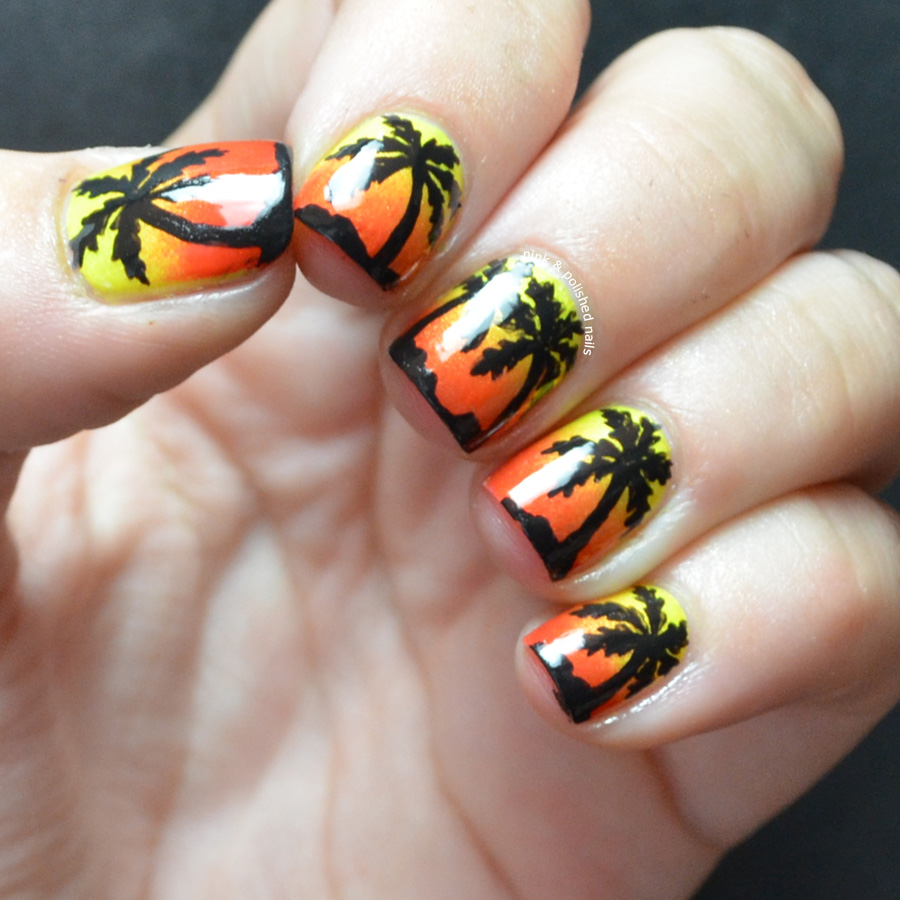
I decided to mattify it using NYC Matte Me Crazy like in the original and I'm super glad I did I love it even more!


And guess what?! My nails actually match for once! Well sorta anyways ;) Lol I was going to do the same design on my right hand but my sister suggested using blue instead of red and now I'm not sure which color combination I like better. I was super scared to try painting the palm trees on my right hand because I'm not nearly as steady with my left but I'm actually really proud at how they came out! 

For the blue version I started out with a base of China Glaze Sun-Kissed and sponged a gradient using China Glaze I'm With The Lifeguard and Nina Ultra Pro Blue Blaze. The palm trees are also done in black acrylic paint. 


Sorry guys no awkward attempts at modeling with my right hand... you'll have to deal with the boring pose ;) 


The red reminds me of the sunset but the blue reminds me of right after when it starts to actually get dark... either way I wanna be there for sure! LOL  

Which color combination do you guys like better? :) 


Monday, July 8, 2013

Happy... 8th of July!!

Yep this post was definitely supposed to go out on the 4th -_- oops!

So valiant effort on my part I really did try to get this post out on last Thursday but this 4th of July weekend had been CRAZY for me! On top of fireworks and parties the Summer Nationals were the entire weekend. If you don't know what that is basically its like a car show with drag races and burnouts... super fun! I literally had no time to get the post up.. today is actually the first day I had the chance to paint my nails in almost  week! 

As much as I love having fun.. it's nice that things are quieter now... more time to paint my nails ;) 

Alright better late then never to take a look at these red, white, and blue babies... or should I say red, silver, and blue? I decided I wanted my nails to look metallic this year and I'm really liking how they turned out. I started with a base of Sally Hansen Silver Sweep and then freehanded the flag design with Maybelline Color Show in Navy Narcissist and Sally Hansen Unbreakable Heart. And to add the extra sparkle for the stars I put China Glaze Fairy Dust over the blue. Tell me what you think!


I have to say I felt pretty patriotic wearing this on my nails! 

But, I've come to the conclusion that I'm never going to have pretty long nails -_- so sad. I just can't get them to grow long enough without snapping off a corner or three! Guess I've just gotta work with what I've got huh? 

So what do you guys think? Did you have a great 4th of July weekend if you celebrated? I'd love to know what you wore on your nails! ;)


Thursday, June 27, 2013

Swatch and review: Azature

Hello chickies :)
*products provided for review*

I'm not technically "back" from vacation quite yet but I just had to come home quick to swatch these gorgeous polishes! The lovely people at Azature have sent me two beautiful polishes for review and I can't wait to show them to you! 

Azature is a Los Angeles based fine jewelry designer who specializes in black diamonds. Last year they put out a bottle that contained 267 carats of black diamonds and retailed for $250,000. Wow! I'd love to get my hands on that baby ;) Haha. These versions and more consumer friendly as they contain one black diamond and retail for $25. Ready to check them out?


Azature White


Azature White is a classic white polish, sure not a very original color but every collection needs that perfect white. This is two effortless coats of Azature White. It applied like butter and it has that nice, clean, and crisp look to it. 


Azature Canary


Azature Canary is a bright canary yellow with a glass fleck like finish. While it's not the best yellow for my skin tone I really love it. It has a jelly formula so this is three thicker coats. You can still see some visible nail line in natural light but that's the way with jelly polishes. Even though I used three coats it wasn't thick at all on the nail and the polish applied so easily just like with Azature White. 

And below I decided to try my hand at a skittlette! Recently Marta at Chit Chat Nails posted how she does her skittlette nails and I knew I just had to try with these two polishes so check it out :) 


So what do you guys think? Would you spend $25 on a bottle of nail polish? I'm not sure my wallet could afford it but the I think the quality of these polishes is definitely worth it. :)

Thanks for reading lovelies I'll catch ya later when I get back! 


Saturday, June 22, 2013

It's My Birthday!!!! (+tutorial!)

Hello cherubs!

So guess what?! It's my birthday!! Woohoo! I don't think there is anyone in the world who loves their birthday more then me ;) I had such a hard time coming up with an idea for my nails. I literally have been debating on them for the past two weeks! Do I do the classic cupcakes? Or do I do something that I really love? I finally decided to combine both ideas and do one of my favorites with cupcake accents and I really love it!

I started with a base of Lime Crime Parfait Day on all of my nails besides the accents. When that was dry I used striping tape to create the lines with OPI My Boyfriend Scales Walls. And finally I topped it off with China Glaze Fairy Dust because who can resist some good sparkle? ;) 

And down below you'll find my very first tutorial EVER! I made one on how I created the cupcake nails so check it out!


And here's the tutorial!


What do you guys think? Should I make some more tutorials? 

Also you won't hear from me for a little bit I'm going on vacation starting today and I won't be back until next Saturday... I'll try to bring my laptop with me but my family and I are going camping so I'm not sure if I'll be able to get on at all. 

I hope you guys have a great weekend thanks so much for stopping by! :) 


Thursday, June 20, 2013

Monster's University!

Helloooo cupcakes!

So it's no secret that I LOVE Disney movies! And Monster's Inc had to be one of the top ten. Well guess what?! They came out with a sequel YES! Now I know sequels aren't always as good as the originals but I really can't wait to see this one. To make is better? My birthday is two days away and my best friend is taking a couple of us to go see the premiere TONIGHT! *happy dance* Call me a child all you want but I'm so excited ;) 

Now what does an awesome movie call for? Awesome movie nails of course! In honor of the premiere of Monster's University I present you all with my MU nails!

I used SO many different colors so if you want to know a color just let me know :) 


On my thumb and ring finger I have the Monster's logo, on my pointer I've got Sulley, on my middle I have Mike Wazowski and on my pinky I have an abstract sort of letterman jacket (because they're in college now ;)) 

I'm pretty proud of these puppies and can't wait to sport them tonight! What do you guys think? Will you be seeing Monster's University?


Monday, June 17, 2013

Flashback! Giraffe

Hey guys!

I've got a little flashback for you all... well not really I guess but it's the same design that I've done before. 

It's finally getting warm so do you guys know what that means?! Time to go to the ZOO! I absolutely love the zoo so why not get some zoo on my nails?! I decided on giraffe print again because I wanted to use some more Color Club holos and the orange/brown was just perfect! 

I started with a base of Color Club Cosmic Fate and stamped over it with an unnamed white stamping polish using a plate from the Bundle Monster 2012 set. :) 


These sparkled like crazy! They were totally distracting me from all the animals -_- LOL Oh well right at least I got to see the giraffes ;)

So what do you guys think?


Saturday, June 15, 2013

Taste the neon rainbow!

Hey dolls

I'm super excited to show you guys what I've come up with today! It's no secret that I love neons... like a large amount. So I decided to combine them all and create some sort of neon stripe-y gradient.

I started with a base of OPI My Boyfriend Scales Walls and used some striping tape to create some stripes and created the gradient using China Glaze Pool Party, Orange Knockout, Sun-Kissed, I'm With the Lifeguard, Nina Ultra Pro Blue Blaze, and China Glaze Flying Dragon. I finished it off with NYC Matte Me Crazy because I'm really loving mattified neons at the moment... don't worry there's a shiny one at the end for all you who don't agree with me ;) 


And this is with Poshe top coat.


This was surprisingly easy to do and I really loved the outcome! For some reason the whole chalky look that comes with mattifying a mani really appeals to me with neons. What about you guys? Shiny or matte?