Saturday, August 31, 2013

Ruby Wing Lacquer in Cinnamon Bun and Rose

Hi everyone!
press sample

Today I have two shades from Ruby Wing's fall 2013 collection Cupcakes and Champagne. Not only are they scented, but they're solar changing too! I've never really gotten into solar changing polished because I always thought that the change would be too subtle to notice but these polishes from Ruby Wing have totally proved me wrong! Ruby Wing polishes use SolarActive technology to change color in UV light and believe me it's definitely noticeable. ;) Because Ruby Wing uses this technology the polishes will transition out under the sun or under a blacklight. 

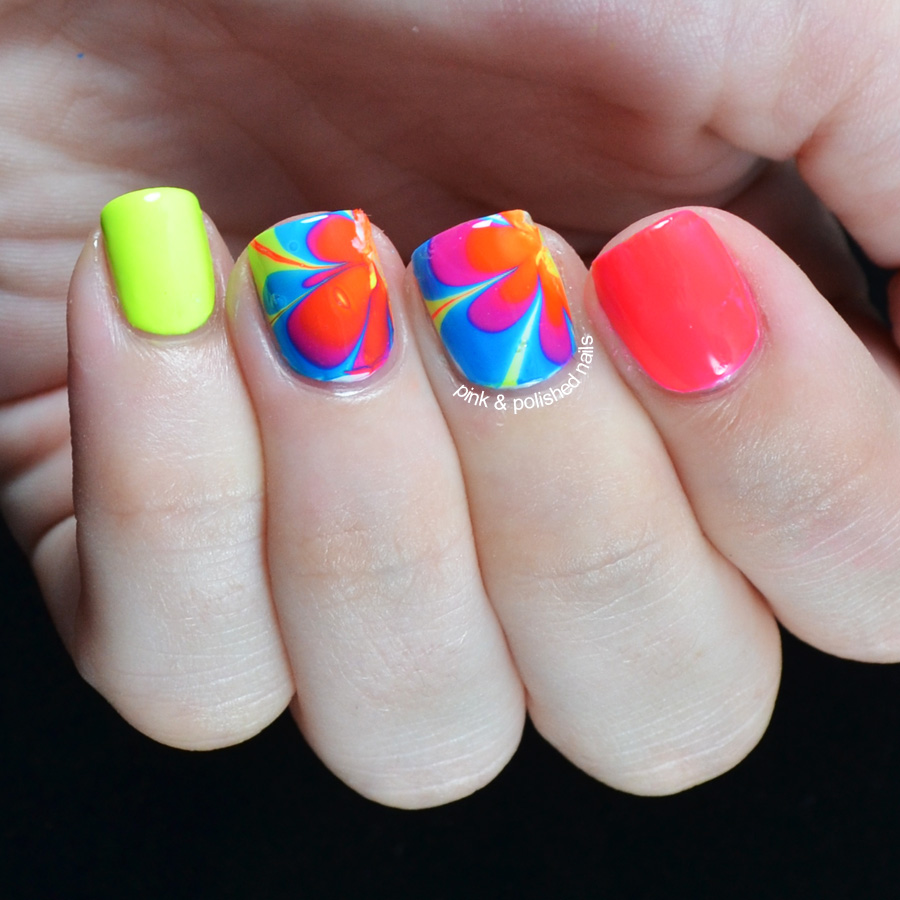
Cinnamon Bun is a brown, rust colored duochrome foil polish that transitions to a very pretty dark purple-ish brown cinnamon shade. I never go for brown polishes but this one actually went with my skin tone quite well. Now I'll be the first to tell you that I don't like scented polishes... they are always too strong and end up giving me a huge headache. Cinnamon Bun has a very light cinnamon scent to it and while I would still prefer no scent, it didn't give me a headache and wasn't overpowering at all. The formula is smooth, a little sheer on the first coat but it builds up nicely. Swatched below is three coats and one coat of top coat, first photo is indoors and second photo is outdoors after the transition. 


Rose is a sheer, soft pink glitter that transitions into a gorgeous berry pink shade. It has a pretty distinct floral scent, still not quite overpowering and definitely tolerable. The formula on this one was a little thick but that's to be expected with glitter polishes like these. Rose is too sheer to be worn alone so below I've layered two coats of rose over one coat of Azature White. Surprisingly I only needed one coat of top coat for a nice smooth finish. The first photo is indoors and the second photo is outdoors after the transition. 


Ruby Wing retails for $10 for a 15ml bottle. If you want to purchase these colors or any Ruby Wing polishes you can do so at www.rubywing.com. You can also purchase their SolarActive polishes such as these from the website above or from the SolarActive website. Don't forget to keep up with new releases by signing up for their newsletter and following them on facebook and twitter

Thanks cupcakes :) 


**Products in this post were provided by Ruby Wing in exchange for my honest opinion. 
For more information check out my disclosure policy. 


Friday, August 30, 2013

Color Club Nail Lacquer in Wicker Park and Pearl District

Hi lovlies
press sample 

I've got two polishes from Color Club's fall 2013 collection Girl About Town to share with you. I'm really enjoying this collection and it's fun because they are throwing in some unexpected shades like the first one I have to share with you.

Wicker Park is a beautiful creamy lavender polish, not quite pastel, but pretty darn close. This shade doesn't quite remind me of fall but it's such a beautiful color that it doesn't matter. ;) The formula on this one was so smooth and my swatches below are two easy coats with one coat  of top coat. 


Pearl District is a honey gold with a slight green tinge. It has been described as a tiger eye shade and I really couldn't describe it better then that. Looking at the bottle I thought I wouldn't like this shade but I was happy to find myself wrong because I love it on my nails! It's a really unique and beautiful shade. The formula was perfect, slightly sheer on the first coat but built up nicely. Swatched below is three coats with one coat of top coat. 


Color Club retails for $8 for a 15ml bottle. They also have some combo packs, you can actually buy both of these for $12. You can buy polishes from this collection, and any other collection here at www.shopcolorclub.com. Don't forget to keep up with their new products and collections by following them on facebook, twitter, pinterest, and youtube

What do you guys think? Will you be picking up any polishes from Color Club's Girl About Town fall 2013 collection?
Thanks so much!! :) 


**Products in this post were provided by Color Club in exchange for my honest opinion.
 For more information check out my disclosure policy.


Wednesday, August 28, 2013

Mish Mash Challenge: Music

Happy Wednesday lovelies!!

I'm sure you guys all know what Wednesdays mean around here right? Mish Mash Challenge time!!! Woohoo! Today's theme is Music. I actually wasn't really looking forward to today's theme because I had no idea what to do. I thought about picking a song to illustrate but then I couldn't think of a song. Then I thought maybe a cd cover... but all the music I listen to have people on their covers -_- 

So how about some music note nail art instead? LOL 

To start off this look I used a base of OPI My Boyfriend Scales Walls. When that was dry I took my nail art brush and some acrylic paint to create all of the designs on my nails. I actually got my inspiration for my ring finger HERE. Then I added a layer of China Glaze Fairy Dust because every mani needs to sparkle!! ;) Add some Poshe after that and this look was finished!


For not being excited for this challenge day I'm actually really happy with the way this turned out. I haven't done nail art like this in a while so it felt good being able to sit down and spend time on this mani. 

What do you guys think? What's your favorite kind of music? 
Thanks so much for stopping by and don't forget to check out everyone else's designs for today I can't wait to see how everyone interpreted today's theme! :) 


Tuesday, August 27, 2013

Groooovy man

Hi dolls

I'm back again for some more water marbling torture ;) I see a lot of gorgeous water marble designs using neon rainbow colors and just knew that I needed to try it. I'm glad China Glaze polishes are so good for marbling because almost all of my neon colors are from them! Now let's get this mani done shall we?! ;) 

I started with a base of OPI My Boyfriend Scales Walls. A perfect muted white that I use under all of my neons to really make them pop :) The I used China Glaze Pool Party, Orange Knockout, Orly Highlighter, and Nina Ultra Pro Blue Blaze for the marbling colors and did a flower-ish design on my middle, ring, and thumb. On my index I did two coats of China Glaze Pool Party and on my pinky I did two coats of Orly Highlighter. Seal it it with a great top coat and you're all done! 


UGH! I wish my camera didn't hate neons -_- I tried to color correct these and China Glaze Pool Party just refused to look color accurate! It much more pink and neon then my photos show. But despite my camera having a fit I really loved the way these turned out. They were super bright and have a certain 70's feel to them don't ya think? ;)

Groooovy dude B)

Sunday, August 25, 2013

Inspiration Nation: Glitter Tips

Hey chickies!

Ready for another Inspiration Nation post? My inspiration this time comes from another blogger that I follow like... religiously lol! She's super sweet and her nails are always flawless! Not to mention she's so talented!! I'm talking about the lovely Marta from Chit Chat nails :) Marta is pretty well known for her skittlette manis but she does something else that I really love.. faded glitter tips! She's done a bunch of them and every time I see one I drool all over my keyboard! She's actally written up a tutorial for how she does them too. 

To start this mani I did two coats of an unnamed sheer pink polish... It was just one of those weird ones I got in a package at some store. But it works great to make my nails look unstained so I'll take it! ;) Then I took a make up sponge and ripped it in half so I had a little bit of a jagged edge. I do this so the color gradient part isn't such a straight, cut off line. Then I did the gradient tip with Zoya Zuza, a beautiful shimmery teal. When that was dry it took Orly Mermaid Tale and placed the glitter from the tip of my nail all the way to the middle. Finish off with some top coat and you're good to go!


Not only is the final result super pretty but it's actually really easy and not time consuming. Tips like these will definitely be making a repeat appearance on Pink & Polished so I hope you like them! ;) 

Thanks loves!

Friday, August 23, 2013

She's Country

Hi lovelies!

I'm super excited about today's nails because they mean I'm off to have a great time! ;) I'm a country girl at heart and once a year some amazing country singers come to Massachusetts for the Country Music Festival and this year I actually get to go! My first concert ever... I mean I'm 22 and never been to a concert before no big deal right? ;) lol! For those of you who love country music like me this year we have Eli Young Band, Kasey Musgraves, Eric Church, and Kenny Chesney. I'M SO EXCITED! 

So you know what this calls for right? Country Fest nails duh! I wasn't sure what I wanted to do but then I figured what's more country then red, white, and blue? :)

To start these nails I painted a base of Azature White. When that was dry I used a ripped up sponge and randomly sponged Nina Ultra Pro Blue Blaze and Color Club Over the Moon. on my thumb and ring finger. I tried to give it a sort of distressed denim look. I used white acrylic paint to create the stars. On my index, middle, and pinky I used some striping tape and took Dior Marilyn and Julep Demi and sponged over the tape using the same method before. After I pulled off the tape I top coated with Poshe and I was almost done. When that was dry I decided to layer NYC Matte Me Crazy over the whole mani to finish the flat distressed look. The bottom two pictures are after the matte topcoat.


I just love when an idea in my head turns out the same on my nails! LOL! What do you think? Country enough? I'll be sure to keep you all updated on Instagram on the whole day so make sure you follow me! ;)

What's your favorite kind of music?
Thanks dolls! :) 

Wednesday, August 21, 2013

Mish Mash Challenge: Nail Art Technique You've Never Tried

Hi chickies!

Happy hump day! You know why I like Wednesdays so much? Because it means another challenge day from the Mish Mash Challenge hosted by Kimber's Lacquer Korner! Yay!!! Today's theme was something kind of cool: a nail art technique you've never tried before. There's a million and one different nail art techniques I haven't tried yet so I was pretty excited for this day. I knew whatever I chose would be challenging, and it was ;), but I always love a good challenge!

I've been seeing water spotted nails floating around the blogosphere a lot lately and knew I had to try it out. Water spotted nails always seem to make me think of one idea, turquoise stone nails. YES! 

I was correct in thinking that this would be difficult though -_- I followed the tutorial from Lacquerstyle she made it super easy to follow! And even though they didn't really end up looking like turquoise stones I still quite like them! ;)

I started with a base of Zoya Zuza on all of my nails. Then I ripped up a makeup sponge and lightly sponged Sinful Colors Mint Apple randomly. When that was dry I used a new piece of the sponge to dab on Sally Hansen Golden-I randomly as well. Then I put a drop of Wet n Wild Black Creme in a cup filled with water and sprayed some hairspray on it to create all the holes in the water. I dipped each finger in quick to get my design. Top coat with some Poshe and this design was ready to go! 


Why is this so blurry?!?!? -_-
And to make it look even more rock-like I added NYC Matte Me Crazy to take away the shine. I really like it this way!


I wouldn't necessarily call this a 'fail', more like a 'needs improvement' ;) But that's ok because practice makes perfect right? And even though it was a bit frustrating and they didn't really turn out looking like turquoise stones I still think the final effect is pretty cool!

Have you tried water spotted nails yet? What's your favorite color combination? 
Thanks guys and don't forget to check out everyone else's designs I can't wait to see what everyone comes up with! 


Tuesday, August 20, 2013

Adding some love

Cupcakes!!!

Remember my super holographic gradient from the other day? Well I decided that it wasn't quite holographic enough ;) Since I always love the way a gradient looks after you stamp over it I wanted to give it a try and figured you can never have enough of holographic polishes!

After I did my gradient with Color Club Kismet and Over the Moon, I took Color Club Beyond, a stunning black holographic, and stamped over the gradient using BM-322 from Bundle Monster's 2012 nail plate set. Some more Poshe top coat and this mani is done!


I have to say, I loved the gradient alone... but the stamping adds so much more to it. I think I wore these nails for a good 5 days before I even thought about taking them off. This has got to be one of my top 10 favorite nails I have ever done!

What do you think about stamping over a gradient? Pretty or just too much?

Sunday, August 18, 2013

Color Club gradient

Hi chickies!

Anyone else obsessed with holographic polishes this summer? I literally can't get enough of them! Whenever I don't know what to put on my nails I always end up using a holographic polish some way. Most of the time it's one of the Color Club Halo Hues because they are definitely my favorite holographic polishes to use. The linear holo effect they give off is super strong. And what's better then a strong holographic you ask? How about a strong holographic gradient?! ;) 

I feel like this blog has been lacking in the gradient department lately. It's not that I don't love gradients... because I really do.. it's just it's so time consuming and I hate taping my nails and I hate that the clean up process is so much more! But that's just my laziness talking ;) I sucked it up and ended up doing one of my favorite gradients to date!

I started with a base of Color Club Kismet, a beautiful pale green holo. Then I used a make up sponge loaded with Kismet and Over the Moon and created my gradient. Top coat with some Poshe and you're done! This was super quick and easy!


Look at the rainbow amazingness!

Another thing I love about the Color Club Halo Hues... they are really easy to clean up! I'm not sure if it's because they are a holographic polish or what but they are super easy to get off of my skin. This mani was so simple! It took me like 20 minutes and it's so eye catching!! Especially when the sun came out!

What's your favorite holographic polish? 

Friday, August 16, 2013

The subtlest of not subtle water marble ;)

Hi loves!

I hope you guys are having a lovely week so far!! It's been beautiful weather here so I really can't complain too much :) 

Water marbling has always been something I've usually admired from a far... I try my hand at it every once in a while but it just gets so discouraging because the polishes I use don't always work, I mess up a few nails, the clean up is horrendous, or my personal favorite, I spill water all over my desk -_- But enough of my complaining! I decided that me and water marbling were going to become fast friends. I was going to do it until I got the technique down and I only spilled all the water a couple of times ;) To my surprise it went pretty smoothly this time! I think it has a lot to do with the fact that the polishes I chose worked well for marbling. 

So let's get started! I started with a base of OPI My Boyfriend Scales Walls on all of my nails. Then I used China Glaze Sun-Kissed and I'm With the Lifeguard for my marbling colors and marbled my middle, ring, and thumb. Then I did two coats of I'm With the Lifeguard on my index and two coats of Sun-Kissed on my pinky.


For once my camera wasn't horrendous at photographic neons! I still had to do some color correction... hence why I look like I have jaundice in the last photo -_- but not nearly as much as I'm used to when I work with neons. The difference between the green and yellow was a lot more noticeable in person but they still photographed remarkably well ;) These were so darn bright I needed some sunglasses just to look at them B) 

I don't think I'll ever get tired of using neons in the summertime. What's your favorite thing to wear on your nails in the summer? Thanks guys :) 

Wednesday, August 14, 2013

Mish Mash Challenge: Metallic

Hi cupcakes!

It's Wednesday so you know what that means right?! Another challenge day for the Mish Mash Challenge hosted by Kimber's Lacquer Korner. :) Today's challenge day theme is metallic. I know exactly what you guys are going to say when you see mine... "another tape mani really?" But hey I didn't know what else to do! And I always love how tape manicures end up so... deal with it yo! ;) 

Anyways, I don't actually own very mani metallic polishes because I don't like them. I don't like being able to see brush strokes and generally I'm just not a big fan of the way they look. But I do have a few and decided to go with a gold, silver, bronze look here.

To start off I painted all of my nails with Sally Hansen InstaDri Silver Sweep. Then I taped off my nails and painted with Maybelline Color Show Bold Gold and ELF Copper. After that I took all three colors and free handed some more triangles on the sides and inside the other ones. Then I used NCY Matte Me Crazy because I like the way metallics look mattified better and added a rhinestone to each and I was done! 


What do you think? I'm so iffy on metallics but I actually kind of liked how these turned out! I think the matte top coat made me like it more too it made the brush strokes less visible in my opinion. 

I can't wait to see what everyone else comes up with don't forget to check them out!
Thanks guys :)